Table of Contents >> Show >> Hide
- How to Think About “Essential” Baking Equipment
- The 22 Essential Baking Tools (With Practical “Why You Need It” Notes)
- Measurement & Prep: Where Great Baking Actually Starts
- Mixing & Structure: The Tools That Build Texture
- Dough & Pastry Tools: For When Flour Gets Serious
- Bakeware: The Foundation of Cookies, Cakes, and Everything In-Between
- Nonstick Helpers: The Tiny Things That Prevent Big Problems
- Two “Secret Weapon” Tools That Make You Feel Like a Pro
- How to Build Your Baking Kit Without Overspending
- Conclusion: A Better Tool Kit = Better Baking (and More Fun)
- Extra: of Real-Life Baking “Experience” (The Stuff You Learn the Messy Way)
Baking is basically delicious science with a dramatic flair: one minute you’re calmly measuring flour, the next you’re whispering, “Please rise,” like you’re negotiating with a tiny, yeasty landlord. The good news? You don’t need a celebrity-chef kitchenor a storage unit labeled “misc. whisks”to bake confidently.
What you do need is a smart set of essential baking tools that make results more consistent, cleanup easier, and the whole process less “Why is my cookie sheet smoking?” and more “Wow, I made that.” Below are 22 must-have baking supplies that cover everyday cookies and cakes, plus the occasional “I’m making bread now” era we all go through.
How to Think About “Essential” Baking Equipment
The best baking tools earn their keep by doing at least one of these:
- Improve accuracy (because baking is pickylike a cat, but edible)
- Reduce sticking (the silent villain of cookies and cakes)
- Increase consistency (so you can repeat your wins on purpose)
- Save time (and preserve your will to wash dishes)
The 22 Essential Baking Tools (With Practical “Why You Need It” Notes)
Measurement & Prep: Where Great Baking Actually Starts
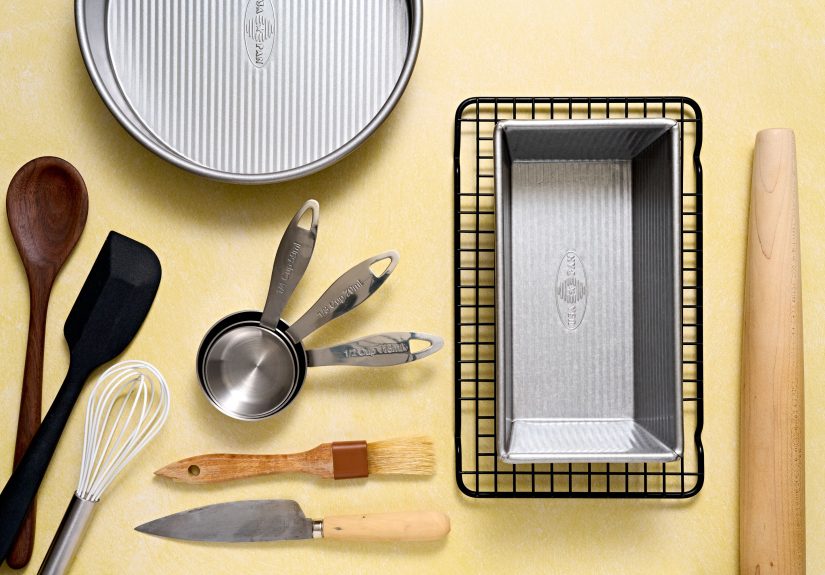
1) Digital Kitchen Scale
If you buy one “level up” tool, make it a digital kitchen scale. Measuring flour by volume can swing wildly depending on how you scoop. Measuring by weight is faster, cleaner, and more consistentespecially for bread, macarons, and anything where “close enough” becomes “why is it dense?”
Example: If a cookie recipe calls for 240g flour and you accidentally pack your measuring cup, your “1 cup” can quietly turn into “1 cup plus regret.” A scale stops that.
2) Dry Measuring Cups
Dry cups are for flour, sugar, cocoa, oatsanything you can level off. A sturdy set (¼, ⅓, ½, 1 cup) keeps you from eyeballing with a coffee mug like a brave chaos goblin.
Tip: For flour, spoon it into the cup and leveldon’t scoop straight from the bag unless the recipe says so.
3) Liquid Measuring Cup (Clear, With a Spout)
Liquid cups are built for accuracy at eye level. Using a dry cup for milk is like using a fork to eat soup: technically possible, spiritually unnecessary.
Best for: Water, milk, buttermilk, oil, honey (spray it with a little oil first for easier release).
4) Measuring Spoons
Baking powder, baking soda, salt, vanillasmall quantities with big consequences. Get a set that includes at least ¼ tsp, ½ tsp, 1 tsp, and 1 Tbsp.
Bonus: A narrow spoon helps measure from spice jars without turning your counter into a cinnamon snowstorm.
5) Fine-Mesh Sieve (or Flour Sifter)
A sieve does double duty: it removes lumps from powdered sugar and cocoa, and it can aerate flour when recipes want a lighter texture. It’s also perfect for dusting a finished cake like you’re starring in a baking show montage.
6) Mixing Bowls (Nesting Set)
Stainless steel or glass bowls are reliable, easy to clean, and great for everything from whisking to holding prepped ingredients. A nesting set saves space and prevents the “I only own one bowl and it’s always dirty” lifestyle.
Mixing & Structure: The Tools That Build Texture
7) Stand Mixer or Hand Mixer
You don’t need a stand mixer to bake, but you do need a mixer if you regularly make cookies, frosting, or enriched bread dough. A hand mixer is budget-friendly and compact. A stand mixer is the luxury SUV of baking equipment: not required, but it makes heavy mixing feel effortless.
Example: Swiss meringue buttercream is much less “arm workout” with a stand mixer, but totally doable with a hand mixer and patience.
8) Whisk Set (At Least One Big, One Small)
A balloon whisk brings air into batters and mixes dry ingredients evenly. A small whisk is ideal for eggs, cornstarch slurries, and smoothing out a tiny bowl of glaze without splattering your shirt (again).
9) Silicone Spatulas & Bowl Scrapers
A heat-resistant silicone spatula is the unsung hero of clean bowls and fully mixed batter. It folds, scrapes, spreads, and stirs and it won’t melt if you accidentally park it near a hot pan.
Pro move: Use a flexible bowl scraper to get every last bit of cookie dough into the pan. Those “last bits” bake into the best cookies.
10) Wooden Spoon (or Sturdy Mixing Spoon)
Sometimes you need muscle, not fluff. A wooden spoon is perfect for thick batters, folding add-ins, and stirring stovetop components like custards. It’s also excellent at making you feel like a wholesome, competent adulteven if your sink is full of dishes.
Dough & Pastry Tools: For When Flour Gets Serious
11) Rolling Pin
Cookies, pie crust, biscuits, cinnamon rollsrolling is part of the job. A French-style pin (no handles) gives good control; a handled pin offers leverage. Either is greatchoose what feels comfortable in your hands.
12) Bench Scraper
A bench scraper is wildly useful: it divides dough, lifts sticky bread from the counter, and cleans floury messes in one swoop. It also transfers chopped ingredients like a tiny snowplow of competence.
13) Pastry Brush
Egg wash for shine, butter on phyllo, syrup on cakesthis tool makes finishing steps neat and even. Silicone brushes are easy to clean; bristle brushes can hold more liquid. Pick what you’ll actually wash.
14) Pastry Cutter/Blender (Optional-But-Great for Pie People)
If you make pie crust, scones, or biscuits, a pastry blender helps cut cold butter into flour without warming it with your hands. Cold butter = flaky layers. Warm butter = “why is this a cookie pretending to be pie crust?”
Alternative: Two knives or a food processor can work, but a pastry blender is simple, cheap, and effective.
Bakeware: The Foundation of Cookies, Cakes, and Everything In-Between
15) Rimmed Half-Sheet Pans (At Least Two)
A sturdy rimmed half-sheet pan is a workhorse: cookies, roasted nuts, granola, slab pies, sheet cakes, toasting flour (yes, that’s a thing), and catching drips under a pie that’s feeling dramatic.
Tip: Buy the classic aluminum style for even heating; line it to reduce sticking and simplify cleanup.
16) Cooling Racks (Wire Racks)
Cooling racks prevent soggy bottoms (no one wants a steamed cookie). Air flow matters: it helps cookies stay crisp at the edges, keeps cakes from sweating, and makes glazing less messy.
Quick win: Put a rack over a sheet pan before glazing donuts or drizzling icingyour counter will thank you.
17) Cake Pans (Two 8- or 9-Inch Rounds)
Two round cake pans unlock layer cakes, shortcakes, and “I brought dessert” confidence. Light-colored pans promote even baking; darker pans brown faster.
Example: Classic vanilla layer cake, carrot cake layers, or even an icebox cake base you can dress up later.
18) Muffin Tin (Standard 12-Cup)
Muffins, cupcakes, mini quiches, cornbread muffins, brownie bitesthis pan earns its drawer space fast. Use liners for easy release, or grease well and flour lightly for a bakery-style edge.
19) Loaf Pan (9×5-Inch)
A loaf pan is for banana bread, pound cake, sandwich bread, and any “quick bread” that shows up when you have overripe bananas and good intentions. It’s also great for meatloaf, but we’ll keep this page sweet.
20) Springform Pan (For Cheesecake and Friends)
A springform pan’s removable sides make it ideal for cheesecake, mousse cakes, and delicate desserts that hate being flipped. If you bake cheesecakes even a couple times a year, it’s worth owning.
Note: Many springform pans aren’t fully leakproofplace it on a sheet pan, especially for water-bath bakes.
Nonstick Helpers: The Tiny Things That Prevent Big Problems
21) Parchment Paper
Parchment is the easiest upgrade for cleaner baking. It prevents sticking, encourages even browning, and makes cleanup feel like a magic trick. It also helps lift bar cookies out of pans in one satisfying slab.
Example: Line your cake pan, bake, then lift the cake out without the “please don’t tear” pep talk.
22) Silicone Baking Mats or Reusable Liners
Silicone mats are reusable, nonstick, and great for cookies and macarons. They’re not mandatory (parchment is fantastic), but if you bake often, they reduce waste and can provide very consistent results.
Tip: If you’re chasing crisp cookie edges, parchment usually wins. If you want ultra-even, gentle browning, silicone can be your best friend.
Two “Secret Weapon” Tools That Make You Feel Like a Pro
Bonus Tool A: Mini Offset Spatula
Okay, yes, this makes it 23 if we’re counting like a strict accountantbut hear me out: a mini offset spatula is so useful it practically pays rent. Frosting cupcakes, smoothing ganache, lifting cookies, loosening brownies from the panthis little blade does it all. If you decorate even occasionally, you’ll wonder how you lived without it.
Bonus Tool B: Thermometers (Oven Thermometer + Instant-Read)
Also “bonus,” because not everyone buys them right awaybut they solve two of the most common baking mysteries: Is my oven lying? and Is this actually done? An oven thermometer can reveal temperature drift. An instant-read thermometer helps with bread, custards, and perfectly baked cakes that aren’t raw in the middle.
How to Build Your Baking Kit Without Overspending
- Start with accuracy: scale, measuring tools, mixing bowls, spatulas.
- Add bakeware based on what you actually bake: cookies → sheet pans; cupcakes → muffin tin; bread → loaf pan; cheesecake → springform.
- Buy fewer, better pieces: a solid sheet pan and cooling rack outlast a pile of flimsy “bargains.”
- Skip gimmicks until you want them: you don’t need a donut-shaped donut cutter on day one. (Unless you do. No judgment.)
Conclusion: A Better Tool Kit = Better Baking (and More Fun)
The goal isn’t to own everythingit’s to own the right things. With these essential baking tools in your kitchen, you’ll measure more accurately, mix more confidently, bake more evenly, and spend less time chiseling cookies off a pan like an archaeologist. Start with the basics, add as your baking habits grow, and remember: the best tool is the one you actually use.
Extra: of Real-Life Baking “Experience” (The Stuff You Learn the Messy Way)
If you bake long enough, you’ll collect a handful of stories that all start the same way: “So I thought I could skip a step…” The funny part is that most baking disasters don’t happen because you’re “bad at baking.” They happen because baking is quietly strict about small detailsand your tools are often the difference between “rustic charm” and “please don’t photograph this.”
One of the first experiences most home bakers run into is the Great Flour Mystery. You follow a recipe exactly, but your dough is either dry and crumbly or sticky like it’s auditioning to become glue. That’s usually when people discover the power of a kitchen scale. Once you weigh ingredients for a few bakes, you notice something wild: recipes become repeatable. Not “repeatable-ish,” but “my cookies are consistently my cookies.” It’s a small upgrade with a big confidence boost.
Another common moment: you bake cookies on a random thin pan, and the bottoms go from pale to “campfire souvenir” in seconds. Then you try a sturdy half-sheet pan lined with parchment and realize your oven wasn’t the only problemyour bakeware was heat-spiking your cookies. After that, you start doing tiny rituals like rotating the pan halfway through and letting the sheet pan cool between batches. Congratulations, you are now a person with “baking opinions.”
The mixing stage teaches its own lessons. You’ll eventually overmix a batter and wonder why your cake tastes like a slightly sweet sponge. That’s when you learn to switch from a mixer to a spatula at the right time. A silicone spatula isn’t just for scrapingit’s for gentle folding, which keeps cakes tender and prevents muffins from turning into dense little bricks of disappointment. And the first time you properly scrape the bowl during mixing, you’ll be shocked by how often unmixed butter or flour hides on the bottom like it’s playing hide-and-seek.
Cooling racks feel optional until you experience the tragedy of steaming baked goods. A batch of cookies can come out perfect, then soften on the pan and lose that crisp edge because the trapped heat creates moisture. The first time you slide cookies onto a rack and they cool with the texture you actually wanted, you’ll understand why bakers treat wire racks like VIPs.
Decorating is its own chapter. Many people start with a spoon and optimism, then discover piping bags and an offset spatula. Suddenly frosting looks intentional instead of “applied during a mild earthquake.” And even if you’re not chasing fancy swirls, those tools help you work cleaner and fasterespecially when you’re making cupcakes for a party and time is disappearing.
The best part of all these experiences? They make baking more fun. Each tool solves a specific frustration, and once the friction is gone, you can focus on flavors, creativity, and sharing something you made with your own hands. That’s the real win: fewer avoidable messes, more “I can’t believe this came from my kitchen.”