Table of Contents >> Show >> Hide
- Before You Organize: Do the 10-Minute “Bottle Audit”
- 1. Use a Stackable Bottle Organizer for Your “Daily Drivers”
- 2. Repurpose a Wine Rack (Because Bottles Are Bottles)
- 3. Corral Bottles in a Deep Bin You Can Pull Out Like a Drawer
- 4. Stand Bottles Upright with Shelf Risers (Vertical Space = Free Space)
- 5. Use Magazine File Holders to Store Lids and Straws Upright
- 6. Add Drawer Dividers for a “No-Roll Zone”
- 7. Try a Lazy Susan for Corner Cabinets (Make the Dead Zone Useful)
- 8. Hang a Back-of-the-Door Organizer for Lightweight Bottles
- 9. Install an Under-Shelf Basket for Grab-and-Go Storage
- 10. Use a Rolling Cart for Overflow (and Keep the Kitchen Peace)
- How to Make Any Water Bottle Organization System Stick
- Conclusion: Your Bottles Don’t Need More SpaceThey Need a Plan
- Organizer Experiences: What I’ve Learned from Real-Life “Bottle Cabinet Wars” (Extra Notes)
Reusable water bottles are the modern-day equivalent of socks: no matter how many you own, you can never find the
matching lid when you’re already late. They roll, they topple, they multiply after every corporate swag event, and
somehow they always end up in the exact cabinet you need for literally anything else.
The good news: you don’t need a bigger kitchenyou need a smarter system. Below are 10 water bottle storage ideas I
use as a professional organizer to stop the “tumbler avalanche,” make lids behave, and keep your cabinets from
feeling like a game of kitchen Jenga.
Before You Organize: Do the 10-Minute “Bottle Audit”
The fastest way to create more space is to stop storing what you don’t actually use. Before buying bins, racks, or
anything with the word “genius” in the product title, do this quick reset:
Step 1: Gather every bottle and lid
Pull bottles from backpacks, cars, nightstands, gym bags, and that mysterious corner of the counter where “temporary”
items go to live forever.
Step 2: Make three piles
- Daily drivers: the bottles you reach for every week.
- Occasional: travel mugs, specialty bottles, seasonal sports bottles.
- Outta here: extras, duplicates, dented bottles, mystery lids, and anything you “mean to use.”
Step 3: Set a realistic “bottle limit”
A helpful rule: plan for one bottle per person, plus one backup. If you want to keep a couple of “guest” or
“field-trip” bottles, greatjust decide where those live so they don’t take over the daily zone.
Now that you’re only organizing what deserves cabinet space, let’s build a system that stays organized longer than
a weekend.
1. Use a Stackable Bottle Organizer for Your “Daily Drivers”
If your main problem is bottles rolling around like bowling pins, a stackable bottle organizer is the quickest win.
These racks store bottles horizontally in individual “lanes,” so each bottle has a home and stays put.
Best for
- Standard reusable bottles and tumblers that fit on their side
- Families who grab bottles every day (and need them visible)
Pro tip
Keep the organizer in the cabinet closest to your water source (fridge dispenser, sink, or water filter). Less
walking = more follow-through.
2. Repurpose a Wine Rack (Because Bottles Are Bottles)
A wine rack isn’t just for cabernet. It’s also perfect for chunky water bottles because it’s designed to keep
cylindrical items stable and separated.
Best for
- Bigger insulated bottles that don’t fit in narrow organizers
- Pantry shelves where you want a “drop-in” solution
Pro tip
Choose a rack with wider openings if you have bulky bottles. If you’re not sure, do a quick test: bring one large
bottle to the rack, slide it in, and confirm it doesn’t scrape or stick.
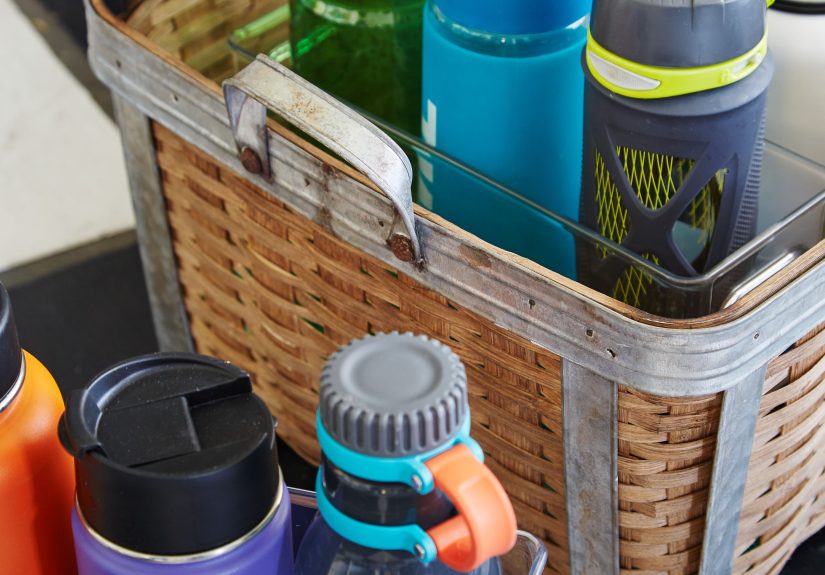
3. Corral Bottles in a Deep Bin You Can Pull Out Like a Drawer
Deep cabinets are where good intentions go to disappear. A deep bin acts like a pull-out drawer so you can slide
bottles out, see what you have, and put them back without rearranging the whole cabinet.
Best for
- Lower cabinets with depth (where bottles get lost in the back)
- Mixed drinkware: bottles, travel mugs, shaker cups
Pro tip
Label the bin “BOTTLES” (boldly, unapologetically). Labels aren’t about aestheticsthey’re about preventing someone
from shoving batteries in there because it looked “open.”
4. Stand Bottles Upright with Shelf Risers (Vertical Space = Free Space)
Most cabinets waste vertical space. Add a shelf riser to create a second “level” so shorter bottles can live on the
bottom and taller bottles can stand on the top shelf without blocking everything.
Best for
- Cabinets with one tall, empty “air zone” above bottles
- Households with different bottle heights (kids vs. adults)
Pro tip
If bottles tip over, add a non-slip shelf liner. It’s the silent hero of cabinet stability.
5. Use Magazine File Holders to Store Lids and Straws Upright
Lids are the true villains of bottle clutter. They’re oddly shaped, they stack badly, and they vanish when you need
them. The fix: store them upright like folders in a magazine file holder (or any vertical organizer).
Best for
- Flat lids, flip tops, silicone lids, and straw lids that flop around in piles
- Cabinets where you can dedicate a narrow lane for “accessories”
Pro tip
Sort by type: “STRAW LIDS,” “FLIP LIDS,” “KIDS.” If you have to dig, your system will slowly become a lid soup.
6. Add Drawer Dividers for a “No-Roll Zone”
If you have a wide, deep drawer (or a pull-out cabinet drawer), dividers can create lanes so bottles don’t roll into
each other like bumper cars.
Best for
- Kitchen islands with deep drawers
- Families who prefer drawers over cabinets (less bending, more visibility)
Pro tip
Store bottles horizontally with caps facing the same direction. It’s a small detail that makes it easier to grab the
right one fastespecially during the morning “everyone’s thirsty” rush.
7. Try a Lazy Susan for Corner Cabinets (Make the Dead Zone Useful)
Corner cabinets love to swallow items whole. A Lazy Susan puts bottles on a turntable so you can spin and grab what
you need without performing cabinet yoga.
Best for
- Corner cabinets and awkward pantry shelves
- Smaller bottles and kids’ cups that get lost easily
Pro tip
Keep heavier bottles toward the center so the turntable spins smoothly. If it feels like steering a shopping cart
with one broken wheel, it won’t get used.
8. Hang a Back-of-the-Door Organizer for Lightweight Bottles
When cabinet space is tight, go vertical. A back-of-the-door organizer (the kind often used for shoes) can hold
lightweight bottles, shaker cups, or kids’ drinkware without eating shelf space.
Best for
- Pantry doors or utility closet doors near the kitchen
- Households with lots of kids’ bottles and smaller tumblers
Pro tip
Don’t overload it. If the door becomes a slamming hazard, the organizer will “mysteriously” come down and never be
rehung.
9. Install an Under-Shelf Basket for Grab-and-Go Storage
Under-shelf baskets clip onto an existing shelf and create an extra pocket of storageperfect for bottle lids,
cleaning brushes, or smaller bottles.
Best for
- Pantries and cabinets with thick shelves and wasted under-space
- Accessories you want to keep close to bottles (like brush and spare straws)
Pro tip
Make it a “hydration station.” Keep your bottle brush, replacement straws, and a small towel here so everything you
need is in one zone.
10. Use a Rolling Cart for Overflow (and Keep the Kitchen Peace)
If your household truly uses a lot of drinkwaresports, school, commuting, gyma rolling cart can handle overflow
without cramming cabinets. It also moves wherever you need it.
Best for
- Busy families and small kitchens with limited cabinet space
- Homes where bottles migrate to multiple rooms
Pro tip
Assign shelves by category: top for daily bottles, middle for kids’ bottles, bottom for backups and accessories.
When every shelf has a job, the cart stays tidy.
How to Make Any Water Bottle Organization System Stick
The best storage idea is the one your household will actually use when nobody is watching. Here’s how to keep the
system from backsliding:
- Store by frequency: daily bottles at arm level, occasional bottles up high.
- Separate bottles and parts: bottles in one zone, lids/straws in a clearly labeled zone.
- Create a “return path”: if the dishwasher unload zone is across the kitchen, bottles won’t make it back.
- Do a monthly lid check: unmatched lids get donated or recycled (where possible) before they become a drawer ecosystem.
Conclusion: Your Bottles Don’t Need More SpaceThey Need a Plan
Water bottle clutter isn’t a character flaw. It’s a systems problem. Once you decide what you actually use, then
choose a storage method that matches your cabinet layout and your habits, the chaos fades fast. Pick one idea above
that fits your kitchen today, set it up in under 30 minutes, and enjoy the simple luxury of grabbing a bottle
without triggering an avalanche.
Organizer Experiences: What I’ve Learned from Real-Life “Bottle Cabinet Wars” (Extra Notes)
After organizing a lot of kitchens, I can tell you this: water bottles are never the real issue. The real issue is
that water bottles are shaped like trouble. They’re tall, round, slippery, and frequently paired with tiny
accessories that have the survival skills of a single sock in a dryer. But once you’ve watched enough families
wrestle a cabinet full of tumblers at 7:12 a.m., patterns emergeand those patterns are incredibly useful.
First, families don’t fail at organization because they “don’t have discipline.” They fail because the system asks
them to do something inconvenient. If the only spot for bottles is a top shelf that requires a step stool, bottles
will end up on the counter. If the lids live in a random drawer across the kitchen, someone will build a lid pile
near the sink “temporarily.” A professional organizer trick is to reduce friction: store bottles close to where
they’re filled, store lids close to bottles, and keep the most-used items at the easiest height. It sounds obvious,
yet it’s the difference between “organized for a photo” and “organized for Tuesday.”
Second, mixing categories is what turns a cabinet into chaos. I’ll open a door and find bottles, lunch containers,
protein shakers, sippy cups, and one rogue plastic vase (I don’t ask questions anymore). When everything is stacked
together, nobody can see what they have, so they buy duplicates, then complain that they have too much stuff, then
buy another organizer to store the duplicates. The fix is zoning: bottles in one bin, accessories in another, and
overflow in a separate “backstock” space that’s out of the daily zone. This is how you stop the cycle of buying
storage for storage.
Third, lids are the entire game. If you do nothing else, give lids a job and a home. I’ve seen great bottle
systems collapse because lids were tossed into a drawer like coins in a cup holder. The moment someone can’t find
the matching lid, they either (a) leave the bottle on the counter indefinitely, or (b) declare the bottle “broken”
and buy a new one. Storing lids uprightfiled like foldersmakes them visible, easy to grab, and easy to put back.
Also: it makes it painfully clear which lids don’t have a matching bottle. That’s good pain. That’s “future you”
pain relief.
Fourth, “one size fits all” is a myth. Some households need a stackable rack because bottles roll. Others need a
pull-out bin because cabinets are deep. Some need a rolling cart because kids have activities and bottles need to
travel. The best organizer is the one that matches your bottling habits. If you’re a “grab-and-go” family, build a
hydration station. If you’re a “we refill one bottle all day” household, you might only need a small bin and a lid
file. Organization is personal. The cabinet doesn’t care what worked on social media.
Finally, the most honest lesson: you can’t organize your way out of too many bottles. I’ve seen people try. They’ll
add more bins, more racks, more shelvesuntil the cabinet looks like a warehouse for stainless steel. The moment you
hit that feeling of “even organized, this is still too much,” that’s your cue. Pick your favorites, keep what you
truly use, and let the rest go. Your kitchen will feel bigger, mornings will feel calmer, and you’ll never again be
attacked by a falling tumbler that was just waiting for its moment.