Table of Contents >> Show >> Hide
- Meet the Finder: Your Mac’s Home Base
- Finder Windows That Work With You (Not Against You)
- Master the 4 Finder Views (And Use the Right One)
- Navigation Tricks That Save Real Time
- Finder Search: Find Files Like You Actually Mean It
- Tags: Organization Without Moving Anything
- Quick Look: Preview Almost Anything Without Opening It
- Quick Actions: Do Useful Work Right in Finder
- Batch Tasks: When You Don’t Want to Repeat Yourself 47 Times
- Finder Settings Worth Changing (Yes, Really)
- Hidden Files, Privacy, and “Don’t Panic” Maintenance
- Common Finder Problems (And Quick Fixes)
- Conclusion: Make Finder Your Quiet Superpower
- Real-World Experiences Using the Finder on Your Mac (Extra )
If your Mac were a house, the Finder would be the person who knows where everything is: keys, receipts,
that one cable you swear you didn’t buy twice, and the screenshots multiplying like gremlins after midnight.
The Finder isn’t just a file browserit’s the control room for how you navigate, organize, preview, search,
and act on your stuff.
This guide walks you through the Finder features that actually matter in daily life: the four Finder views,
the sidebar and toolbar, tags, Quick Look, Quick Actions, Smart Folders, and search tricks that help you find files
faster than you can say “Downloads folder.” You’ll also get practical examples and “real-world” scenarios at the end
(because yes, Finder drama is a thing).
Meet the Finder: Your Mac’s Home Base
The Finder is the smiling blue face in your Dock. Click it and you get Finder windowsyour main interface for
browsing apps, documents, external drives, iCloud Drive, network locations, and more. If you ever feel like you have
“files everywhere,” the Finder is where you turn chaos into something that looks vaguely intentional.
Core Finder parts you should recognize
- Sidebar: Quick access to favorites, iCloud locations, devices, shared items, and tags.
- Toolbar: Back/forward, view buttons, share, tags, and other tools (customizable).
- Path + Status bars: Optional “where am I?” and “what’s in here?” helpers.
- Preview pane: See file details and Quick Actions without opening anything.
- Tabs: Like browser tabs, but for folders. Your desktop will thank you.
Finder Windows That Work With You (Not Against You)
Customize the sidebar for speed
The sidebar is your “fast travel” menu. Add the folders you use constantly (Projects, Clients, School, Taxes,
Recipes, whatever your life requires), and hide the stuff you never click. A clean sidebar is like a clean kitchen:
it reduces the odds you’ll start eating cereal over the sink.
- Pro tip: Put your top 3–5 working folders in Favorites.
- Reality check: If “Recents” stresses you out, you’re allowed to remove it.
Make the toolbar match your workflow
Finder’s toolbar can be customized so the tools you actually use are one click away. If you often tag files, add a
Tag button. If you share constantly, keep Share. If you never share anything and your Mac is basically a hermit
cabin, remove it.
Use tabs and “Merge All Windows” to reduce clutter
If you routinely end up with six Finder windows scattered around like playing cards, switch to tabs. You can also
merge multiple Finder windows into a single window with tabsless chaos, more focus.
Master the 4 Finder Views (And Use the Right One)
Finder has four main views: Icon, List, Column, and Gallery. Each is best for a
different job. The trick is knowing when to switch rather than forcing one view to do everything.
Icon View: “I want a visual grid”
Icon view shines when you’re working with images or browsing folders where you recognize files by look. You can
adjust icon size and spacing so you’re not squinting like a detective examining a blurry security photo.
Best for: Photo folders, design assets, quick visual browsing.
List View: “Show me details and let me sort”
List view is the spreadsheet of Finder views: names, dates, sizes, kinds. It’s perfect when you want to sort by
“Date Modified” to find what you touched last, or by “Size” to locate the storage hogs.
Best for: Work documents, downloads cleanup, file auditing.
Column View: “I need to navigate a folder tree fast”
Column view is underrated productivity gold. It shows your folder path as a series of columns, so you can dive deep
into nested folders without losing context. It’s also great for quickly previewing a selected file.
Best for: Deep folder structures, fast navigation, quick previews.
Gallery View: “Preview-first browsing”
Gallery view gives you a large preview and a strip of thumbnailsgreat for photos, videos, PDFs, and anything you
want to identify visually. It’s like giving your files a runway show, but without the drama (usually).
Best for: Media selection, reviewing PDFs/images before sharing.
Customize each view with View Options
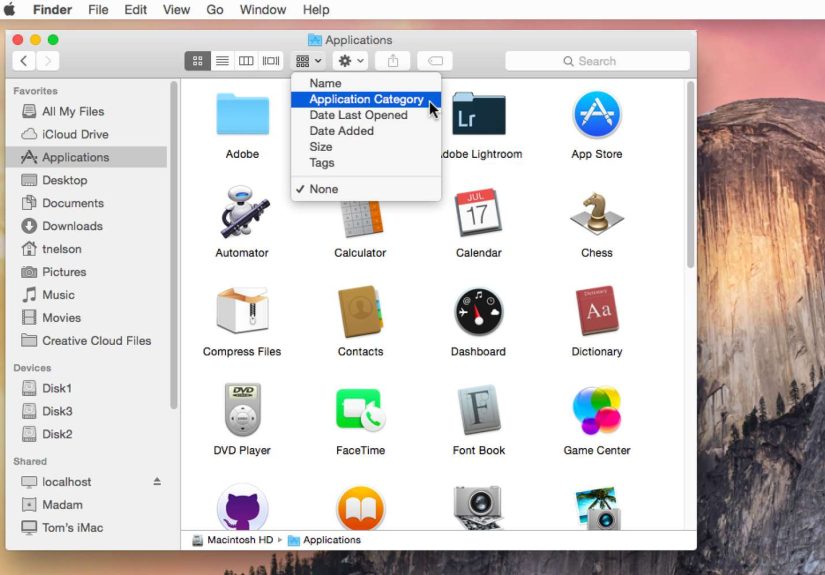
In any Finder window, you can open View Options and tune the view: icon size, text size, column choices, grouping,
sorting, and more. This is how you make Finder feel “yours,” instead of a generic filing cabinet from 2007.
Example: In List view for your Downloads folder, add columns like Date Added and
Size, then sort by Date Added so new clutter floats to the top like a warning sign.
Navigation Tricks That Save Real Time
The Go menu is your shortcut buffet
Finder’s Go menu helps you jump to common places (Applications, Utilities, Home folder, Downloads).
If you’re constantly hunting for a system folder, Go is your friend.
Go to Folder: jump anywhere by typing a path
When you know where something lives (or you’re following instructions), Go to Folder lets you type
a folder path and jump there instantly.
Example: Need to reach your user Library folder? Use Go to Folder and type
~/Library. (Yes, it exists. Yes, it’s where a lot of “why is my Mac doing that?” mysteries begin.)
Use the Preview pane for “check before you open”
The Preview pane shows file metadata (dates, dimensions, file type details) and can display file content. It’s
ideal when you’re choosing between five files named Final_v3_REALfinal.pdf and
Final_v3_REALfinal(1).pdf.
Path bar and status bar: small toggles, big clarity
Turning on the path bar helps you see exactly where you are in your folder structure. The status bar can show how
many items are in a folder and how much space is available. These two features reduce “Wait…where am I?” moments.
Finder Search: Find Files Like You Actually Mean It
Finder search is more powerful than most people realize, because it can search by name, kind, date, tags, and
dozens of attributes. The key is to avoid “type one word and pray.”
Start with scope: “This Mac” vs “Current Folder”
When you search, Finder lets you choose whether to search your entire Mac or just the folder you’re in. This is
how you avoid searching the whole planet when you only meant to search one project folder.
Add criteria to narrow results
A great Finder search usually becomes a set of filters: file type, created/modified date, tags, and more.
Think of it like ordering coffee. “Coffee” is a start. “Iced oat latte with two shots” gets you the thing you
actually wanted.
Example search workflows:
- Find a PDF you edited this week:
Search for the topic, then add criteria: Kind = PDF and Last Modified = This week. - Find all images for a project:
Add criteria: Kind = Image, then filter by a folder or a tag like “Client-A”. - Find a file you only remember by content:
Use a unique phrase you know is inside the document, then narrow by Kind or Date.
Save powerful searches as Smart Folders
Smart Folders are saved searches that update automatically. They look like folders, but they’re really “live
filters.” You don’t have to move files into a Smart Folderfiles appear there when they match the criteria.
It’s organization without the dragging-and-dropping part (which, frankly, is the part that makes people quit).
Smart Folder ideas you’ll actually use:
- “Recent Work”: Kind = Document, Last Modified = Last 7 days, Location = Projects
- “Large Files”: File Size is greater than 500 MB (great for storage cleanups)
- “Receipts”: Kind = PDF or Image, Tag = Receipts
Tags: Organization Without Moving Anything
Tags are one of the best Finder features for modern workflows because they let a file belong to multiple categories
at once. A single PDF can be tagged Taxes, Client-A, and Urgent without being duplicated
or shoved into three different folders like a digital shell game.
Use color tags like “visual sticky notes”
Color tags are great when you need quick, low-friction status tracking. For example:
Red = Needs review, Yellow = In progress, Green = Done.
Pair that with a text tag (like “Q1-Report”) and your future self will stop sending your present self angry vibes.
Practical tag setup for a project workflow
- Create tags for projects or clients (e.g.,
Client-A,Client-B). - Create status tags (e.g.,
To-Do,Waiting,Final). - Show only the tags you actually use in the Finder sidebar.
- Click a tag in the sidebar anytime you want “everything related to X” instantly.
Quick Look: Preview Almost Anything Without Opening It
Quick Look is the fastest way to preview files. Select a file and press the spacebar. You can preview documents,
images, PDFs, audio, video, and moreoften with lightweight tools like markup, rotate, or trimmingwithout opening a
full app.
Example: You’re attaching a PDF to an email. Instead of opening it in Preview, Quick Look it,
verify it’s the right version, mark it up if needed, and move on. That’s fewer windows, fewer distractions, and
fewer opportunities to attach the wrong file and spend the next hour sweating.
Quick Actions: Do Useful Work Right in Finder
Quick Actions let you perform simple taskslike rotating images or marking up a PDFdirectly from Finder. They often
show up in the Preview pane or context menu. This is “small automation” that adds up fast.
Good uses for Quick Actions:
- Rotate images (no app launch required).
- Markup PDFs or images for quick edits.
- Create PDFs, trim media clips, or run simple workflows (depending on your macOS setup).
Batch Tasks: When You Don’t Want to Repeat Yourself 47 Times
Batch rename files the sane way
Finder can rename multiple files at once. Select a group of files, right-click, choose Rename, then pick a method:
replace text, add text, or format with a sequence.
Example: You have 30 photos named IMG_1234, IMG_1235, etc. Batch rename to
ClientA_Event_2026-01_001, ClientA_Event_2026-01_002… and suddenly your files look like you
have your life together.
Other quick multi-file wins
- Compress: Select files → right-click → Compress to create a zip.
- Duplicate: Useful for templates before editing.
- Get Info: Check size, permissions, and detailsespecially helpful for troubleshooting.
Finder Settings Worth Changing (Yes, Really)
Finder settings can remove friction from your daily workflow. If you’ve never opened Finder Settings, you’re
basically using a new car with the seat stuck in the default position and the mirrors pointed at your regrets.
Advanced settings people actually benefit from
- Show filename extensions: Helpful for knowing exactly what type of file you’re working with
(especially when sharing or troubleshooting). - Keep folders on top: Makes sorting by name feel more natural (folders first, files after).
- Search default: Choose whether Finder searches “This Mac” or the current folder by default.
- Trash behavior: Some setups automatically remove items after a set time; know what your Mac is doing.
Hidden Files, Privacy, and “Don’t Panic” Maintenance
Show hidden files when you need to (and hide them again)
Sometimes you need to see hidden files for troubleshooting. Finder can toggle hidden files with a keyboard shortcut.
Just remember: hidden system files are hidden for a reason. Treat them like the wiring behind your wallslook, but
don’t start pulling things out unless you’re sure.
Hide files isn’t the same as secure files
Hiding files in macOS can keep them out of casual view, but it’s not strong security. If you’re protecting truly
sensitive data, you want encryption and good account security (password/Touch ID)not just “it’s invisible, so it’s
safe.” That’s like hiding snacks on the top shelf and assuming nobody owns a chair.
Common Finder Problems (And Quick Fixes)
Finder search feels “wrong”
If Finder search results seem off, check your search scope (This Mac vs current folder) and make sure you’re using
criteria like Kind and Date to narrow down results. Also consider whether you meant Finder search or Spotlightboth
are useful, but Finder is better when you want structured filters and saved searches.
Finder acts glitchy
Finder is an app, and sometimes apps need a restart. If something feels stuckpreviews weird, windows not updating,
icons misbehavingrestarting Finder can fix it. (This is the Mac equivalent of turning something off and on again,
but with slightly more dignity.)
Conclusion: Make Finder Your Quiet Superpower
Using the Finder well isn’t about memorizing every featureit’s about building a workflow that reduces friction:
the right view for the moment, a sidebar that reflects your real life, tags for flexible organization, Quick Look
for instant validation, Smart Folders for “automatic grouping,” and search filters that feel like precision tools
instead of a guessing game.
Spend 15 minutes tuning Finder and you’ll get that time back every weekbecause the less time you spend hunting for
files, the more time you have to do literally anything else. Including taking fewer “where did I save it?” breaks.
Real-World Experiences Using the Finder on Your Mac (Extra )
Here are a few common “Finder experiences” that Mac users run intoand how the right Finder features turn them from
frustrating to surprisingly smooth. Think of these as the moments where Finder stops being a smiling icon and starts
acting like an actual assistant.
Experience #1: The Great Downloads Folder Archaeological Dig
You open Downloads looking for one file you grabbed yesterday. Instead, you discover a time capsule: installers,
random PDFs, duplicate images, and at least one file named something like receipt(3).pdf. This is where
List view earns its paycheck. Switch to List view, sort by Date Added, and the most recent files
float right to the top. If you’re cleaning house, sort by Size and you’ll instantly see who’s
squatting on your storage.
The “aha” moment for many people is realizing you don’t have to manually move everything to organize it. Add a tag
like ToFile for anything you want to deal with later, then click that tag in the sidebar when you’re
ready. It’s like making a pile on your deskbut the pile is searchable and doesn’t judge you.
Experience #2: The “Which Version Is the Real Final?” Problem
You’re about to send a document and there are five versions: Final.docx, Final2.docx,
Final_THISONE.docx, Final_revisions.docx, and Final_revisions_really.docx.
Instead of opening each one, you use Quick Look to preview them instantly. If you turn on the Preview pane, you can
also compare metadatalike Last Modifiedto confirm the newest edit. Finder becomes a truth machine:
it shows you what the file is, what’s inside, and when it was last touched.
Once you’ve lived through this once, you start using Batch Rename for sanity. Rename the set with a clean naming
scheme: Q1_Report_2026-01_01, Q1_Report_2026-01_02, and so on. Suddenly, your files have a
timeline and your brain can stop acting like a detective in a low-budget mystery movie.
Experience #3: The “I Know It’s Somewhere” Search Spiral
This is the classic: you remember a file exists, you remember a word in it, and you remember it was “probably in a
folder,” which is… not helpful. Finder search fixes this when you treat it like a filter tool, not a lottery ticket.
Start a search, set scope to This Mac, then add criteria: Kind = Document,
Last Modified around the time you worked on it, and (if you’re a tag person) the project tag.
The results narrow fast. It feels less like “searching” and more like “targeting.”
Experience #4: The Lightweight Workflow That Feels Like Magic
You’re collecting screenshots for a presentation. Instead of opening each image to rotate or mark it up, you use
Quick Actions or Quick Look markup right from Finder. You rotate the few that came in sideways, add a quick circle
highlight, zip the final set, and share it. No app parade. No bouncing dock icons. Just: select, preview, act, done.
This is when Finder stops being “the thing you use to find files” and becomes a quiet production line.
The takeaway from these experiences is simple: Finder gets dramatically better when you lean on views, tags, Quick
Look, and Smart Folders. You don’t need a complex systemjust a few small habits that help you stay oriented,
reduce clutter, and find what you need fast.