Table of Contents >> Show >> Hide
- Why a Door + Beams Make a Shockingly Perfect Bar
- Plan It Like a Pub (Before You Cut Anything)
- Pick the Right Door and Beams (Your Future Self Will Thank You)
- Materials & Tools (No, You Don’t Need a Castle Workshop)
- Step-by-Step: Build the Bar (Door Front + Beam Frame)
- Step 1: Decide Your Bar Shape and Footprint
- Step 2: Build the Hidden Frame (The Part That Does the Heavy Lifting)
- Step 3: Prep the Door (Clean, Repair, Reinforce)
- Step 4: Attach the Door as the Bar Front
- Step 5: Add Beams as Posts, Rails, and Trim
- Step 6: Build and Install the Bar Top
- Step 7: Add Storage Where It Matters
- Step 8: Install the Foot Rail (Instant “Real Pub” Upgrade)
- Finish Like a Pub: Dark, Warm, Durable
- Irish Pub Style Details That Sell the Look
- Budget Reality Check (And Where to Splurge)
- Maintenance & Safety Checklist
- Conclusion: Your Door Deserves a Second Act
- Real-World Build Experiences (The Stuff People Learn Mid-Project)
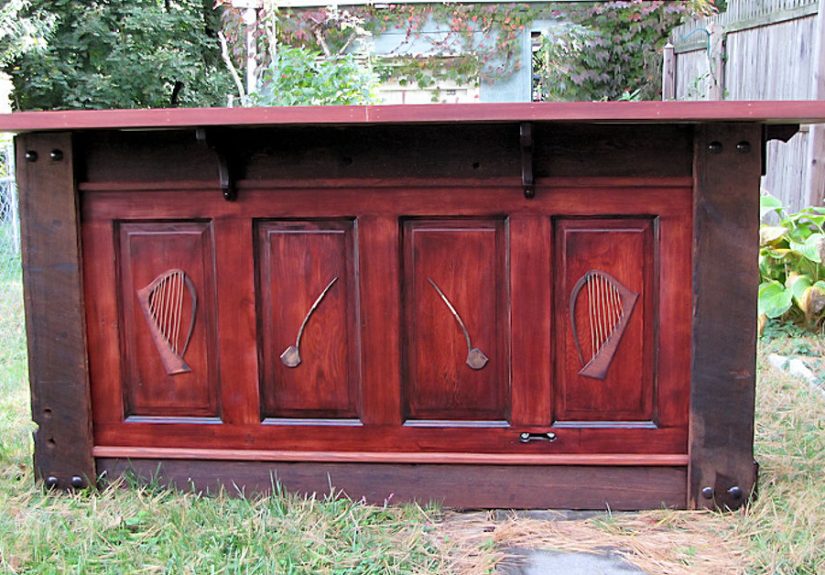
There are two kinds of home bars in this world: the kind you buy in a box (and assemble with the emotional support of a hex key), and the kind that looks like it’s been serving pints since your great-uncle swore he “only had one.” This article is about the second kind the Irish pub style bar made from an upcycled door and reclaimed beams, where every dent has a backstory and every scratch feels like character instead of “oops.”
The magic of building with salvaged materials is that the design almost writes itself. A door already has panels, proportions, and presence. Beams bring instant heft, warmth, and that old-world pub vibelike the bar could tell you a story… and then ask you to pay cash.
Why a Door + Beams Make a Shockingly Perfect Bar
A traditional pub bar feels sturdy, welcoming, and a little dramaticdark wood, warm lighting, and details that look like they were built to outlast trends. An old door gives you ready-made visual structure (panels, rails, stiles), which means your bar front can look custom without you carving anything more complex than a sandwich.
Reclaimed beams (or thick salvaged lumber) are ideal for the parts that need to feel substantial: corner posts, support rails, the bar top substrate, shelving supports, and trim. In short: a door gives you the face; beams give you the backbone.
Plan It Like a Pub (Before You Cut Anything)
Irish pub style is cozy, not cramped. Before you start sawing, do a quick “pint test” with painter’s tape on the floor: mark the bar footprint, where stools will sit, and where people will stand. If your layout requires guests to shuffle sideways like crabs, widen the aisle or shorten the bar. This is a bar, not a submarine.
Bar Dimensions That Feel Right
- Bar height: Aim for classic bar height so it feels legit (and so stools make sense).
- Top depth: Deep enough for drinks, plates, elbows, and the occasional dramatic lean.
- Overhang: Enough knee space so guests aren’t forced into a polite squat.
A super practical approach: build a bar around common standards (bar-height seating, comfortable overhang, stool spacing), then tweak for your room. If you’re short on space, reduce depth before you reduce overhangknees have surprisingly strong opinions.
Seating Math (So Everyone Has Elbow Rights)
- Stool spacing: Plan roughly 24–30 inches per seated person so you’re not bumping shoulders every time someone gestures during a story.
- Seat-to-counter gap: Leave comfortable space between the stool seat and the underside of the bar top.
- Footrest: A foot rail turns “nice-looking bar” into “please don’t make me leave.”
Pick the Right Door and Beams (Your Future Self Will Thank You)
Choosing a Door That Won’t Betray You
Look for a solid wood or solid-core door with attractive panels. Avoid flimsy hollow-core doors unless you’re using it purely as decorative cladding over a strong frame (they can dent if you look at them sternly). Panels add instant pub vibeespecially if you stain them deep brown, add trim, and finish with a satin sheen.
Best-case scenario: an older, heavier door with good bones. Minor warping is workable if you’re fastening it to a straight frame, but severe twist can fight you the entire build like it’s auditioning for a villain role.
Evaluating Reclaimed Beams
Beams can be gorgeousand also full of surprises. Inspect for:
- Rot or punky spots: Soft wood that crumbles under a screwdriver poke is a no-go for structural parts.
- Insect damage: Old holes aren’t always active, but verify the wood is clean and stable.
- Hidden metal: Old nails, screws, staplesaka “tool-blade assassins.” Scan carefully.
Safety First: Old Paint Can Be a Big Deal
If your door or beams have old paint (especially if you don’t know the age), treat it seriously. Lead-based paint is a risk in older materials, and sanding/stripping can create hazardous dust. Use lead-safe practices, contain dust, and choose methods that minimize airborne debris. When in doubt, test before you sand aggressively.
Materials & Tools (No, You Don’t Need a Castle Workshop)
You can build an upcycled Irish pub style bar with standard DIY tools. The key is a sturdy frame and patient prep.
Core Materials
- Upcycled door (for the bar front)
- Reclaimed beams or thick lumber (posts, rails, trim, top support)
- 2x4s or 2x6s (hidden framing)
- 3/4" plywood (base, interior walls, shelving)
- Bar top material (laminated reclaimed boards, butcher block, or a thick plank assembly)
- Wood glue, construction adhesive, screws, pocket-hole screws, lag screws
- Optional: brass foot rail kit (or tubing + brackets)
Helpful Tools
- Circular saw or miter saw
- Drill/driver + bits
- Orbital sander + sanding discs
- Clamps (you can never have too many; it’s science)
- Square, level, tape measure
- Metal detector (strongly recommended for reclaimed wood)
Step-by-Step: Build the Bar (Door Front + Beam Frame)
Step 1: Decide Your Bar Shape and Footprint
Straight bar? L-shape? A compact “pub corner”? Choose based on how you’ll use it: serving drinks, displaying bottles, storing glassware, or all of the above. Mark it out on the floor with tape and place a stool in front of it. Sit. Pretend to sip something fancy. If your knees hit the tape line, adjust nowbefore you build a bar designed exclusively for mannequins.
Step 2: Build the Hidden Frame (The Part That Does the Heavy Lifting)
Build a sturdy rectangular base from 2x lumber, then add vertical studs at corners and along the front. Think “mini wall.” This frame provides the structure; the door is the pretty face.
- Anchor the base so it won’t rack (wobble) when people lean on it.
- Add blocking where the bar top will attach and where a foot rail might mount.
- If you’re adding shelves or a back bar, frame those supports now.
Step 3: Prep the Door (Clean, Repair, Reinforce)
Remove hardware (hinges, knobs, locks). Fill old holes if you want a cleaner lookor keep them if you like “salvage swagger.” If the door is taller than your design, trim it carefully and reinforce cut edges if needed.
If you’re keeping the panels prominent, avoid sanding them into oblivion. A pub bar should look rich, not freshly erased.
Step 4: Attach the Door as the Bar Front
Screw the door to the frame from the inside so fasteners are hidden. If the door has a recessed panel design, align the “best-looking” section at eye level. Add a baseboard/kick plate at the bottom to protect from shoes and barstool scuffs.
Step 5: Add Beams as Posts, Rails, and Trim
This is where “DIY bar” becomes “pub.” Use beams as corner posts or vertical pilasters flanking the door. Add a thick top rail (beam or built-up lumber) to visually cap the front and support the bar top.
- Corner posts: Make the bar feel grounded and intentional.
- Top rail: Supports the top and frames the door aesthetically.
- Accent trim: Reclaimed strips can mimic pub paneling and raise the “this looks expensive” factor.
Step 6: Build and Install the Bar Top
For an authentic pub feel, go thicker than a typical countertop. Options:
- Laminated reclaimed boards: Classic, warm, and full of grain variation.
- Butcher block: Predictable, flat, and easy to finish.
- Beam cap: If you have wide, stable material, it can look incrediblejust ensure it’s properly dried and reinforced.
Aim for a comfortable overhang on the guest side. If you push the overhang wider, use corbels or hidden brackets so the top stays flat and sturdy. Add a subtle “drink rail” on the inside (bartender side) if you want a classic bar look and a little spill control.
Step 7: Add Storage Where It Matters
The best home bars work hard behind the scenes:
- Glass rack: Under-shelf stemware racks save space and feel pub-authentic.
- Bottle shelves: A two-tier shelf keeps bottles visible and reachable.
- Hidden bin: A spot for napkins, openers, coasters, and the mystery bag of cocktail picks you swear you’ll organize later.
Step 8: Install the Foot Rail (Instant “Real Pub” Upgrade)
A brass foot rail is one of the fastest ways to scream “Irish pub style bar” without actually importing a bartender from Dublin. Most people install it low enough to be comfortable while seated. Use a kit to simplify brackets and end caps, or piece it together with tubing and mounts.
Finish Like a Pub: Dark, Warm, Durable
Prep Without Removing the Soul
With reclaimed materials, you’re not chasing perfectionyou’re chasing intentional. Clean thoroughly, then sand enough to remove splinters and level roughness, but don’t sand away every mark. Those marks are the entire point.
Fill deep cracks only where needed for function (like the bar top). For the door front, small imperfections can stay; they read as heritage instead of “I dropped my sander.”
Color: Getting That Irish Pub Depth
Traditional pub wood tones lean dark and richthink walnut, mahogany, or deep-stained oak. A great trick is layering: stain, then lightly sand high points, then add a glaze or gel stain in corners and panel edges to create depth. It’s like contouring, but for wood.
Topcoat: Protect the Bar Top Like It’s Your Favorite Stool
Bar tops take a beating: rings, spills, lemon wedges, and that one friend who “doesn’t use coasters on principle.” Choose a durable topcoat and let it fully cure before heavy use. Multiple thin coats with proper dry time usually beat one thick coat.
If you want a more authentic pub look, consider a satin sheen instead of high-glossstill protective, but less “bowling alley.”
Irish Pub Style Details That Sell the Look
Signature Elements
- Warm lighting: Pendant lights or sconces with warm bulbs make the wood glow.
- Brass accents: Foot rail, rail caps, or even brass cup hooks.
- Mirrors behind the bar: Makes the space feel bigger and screams “classic pub.”
- Dark trim + paneling cues: Your upcycled door already helpsecho it with trim lines.
- Signs and memorabilia: Keep it curated: one or two bold pieces beat a clutter wall.
Create a “Snug” Corner
Many traditional pubs have a snugan intimate nook for conversation. You can fake this at home with: a small bench near the bar, a tight grouping of stools, and a warm lamp or wall sconce. Add hooks for coats, and suddenly your basement feels like a local spot where someone might offer unsolicited opinions about football.
Budget Reality Check (And Where to Splurge)
Upcycling can save money, but it’s not always “cheap”it’s often “better value.” Salvaged doors and beams range from bargain finds to boutique pricing. If you splurge anywhere, splurge on:
- Bar top durability: A solid, stable top and a quality finish pay off every day.
- Hardware you touch: Foot rail, pulls, hooks, and brackets should feel good in the hand.
- Lighting: Pub atmosphere is 60% lighting, 30% wood tone, 10% the music you pretend is “background.”
Maintenance & Safety Checklist
- Wipe spills quickly, especially citrus and alcohol, which can be harsh on finishes over time.
- Use coasters (or at least keep them visible so guests feel gently judged into compliance).
- Re-tighten foot rail brackets and stool hardware occasionallymovement happens.
- If you used reclaimed painted wood, keep dust down during future touch-ups and use lead-safe practices when applicable.
- Let finishes cure fully before heavy use; “dry to the touch” is not the same as “ready for a party.”
Conclusion: Your Door Deserves a Second Act
An upcycled door bar with reclaimed beams isn’t just a DIY projectit’s functional furniture with a story. Build it solid, finish it like you mean it, and add a few Irish pub style details (brass, warm light, dark wood tone). The result is a bar that looks like it belongs in a cozy corner of a neighborhood pubexcept the snacks are exactly what you want, and the bartender is you (so, naturally, the service is impeccable).
Real-World Build Experiences (The Stuff People Learn Mid-Project)
If you’ve never built with reclaimed materials, the first “experience” is usually emotional: you bring home a gorgeous old door, lean it against the wall, and immediately start narrating its past like you’re filming a home-reno documentary. Then you try to move it again and realize it weighs approximately as much as a compact car. That’s when you learn Lesson One: salvage is charming, and also heavy.
The next experience is the treasure hunt phase. People who build an Irish pub style bar from reclaimed beams often describe the same rhythm: you’re at a salvage yard or architectural recycler, running your hands over wood grain like you’re reading braille, searching for straight pieces, interesting checking, and that deep color you can’t fake with stain alone. And just when you think you’ve found “the one,” you spot a hairline crack that makes you pause. The good news? Many cracks are cosmetic. The better news? You learn to choose structure wiselybeams with character can still be strong, but the bar top and the frame need stability more than drama.
Then comes the moment every reclaimed-wood builder remembers: the first time you uncover hidden metal. Maybe it’s a nail you didn’t see. Maybe it’s a staple. Maybe it’s a mysterious fastener from 1973 whose only job is to destroy your planer blades. This is why so many DIYers end up telling the same story: “I thought I removed everything… and then my tool made a sound I will never forget.” The experience teaches two habits: scan carefully and go slowly. Reclaimed wood rewards patience and punishes shortcutslike a stern but fair pub owner.
Finishing is where the pub vibe truly appears, and it’s also where many people get surprised by how “alive” old wood looks once it’s cleaned and sealed. It’s common to do a test patch on the back of a beam and have an instant reaction: “Oh. That’s the color.” Dark stains deepen the grain, but even a clear coat can make reclaimed wood glow. The trick experience teaches is to build color graduallylayer stain or glazebecause it’s easier to go darker than it is to go backwards after you’ve turned your bar into “espresso mahogany midnight.”
The best experience comes last: the first night you use it. People describe this moment like a tiny grand openinglights dimmed, music on, a bottle shelf stocked, and the smell of wood still faint in the air. Someone inevitably runs their hand along the door panels and says, “You made this?” and you casually nod like you didn’t spend an entire weekend arguing with a crooked beam. The bar becomes a magnet: guests lean, talk longer, laugh louder. It’s not just a surface for drinksit’s a gathering point. That’s the real Irish pub lesson: the style isn’t only in the brass and dark wood. It’s in how the space makes people want to stay.
And if you’re wondering what the most universal experience is? It’s this: after you build one bar, you start looking at everything like it has potential. Old shutters become shelves. Cabinet doors become wall panels. A beam offcut becomes a bottle display. You don’t just own a bar you inherit a new way of seeing materials. Which is either a charming lifestyle upgrade… or the beginning of a garage filled with “future projects.” (But hey, at least you’ll have a place to celebrate them.)