Table of Contents >> Show >> Hide
- What’s Actually Happening Under Your Skin
- Tattoo Healing Timeline: What to Expect (Week by Week)
- Stage 1: The First 24 Hours (Fresh, Tender, and a Little Leaky)
- Stage 2: Days 2–3 (Inflammation Cools Down, Dryness Turns Up)
- Stage 3: Days 4–7 (Scabbing Starts, Itching Begins Negotiations)
- Stage 4: Week 2 (Peeling and FlakingThe “Sunburn Cosplay” Era)
- Stage 5: Week 3–4 (Looks Better, Still Needs Respect)
- Stage 6: Weeks 4–6+ (Deeper Healing and Long-Term Strength)
- Step-by-Step Tattoo Aftercare: The Simple Routine That Works
- Step 0: Follow Your Artist’s Instructions (Yes, Even if TikTok Disagrees)
- Step 1: Keep the Dressing On as Directed
- Step 2: First Wash (Clean Hands Only, No “Kitchen Sponge Energy”)
- Step 3: Dry Like a Professional (Pat, Don’t Rub)
- Step 4: Moisturize, but Don’t Smother
- Step 5: Keep It Clean Daily (Yes, Even If It “Looks Fine”)
- Step 6: Protect It from Friction, Funk, and the Outdoors
- Step 7: After It Heals, Sunscreen Is Your Tattoo’s Retirement Plan
- What to Avoid During Healing (A.K.A. The “Please Don’t Do This” List)
- Precautions: Normal Healing vs. Red Flags
- Special Situations That Change Aftercare
- Example Daily Aftercare Routine (Practical, Not Precious)
- FAQs People Google at 2:00 A.M.
- Conclusion: Heal Smart, Keep It Crisp
- Extra: of Real-World Healing Experiences (So You Don’t Learn the Hard Way)
Congratsyou just got fresh ink. Also congrats: you now own a very stylish, very expensive open wound.
(Don’t panic. That’s normal. Your tattoo artist did not “hurt” you; your immune system just got invited to a tiny,
well-choreographed house party in your skin.)
The tattoo healing process is mostly about two things: keeping the area clean and keeping your body from doing
anything dramaticlike turning your new tattoo into a scratch-and-snack buffet for bacteria or your own fingernails.
This guide breaks down the healing stages, the best tattoo aftercare steps, and the precautions that prevent fading,
infection, and that dreaded “why is it bumpy?” moment.
What’s Actually Happening Under Your Skin
A tattoo needle deposits pigment into the dermis (a deeper layer of skin), while the outer layer (epidermis) gets
repeatedly punctured. Your body responds the way it responds to any controlled injury: inflammation kicks in, fluid
(plasma) may weep out, and then your skin rebuilds its barrier. That’s why a tattoo can look healed
on the surface before it’s fully settled underneath.
Translation: even if it looks fine after a couple of weeks, the deeper healing can still be in progress. So yes,
you should still treat it gentlybecause your tattoo is basically “done baking” on top, but still warm in the middle.
Tattoo Healing Timeline: What to Expect (Week by Week)
Healing time varies based on placement, size, saturation (heavy color or dense blackwork tends to heal louder),
your skin, and how well you follow aftercare. But the overall stages are pretty consistent.
Stage 1: The First 24 Hours (Fresh, Tender, and a Little Leaky)
- Normal: redness, swelling, warmth, soreness, and some ink-tinted fluid/plasma.
- Your job: keep the bandage/covering on for the time your artist recommends.
This is the “brand-new tattoo” phase where your skin is basically yelling, “I HAVE NOTES,” and your only response
should be calm, clean, and boring.
Stage 2: Days 2–3 (Inflammation Cools Down, Dryness Turns Up)
- Normal: reduced weeping, ongoing tenderness, slight swelling, and tightness.
- Common surprise: it may look shiny or slightly “plasticky,” especially after moisturizing.
Stage 3: Days 4–7 (Scabbing Starts, Itching Begins Negotiations)
- Normal: light scabbing or a thin crust, mild flaking, and itchiness.
- Goal: do not pick. Not even “just a little.” Especially not “just the corner.”
Scabs are your body’s temporary protective roof. If you rip the roof off early, you can pull ink out, create patchy
spots, or cause scarring. Your tattoo is not a lottery ticketscratching won’t reveal a prize.
Stage 4: Week 2 (Peeling and FlakingThe “Sunburn Cosplay” Era)
- Normal: visible peeling, flaky skin, and peak itchiness.
- Best practice: moisturize lightly and consistently; keep washing gently.
Peeling can look dramaticlike your tattoo is shedding a whole personality. It’s usually fine. Let it fall off on
its own schedule.
Stage 5: Week 3–4 (Looks Better, Still Needs Respect)
- Normal: less flaking, smoother texture, and colors start settling.
- “Shiny phase”: some tattoos look slightly dull or cloudy as new skin finishes forming.
Stage 6: Weeks 4–6+ (Deeper Healing and Long-Term Strength)
Many tattoos look healed on the surface in about 2–3 weeks, but full healing deeper in the skin commonly takes
longeroften around 4–6 weeks (and sometimes more for large pieces or areas that get lots of friction).
Step-by-Step Tattoo Aftercare: The Simple Routine That Works
Tattoo aftercare is not a 12-step skincare religion. It’s a short set of habits done consistently.
Think: clean hands, gentle wash, light moisture, and avoiding the stuff that wrecks healing.
Step 0: Follow Your Artist’s Instructions (Yes, Even if TikTok Disagrees)
Your artist knows what they used (traditional wrap, medical-style film, “second skin,” etc.) and how your tattoo
was done. Their instructions are your primary plan; this guide helps you understand the “why.”
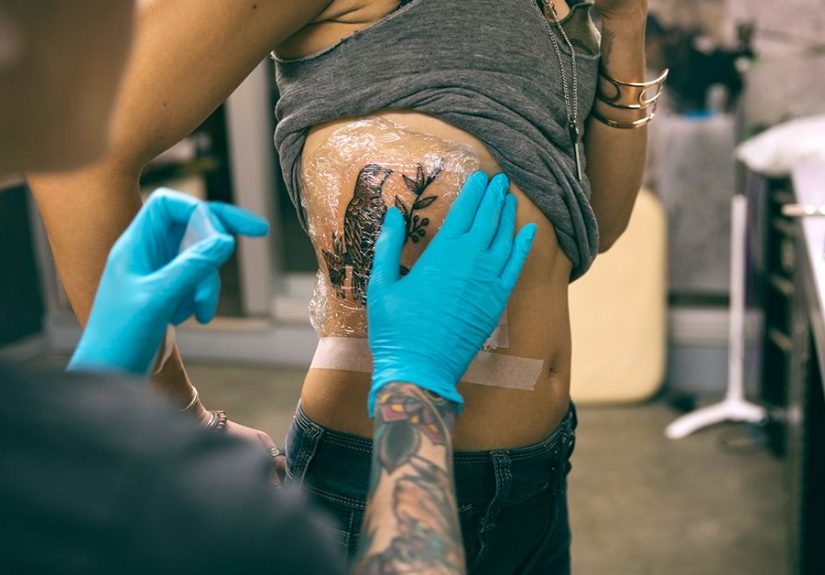
Step 1: Keep the Dressing On as Directed
- Traditional bandage: often removed after a few hours (or as instructed).
- Second-skin / adhesive film: may be left on longer (sometimes a day or more), depending on the product and your artist’s plan.
Don’t “air it out” immediately like you’re curing a steak. A fresh tattoo benefits from clean protection early on.
Step 2: First Wash (Clean Hands Only, No “Kitchen Sponge Energy”)
- Wash your hands thoroughly.
- Use lukewarm water and a mild, fragrance-free soap.
- Gently clean with your fingertipsno loofahs, no washcloth scrubbing.
- Rinse well to remove plasma and residue.
Avoid harsh cleansers and household “disinfecting” impulses. Products like hydrogen peroxide or rubbing alcohol can
irritate tissue and slow healing.
Step 3: Dry Like a Professional (Pat, Don’t Rub)
- Pat dry with a clean paper towel or let it air-dry in a clean environment.
- Avoid shared towels; they can hold bacteria and snag healing skin.
Step 4: Moisturize, but Don’t Smother
The goal is a thin layerenough to reduce dryness and cracking, not enough to make your tattoo look
like it’s been buttered for a dinner roll.
- Early days: many artists recommend a light ointment layer for a short period, then switching to a gentle lotion.
- What to choose: fragrance-free, dye-free, gentle products.
- How often: after washing and whenever it looks drytypically a few times daily.
- What to avoid: heavy over-application that leaves the skin constantly wet or greasy.
Step 5: Keep It Clean Daily (Yes, Even If It “Looks Fine”)
Wash gently 1–2 times per day (or as advised). Over-washing can dry and irritate; under-washing can leave sweat,
bacteria, and debris sitting on healing skin. The sweet spot is “clean and calm.”
Step 6: Protect It from Friction, Funk, and the Outdoors
- Clothing: choose loose, breathable fabrics that don’t rub.
- Bedding: clean sheets help; avoid letting pets sleep on the fresh tattoo area (sorry, Mr. Snuggles).
- Sun: keep it out of direct sunlight while healing; UV is basically a bully to fresh ink.
- Water: showers are fine, soaking is not.
Step 7: After It Heals, Sunscreen Is Your Tattoo’s Retirement Plan
Once the tattoo is fully healed, daily sunscreen helps preserve color and crisp lines. Sun exposure is one of the
fastest ways to make a great tattoo look older than it is.
What to Avoid During Healing (A.K.A. The “Please Don’t Do This” List)
- Picking, scratching, or peeling skin on purpose (this is the #1 way to lose ink and gain regret).
- Soaking: baths, hot tubs, pools, lakes, ocean swims until the surface is healed and flaking is done (often at least 2–3 weeks; longer for some).
- Direct sun or tanning beds while healing.
- Harsh products: alcohol, hydrogen peroxide, abrasive scrubs, fragranced lotions.
- Tight compression and heavy friction over the tattoo.
- “Over-moisturizing” that keeps the tattoo soggy (traps debris and can irritate skin).
Precautions: Normal Healing vs. Red Flags
A healing tattoo can look a little weird. Weird is fine. Dangerous is not.
Here’s how to tell the difference.
Usually Normal
- Redness and mild swelling that improves over the first few days.
- Clear or slightly ink-tinted fluid early on.
- Itching, flaking, and light scabbing as the skin repairs itself.
Possible Infection or Complication (Get Help)
- Worsening pain, swelling, or warmth after the first couple of days.
- Spreading redness (especially rapidly) or red streaking.
- Pus-like drainage, foul smell, or increasing discharge.
- Fever, chills, or feeling generally ill.
- A rash, hives, blistering, or intense itch that seems allergic rather than “normal healing.”
If you suspect infection, don’t try to “out-skincare” bacteria. Contact a clinician promptlyespecially if redness
spreads quickly or you develop systemic symptoms like fever.
Allergic Reactions and Sensitive Skin
Some people react to tattoo pigments, and certain colors (often reds) are more commonly implicated in allergic
reactions. If you have a history of eczema, psoriasis, keloids, or sensitive skin, tell your artist beforehand and
watch healing closely. If a rash or swelling looks extreme or persistent, get medical advice.
Special Situations That Change Aftercare
Second Skin / Adhesive Film
Adhesive films can reduce mess and protect the tattoo early on, but they’re not magic.
If fluid pools excessively, the seal breaks, or irritation develops, follow your artist’s instructions on removal
and re-bandaging. Remove gentlyno fast ripping like it’s a wax strip.
Hands, Feet, and High-Friction Areas
These areas get more washing, rubbing, and movementso they often heal slower and can fade faster.
Keep them clean, moisturize lightly, and minimize friction whenever possible. If your job involves gloves or constant
handwashing, plan ahead and keep everything as clean and dry as you can.
Large, Saturated Color or Heavy Blackwork
Big pieces can ooze more and scab more. You may need longer in the “gentle and boring” phase.
Keep up with cleaning, avoid heavy sweating early on, and don’t be surprised if it takes longer to fully settle.
Medical Conditions (Don’t GuessAsk)
If you have diabetes, immune suppression, clotting issues, or you’re on blood thinners, healing can be different.
Consider checking with a healthcare professional before getting tattooed and be extra vigilant about aftercare and
early infection signs.
Example Daily Aftercare Routine (Practical, Not Precious)
Morning
- Wash hands → gentle wash → pat dry → thin moisturizer layer.
- Put on loose clothing that won’t rub.
Midday
- If it looks dry: apply a very thin layer of fragrance-free moisturizer.
- If you worked out: shower and gently clean the area afterward.
Night
- Gentle wash → pat dry → light moisturizer.
- Clean sheets and avoid sleeping with the tattoo smashed under your body like a panini.
FAQs People Google at 2:00 A.M.
Can I shower with a new tattoo?
Typically yesshowers are fine. Keep the water lukewarm, avoid blasting the tattoo directly, and don’t soak it.
Pat dry afterward.
My tattoo is peelingdid I mess it up?
Peeling is a normal stage. Let flakes fall off naturally. Don’t pick, don’t scrub, don’t panic-text your artist
twelve times in a row (okay, maybe once).
When can I swim?
It’s safest to avoid swimming until the surface is fully healedno open areas, no active flaking or scabbing.
For many people, that’s at least 2–3 weeks, but deeper healing can continue longer. When in doubt, wait longer.
Why does it look dull or cloudy?
New skin can create a temporary “milky” or shiny look while it matures. As healing completes, the tattoo typically
looks clearer and more even.
Conclusion: Heal Smart, Keep It Crisp
The best tattoo healing process is boring on purpose: gentle washing, light moisturizing, and avoiding the big
troublemakerspicking, soaking, sun, and harsh products. Respect the timeline, watch for red flags, and your tattoo
will reward you with clean lines, solid color, and far fewer “uh-oh” moments.
Extra: of Real-World Healing Experiences (So You Don’t Learn the Hard Way)
If you’ve ever wondered why tattoo artists sound like broken records about aftercare, it’s because they’ve seen
everything. And by “everything,” I mean: the gym bro who got a fresh forearm tattoo and then immediately did
deadlifts in a puddle of shared equipment sweat; the beach enthusiast who “only sat in the shade” (while UV rays did
a quiet little sabotage mission); and the well-meaning skincare lover who applied three different scented lotions
because “more moisture equals more better,” right? Not exactly.
One of the most common “normal-but-scary” experiences people report is the itching phase. Around
week one or two, the tattoo can itch like a mosquito bite that learned to file taxes. The instinct is to scratch.
The smarter move is to moisturize lightly, tap around the area (not drag nails across it), and distract yourself.
If you’re at home, this is when people discover that keeping your hands busyfolding laundry, gaming, cookingcan
save your tattoo from accidental damage. A surprising number of tattoos have been harmed by “I scratched in my sleep.”
If that sounds like you, sleeping in a loose long-sleeve shirt or adjusting your position can help.
Another big one: the scab temptation. People often describe seeing a thicker scab spot and thinking,
“If I just remove this gently, it’ll heal smoother.” That’s the lie your brain tells when it wants to do arts and
crafts with your skin. When scabs come off early, you can get lighter patches where ink didn’t have time to settle.
That’s why seasoned collectors treat scabs like they’re on a schedule that is not open to negotiation.
Then there’s the over-moisturizing trap. Folks sometimes slather ointment so thick that the tattoo
looks glossy all day. The result can be clogged pores, irritation, or a soggy healing environment that feels gross.
People who switch to thinner layers usually report an immediate improvement: less “gunk,” less itching, and a tattoo
that calms down faster. The rule of thumb many swear by is: if it’s shiny like a glazed donut hours later, it’s too much.
High-friction placements create their own stories. Tattoos on hands, fingers, feet, inner thighs, and near waistbands
can get irritated just from life happening. People with these placements often say the winning strategy is
friction management: loose clothing, careful movement, and taking a short break from activities that
rub the area constantly. It’s not foreverit’s just long enough to let your skin rebuild without being bullied.
Finally: trust your gut on red flags. Plenty of people describe a moment when something felt “off”:
redness spreading, heat increasing, pain getting worse instead of better. The smartest stories end the same way:
they got medical advice early and avoided a bigger problem. Healing should trend toward calmer. If it’s trending
toward angrier, that’s not “part of the vibe.” That’s your cue to act.


