Table of Contents >> Show >> Hide
- What Makes Beef Stew “Old-Fashioned”?
- The Ingredients That Actually Matter
- 1) The beef: choose a cut that likes a long, slow nap
- 2) The aromatics: onion, garlic, and the “sweat” step
- 3) The vegetables: keep them chunky, add them at the right time
- 4) The flavor builders: tomato paste + Worcestershire
- 5) The liquid: broth (plus an optional brightness booster)
- 6) Thickening: gravy, not beef bathwater
- The Secret Sauce Is… Science (But the Cozy Kind)
- Classic Old-Fashioned Beef Stew Recipe (Dutch Oven)
- Stovetop, Slow Cooker, and Pressure Cooker Options
- Common Beef Stew Problems (And Fixes That Work)
- Serving Ideas That Feel Like a Hug
- Leftovers, Storage, and Food Safety
- FAQ: Old-Fashioned Beef Stew Questions People Actually Ask
- Real-World Experiences With Old-Fashioned Beef Stew (500+ Words of Practical, Cozy Truth)
- Conclusion
Old-fashioned beef stew is the culinary equivalent of a warm sweater that still smells faintly like the good detergent. It’s not flashy. It doesn’t need a “foam.” It doesn’t arrive in a shallow bowl with a sprig of something you can’t pronounce. It shows up in a deep bowl, steams up your glasses, and quietly fixes your entire day.
This guide gives you the classic method (and the “why” behind it), plus a reliable Dutch-oven recipe that tastes like it’s been passed down through generationseven if you just learned it from the internet five minutes ago.
What Makes Beef Stew “Old-Fashioned”?
Old-fashioned beef stew is built on three timeless ideas:
- Brown the beef for deep, roasty flavor.
- Braise it low and slow until tough cuts turn spoon-tender.
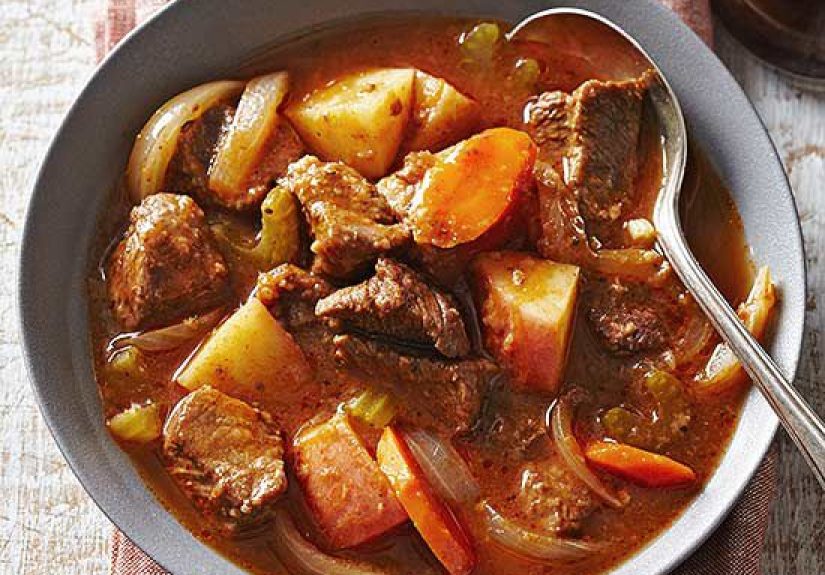
- Keep the ingredients simple: beef, onions, carrots, celery, potatoes, broth, herbs, and a gravy-like broth you want to drink like it’s a beverage (no judgment).
You’ll see modern riffsmiso, gochujang, espresso, a tiny dusting of unicorn optimismbut the old-school spirit stays the same: hearty, savory, and honest.
The Ingredients That Actually Matter
1) The beef: choose a cut that likes a long, slow nap
For classic beef stew, you want a collagen-rich cutsomething that starts tough and ends up luxurious after slow cooking. Beef chuck is the gold standard: it has enough fat and connective tissue to break down into a silky, beefy bite instead of turning dry or stringy.
2) The aromatics: onion, garlic, and the “sweat” step
Onions and garlic form the base. The goal isn’t to caramelize them into jam; it’s to soften them so they melt into the broth and make everything taste like it’s been simmering all afternoon (even if you started at noon).
3) The vegetables: keep them chunky, add them at the right time
Carrots, celery, and potatoes are the classic trio. Cut them into hearty pieces so they hold their shape. A smart old-fashioned move is to add vegetables in stagessome early for flavor, some later for textureso you don’t end up with potato pudding (unless you want potato pudding, in which case: live your truth).
4) The flavor builders: tomato paste + Worcestershire
Tomato paste adds richness and color. Worcestershire sauce adds savory tang and depth. Neither should scream “I’M HERE!”they should whisper “Everything tastes better now.”
5) The liquid: broth (plus an optional brightness booster)
Use beef broth/stock if you can. If your broth is mild, don’t panicold-fashioned stew is forgiving. A small splash of acidity at the end (like a little vinegar or lemon) can brighten the flavor without turning the stew “sour.”
6) Thickening: gravy, not beef bathwater
Old-fashioned stew is typically thickened with flour (coated on the beef or stirred in after sautéing the aromatics). You can also use a slurry (cornstarch + cold water) near the end if you want a glossy finish fast. The key is: thicken gradually and simmer long enough to cook out any raw starch taste.
The Secret Sauce Is… Science (But the Cozy Kind)
Why chuck wins: collagen turns into gelatin
Tough cuts contain connective tissue (collagen). With time and gentle heat, collagen transforms into gelatin, which makes the meat feel tender and the broth feel richer. Lean, “quick-cook” cuts don’t have enough collagen and can dry out during long simmeringso chuck is your steady, old-fashioned best friend.
Why browning matters: fond = flavor
When beef hits a hot pot, it browns and leaves behind flavorful browned bits (fond). Later, you deglaze them with broth, scraping up that goodness. Skipping browning doesn’t make your stew “healthier.” It mostly makes it… beige.
Why low and slow beats fast and furious
A rolling boil tightens meat fibers and can turn stew beef chewy. A gentle simmer (or oven braise) gives collagen time to melt and lets flavors concentrate without beating your ingredients into submission.
Why vegetables can go in two rounds
If you simmer carrots and potatoes for the entire cooking time, they can break down. Adding them later helps them stay intact and keeps your stew satisfying to chew, not just sip.
Classic Old-Fashioned Beef Stew Recipe (Dutch Oven)
Serves: 6–8
Active time: ~25–35 minutes
Total time: ~2.5–3 hours
Ingredients
- 3 lbs beef chuck, cut into 1.5-inch chunks (trim only big hard fat)
- 2 tsp kosher salt (plus more to taste)
- 1 tsp black pepper
- 3 tbsp all-purpose flour
- 2–3 tbsp neutral oil (or a mix of oil + a little butter)
- 1 large yellow onion, chopped
- 3 celery ribs, sliced
- 4 garlic cloves, minced
- 2 tbsp tomato paste
- 4 cups beef broth/stock (plus a splash more if needed)
- 1 tbsp Worcestershire sauce
- 2 tsp dried thyme (or 2–3 sprigs fresh)
- 2 bay leaves
- 4 large carrots, cut into 1-inch chunks
- 1.5–2 lbs Yukon Gold potatoes (or red potatoes), cut into big chunks
- 1 cup frozen peas (optional, stirred in at the end)
- 1–2 tsp apple cider vinegar or lemon juice (optional, for finishing)
- Chopped parsley (optional, for serving)
Step-by-step
- Season and lightly flour the beef.
Pat beef dry. Toss with salt, pepper, and flour until lightly coated. (You’re not breading ityou’re giving the stew a head start on thickening.) - Sear in batches.
Heat a Dutch oven over medium-high heat. Add oil. Sear beef in batches so the pot isn’t crowded. Brown well on multiple sides, 2–4 minutes per side. Move browned beef to a plate. - Sauté aromatics.
Reduce heat to medium. Add onion and celery. Cook 5–7 minutes until softened, scraping up some browned bits as they release. Add garlic and cook 30 seconds. - Toast the tomato paste.
Stir in tomato paste and cook 1–2 minutes, until it darkens slightly and smells sweet-savory (not raw). - Deglaze and build the broth.
Pour in a splash of broth and scrape up the fond. Add remaining broth, Worcestershire, thyme, and bay leaves. Return beef (and juices) to the pot. - Slow cook until the beef is nearly tender.
Bring to a gentle simmer, then cover and cook:- Oven method (recommended): 325°F for ~1 hour 30 minutes.
- Stovetop: Low simmer for ~1 hour 30 minutes, stirring occasionally.
- Add carrots and potatoes.
Stir in carrots and potatoes. Cover and cook another 45–60 minutes, until beef and vegetables are tender. - Finish and adjust.
Remove bay leaves. If using peas, stir in for the last 3–5 minutes. Taste and adjust salt/pepper. If flavors feel “heavy,” add 1–2 teaspoons vinegar or lemon juice. - Rest (optional but magical).
Let stew sit 15–20 minutes before serving. The broth thickens slightly and everything tastes more “together.”
How to thicken (if you want it thicker)
- Simmer uncovered 10–15 minutes to reduce.
- Cornstarch slurry: Mix 1 tbsp cornstarch with 1 tbsp cold water; stir in gradually while simmering.
- Mashed potato trick: Mash a few potato chunks against the side of the pot and stir back in.
Stovetop, Slow Cooker, and Pressure Cooker Options
Slow cooker
Sear the beef and sauté onion/garlic/tomato paste first (flavor lives here). Then transfer everything to the slow cooker. Cook on LOW 7–8 hours or HIGH 4–5 hours. Add peas at the end. If you need thickening, use a slurry and let it cook 10–15 minutes.
Pressure cooker (Instant Pot)
Sear in batches using sauté mode. Build the base, then pressure cook the beef (without potatoes) for ~30–35 minutes, quick-release or natural-release per your preference. Add potatoes/carrots and cook another ~8–10 minutes under pressure. Thicken with slurry on sauté mode.
Common Beef Stew Problems (And Fixes That Work)
“My beef is tough.”
Two likely causes: (1) wrong cut (too lean), or (2) it needs more time, not less. Collagen doesn’t negotiate on a deadline. Keep it at a gentle simmer and check every 20–30 minutes.
“My stew is bland.”
Add salt first (seriously). Then try: a bit more tomato paste, an extra dash of Worcestershire, a pinch of pepper, or a tiny splash of vinegar/lemon at the end. Brightness wakes up beefy flavors without making the stew taste “lemony.”
“It’s watery.”
Simmer uncovered, or thicken with slurry. Also make sure you’re not boiling hard with the lid oncondensation falls back in and keeps the stew from reducing.
“My potatoes turned to mush.”
Use waxier potatoes (Yukon Gold or red) and cut them big. Add them later, and keep the simmer gentle.
Serving Ideas That Feel Like a Hug
- Buttered bread, biscuits, or cornbread for “gravy cleanup duty.”
- A crisp green salad with a tangy dressing (contrast is your friend).
- Pickles or quick pickled onions for brightness.
- Extra black pepper at the table for the pepper-lovers’ union.
Leftovers, Storage, and Food Safety
Beef stew is famously better the next day because flavors have time to mingle and mellow. For best quality and safety:
- Cool quickly: Divide into shallow containers so it chills faster.
- Refrigerate promptly: Don’t leave it out for hours.
- Reheat thoroughly: Heat until steaming hot throughout.
If you’re meal-prepping, stew freezes well. Thaw overnight in the fridge and reheat gently on the stove. If the sauce looks separated after freezing, simmer and stirit usually comes back together like nothing happened.
FAQ: Old-Fashioned Beef Stew Questions People Actually Ask
Should I use “stew meat” from the store?
You can, but it’s often a mix of cuts and sizes, which cook unevenly. Buying a chuck roast and cutting it yourself gives you better texture and more consistent results.
Can I skip flour?
Yes. You’ll get a thinner broth, but you can reduce it, mash some potatoes, or use a cornstarch slurry later.
Why does my stew taste better after resting?
Starches settle, fats and aromatics distribute, and the overall flavor balances. It’s like the stew has time to “compose itself.”
Real-World Experiences With Old-Fashioned Beef Stew (500+ Words of Practical, Cozy Truth)
Ask ten home cooks about old-fashioned beef stew and you’ll get eleven opinions, plus one person who insists their grandma’s version is the only real one. That’s part of the charm: beef stew is a method more than a strict formula, and it tends to meet you exactly where you arebusy weeknight, snowy weekend, or “I need comfort food immediately” Tuesday.
One common experience: the aroma timeline. At first, when you sear the beef, the kitchen smells like confidence. You’re basically a steakhouse for five minutes. Then you add onions and tomato paste and suddenly it smells like you have a plan. About an hour into the simmer, it shifts againless sharp, more roundedlike the stew is quietly turning the volume up on “cozy.” If you’ve ever wondered why stew feels so nostalgic, it’s partly because the smell changes over time in a way that makes the house feel lived-in, warm, and safe.
Another classic: the “Is it done yet?” trap. With stew, undercooked beef isn’t just “a little chewy”it can feel downright stubborn. A lot of cooks assume they overcooked it and pull it early. But with chuck, the opposite is often true: it needs more time for connective tissue to soften. The moment it’s ready, it changes quicklysuddenly the beef yields without fighting back. If you’ve had a stew where the meat was tough, it’s frequently not because it cooked too long, but because it didn’t cook long enough.
Then there’s the vegetable personality test. Some people love carrots that are silky and soft; others want them to keep a little bite. Potatoes are the real wildcard. Cut them small and you risk thick, starchy collapse (which can be delicious, but less photogenic). Cut them big and you get those satisfying, spoon-splitting chunks that feel properly “old-fashioned.” Many cooks land on a compromise: add carrots earlier for sweetness in the broth, but add potatoes a bit later so they don’t melt into the background.
Beef stew also has a reputation for being forgivinguntil it isn’t. The biggest “whoops” moment tends to be crowding the pot while browning. Everyone does it once. You’re hungry, you’re efficient, you believe in yourself… and suddenly the beef is steaming in its own juices and refusing to brown. The fix is simple (and annoyingly true): do it in batches. The reward is huge. Proper browning gives you that deep, roasty backbone that makes stew taste like it took all day even if it didn’t.
And finally: the next-day miracle. Many people swear stew is better after chilling overnight. The flavors meld, the broth thickens slightly, and the whole pot tastes more “complete.” It’s also the reason stew is a sneaky hosting win: you can make it ahead, relax, and then reheat while acting like you’re casually brilliant. Serve it with bread and something crisp on the side, and it feels like a full event, not just dinner.
If you take one experience-based tip and keep it forever, make it this: taste at the end and adjust with intention. Salt brings out beefiness. A tiny touch of acidity brightens. Pepper adds warmth. You’re not changing the stew’s identityyou’re letting it become the best version of itself. Which, honestly, is all any of us are trying to do.
Conclusion
Old-fashioned beef stew isn’t complicatedit’s patient. Choose chuck, brown it well, simmer gently, and add vegetables when they’ll shine. You’ll end up with tender beef, hearty vegetables, and a rich, savory gravy that makes even a regular Tuesday feel like a small holiday.