Table of Contents >> Show >> Hide
- Why Composting Is Worth the (Small) Effort
- The “In-a-Flash” DIY Compost Bin (Plastic Tote Method)
- Where to Put Your Compost Bin
- What to Compost (and What to Keep Out)
- How to Keep Your Bin Working (Without Babysitting It)
- Want It Faster? Use These Speed Boosters
- Troubleshooting: Fix the Usual Compost Drama
- When Is Compost Ready, and How Do You Use It?
- Quick FAQ (Because Composting Has Questions)
- Real-World Experience Notes (Add These to Make It Easier)
Confession: composting sounds like a hobby for people who own overalls on purpose. But it’s actually one of the easiest “set it and forget it” upgrades you can make for your gardenand your trash can. With a basic plastic tote, a drill, and about the length of one decent playlist, you can build a DIY compost bin that turns everyday scraps into dark, crumbly “black gold.”
This guide walks you through a super-easy, fast compost bin build (no carpentry degree required), shows you what to put in (and what to absolutely not put in unless you want to meet every raccoon in the neighborhood), and helps you keep your compost cooking happily until it’s ready to feed your plants.
Why Composting Is Worth the (Small) Effort
Composting is nature’s recycling program: microbes and other decomposers break down organic materials into a soil-like amendment that can improve garden soil, support plant growth, and reduce what you send to the landfill. It’s also a sneaky way to feel like a responsible earth wizard while doing something incredibly normal: throwing away banana peels.
What you get out of it
- Less kitchen and yard waste in the trash
- Richer, more workable garden soil (especially if your soil is sandy or heavy clay)
- Healthier plants thanks to better moisture retention and improved soil structure
- A cheap “fertility booster” you make yourself
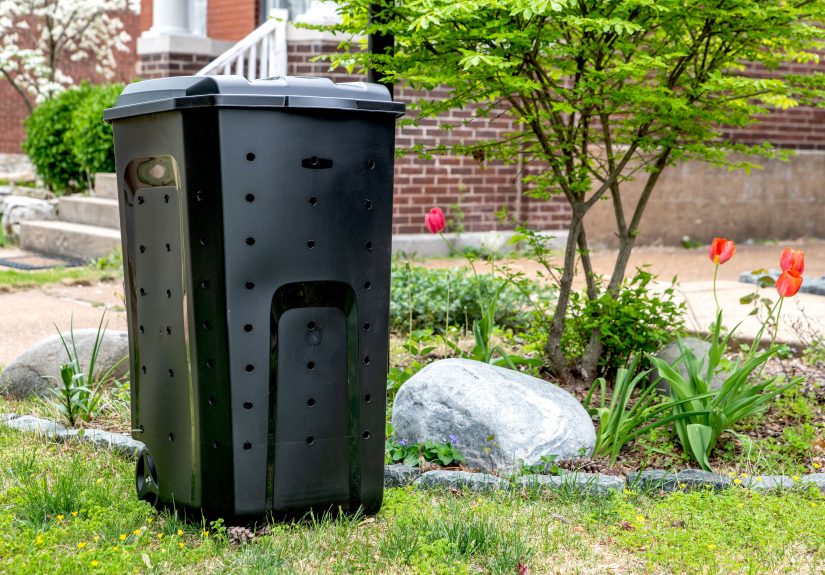
The “In-a-Flash” DIY Compost Bin (Plastic Tote Method)
If you want fast and easy, a plastic storage tote is the MVP. It’s enclosed (helps with neatness and critter control), portable, and takes minutes to convert into a functional compost bin. This is best for small-to-medium households and “cold composting” (the slower, low-maintenance method). You’ll still get great compostjust not overnight magic.
Materials (a.k.a. the stuff you probably already have)
- One plastic storage tote with a lid (18–27 gallons is a sweet spot)
- Drill (or a heated nail/screwdriver in a pinchdrill is cleaner)
- Drill bit around 1/4-inch (you can go a little larger, but don’t turn it into Swiss cheese)
- Optional: a piece of window screen or hardware cloth (to line vents if pests are a concern)
- Optional: zip ties or waterproof tape (to attach mesh)
- Compost starter materials: dry leaves or shredded cardboard (browns), plus some kitchen scraps (greens)
Step-by-step build (10–15 minutes)
- Pick your tote and location. Set the tote where you plan to use itpartial shade is nice so it doesn’t bake in full sun.
- Drill air holes along the upper sides. Add holes around the top third of the tote on all four sides (about every 2–3 inches). These vents help oxygen reach the microbes doing the work.
- Drill drainage holes in the bottom. Space holes a few inches apart. Compost should be moist, not swampy, so drainage helps prevent stink.
- Optional: add pest screens. If you’re worried about insects or rodents, line the inside of the vent area with mesh and attach it with zip ties through small holes or with waterproof tape.
- Start with a “brown” base. Add 3–4 inches of shredded leaves, shredded cardboard, or torn paper (not glossy). This helps airflow and absorbs excess moisture.
- Add a small layer of “greens.” Toss in fruit/veg scraps, coffee grounds, or tea leaves.
- Cover greens with browns. A simple rule: every time you add kitchen scraps, add a covering layer of browns. This helps control odor and discourages pests.
- Close the lid and label it (optional but smart). If your household has multiple “helpers,” a label can prevent… creative additions.
Optional upgrades (still easy)
- Add a “stir stick”: keep a small garden trowel or hand cultivator nearby for quick mixing.
- Use shredded material: chopping scraps and shredding cardboard speeds breakdown dramatically.
- Create a two-tote system: one tote “active” (new scraps), one tote “resting” (finishing/cure stage).
Where to Put Your Compost Bin
Location matters less than consistency. Pick a place that’s easy to access (you’re more likely to use it), has decent drainage, and won’t get blasted by intense sun all day. A little warmth helps composting, but full sun can dry it out fastespecially in a plastic bin.
Good placement tips
- Keep it close to your kitchen door (convenience beats ambition).
- Put it on soil or mulch if possible, not a sealed surfacethis supports natural decomposers and drainage.
- If rain is heavy in your area, consider placing it under an eave or simple cover so it doesn’t become compost soup.
What to Compost (and What to Keep Out)
Great compost is basically a balanced diet for microbes: “greens” (nitrogen-rich, moist materials) and “browns” (carbon-rich, dry materials). A classic target for efficient composting is around a 30:1 carbon-to-nitrogen (C:N) ratio, but you don’t need a lab coatjust aim for “more browns than greens.”
Greens (nitrogen-rich)
- Fruit and vegetable scraps
- Coffee grounds and paper filters
- Tea (remove staples from tea bags if present)
- Fresh grass clippings (thin layers onlythese can mat)
- Crushed eggshells (rinsed helps reduce odor/flies)
Browns (carbon-rich)
- Dry leaves (shredded if possible)
- Shredded cardboard (plain, not glossy)
- Uncoated paper (torn into strips)
- Sawdust or wood shavings (small amounts, untreated wood only)
- Small twigs or dry plant stems (help airflow)
Skip these (unless you want pests, odors, or trouble)
- Meat, bones, fish
- Dairy
- Grease, oils, fatty foods
- Pet waste (especially cats/dogs)
- Diseased plants or weeds gone to seed (unless you hot-compost correctly)
- Treated wood, glossy paper, or anything plastic-y (yes, including produce stickers)
How to Keep Your Bin Working (Without Babysitting It)
Composting is less “scientific experiment” and more “moist, airy lasagna.” You stack, you cover, you occasionally stir. The microbes do the rest.
The 60-second compost check
- Moisture: It should feel like a wrung-out spongedamp, not dripping.
- Air: If it smells sour or rotten, it probably needs more oxygen (stir + add browns).
- Balance: If it smells like ammonia, you likely have too many greens (add browns).
How often should you stir?
In a tote-style bin, turning once a week is great, once every couple of weeks is fine, and once a month still works if you’re patient. More mixing generally speeds decomposition because it brings oxygen into the pile.
Want It Faster? Use These Speed Boosters
Your tote bin is perfect for “cold composting,” which is slower but super forgiving. If you want to nudge it toward faster results, focus on three things: smaller pieces, better mixing, and better balance.
Speed boosters that actually work
- Chop scraps smaller: smaller pieces break down faster.
- Shred browns: shredded leaves/cardboard increase surface area for microbes.
- Layer and cover: always cover kitchen scraps with browns to reduce odor and pests.
- Keep it warm (but not baked): mild warmth helps. Extreme heat dries it out.
Hot composting (optional nerd mode)
Hot composting can reach temperatures in the general neighborhood of 130–160°F when conditions are right, which speeds the process and helps break down materials faster. But it typically works best in larger piles with enough volume to hold heat. A small tote won’t always hit those tempsand that’s okay. You can still make excellent compost; it just takes longer.
Troubleshooting: Fix the Usual Compost Drama
“Why does my compost smell bad?”
Bad odor usually means it’s too wet, too compacted, or too heavy on greens.
- Add dry browns (shredded leaves, cardboard)
- Stir to add oxygen
- Stop adding wet scraps for a few days and let it rebalance
“It’s not breaking down. Is my compost bin broken?”
Probably not. Compost slows down when it’s too dry, too cold, or too brown-heavy.
- Add a little water (remember: wrung-out sponge)
- Add more greens (small amounts), then cover with browns
- Chop materials smaller and stir more often
“I’m seeing bugs.”
Some bugs are normal. Compost is basically a tiny ecosystem. If you’re seeing swarms or attracting pests:
- Bury food scraps under browns
- Avoid meat/dairy/oil (seriouslythis is the big one)
- Consider adding mesh screens and keeping the lid snug
When Is Compost Ready, and How Do You Use It?
Finished compost looks like dark, crumbly soil and smells earthynot like last week’s salad. You may still see a few stubborn bits (like avocado skins). That’s normal; you can sift them out or toss them back into the bin.
How to use finished compost
- Top-dress garden beds: spread a thin layer around plants.
- Mix into soil: blend into planting holes or containers (don’t replace all soilthink “amend,” not “swap”).
- Mulch booster: add compost under mulch to feed the soil over time.
Quick FAQ (Because Composting Has Questions)
Can I compost citrus, onions, and garlic?
Small amounts are usually fine in many home systems, but large amounts can slow things down or create odors. If you notice problems, reduce them and add more browns.
Do I need worms?
Nope. Worm composting (vermicomposting) is a separate method. A tote compost bin works with naturally occurring decomposers and microbes without adding worms.
What happens in winter?
Composting slows in cold weather. Keep adding browns and greens if you want, but don’t panic if it “pauses.” When temperatures rise, microbial activity picks back up.
Real-World Experience Notes (Add These to Make It Easier)
If you’ve never composted before, the first week can feel like you’re starting a weird new pet that eats banana peels. The good news: compost is low-maintenance, and most “mistakes” are reversible. People who stick with it usually develop a rhythmalmost like a kitchen routinewhere scraps go into a small countertop container, and the bin gets a quick “brown blanket” every time it’s fed. That one habit (covering greens with browns) is the difference between a bin that quietly does its job and a bin that announces itself to the entire backyard with a suspicious smell.
A common experience is realizing how much water lives inside kitchen scraps. Toss in a pile of melon rinds or a bunch of soggy salad greens, and suddenly your compost feels like it’s plotting a swamp takeover. The fix is simple: keep a stash of dry leaves or shredded cardboard nearby and treat them like paper towels for compost. Many first-time composters end up with a “brown box” next to the binliterally a cardboard box filled with shredded cardboardbecause it’s so convenient for quick balancing.
Another real-life moment: discovering that “small pieces” are compost’s love language. When scraps are chunky, they hang around longer (like that one guest who doesn’t get the hint). When scraps are chopped, shredded, or broken into smaller bits, they disappear noticeably faster. Some people keep it simple by chopping veggie scraps as they cook; others do the occasional “batch prep” where they tear cardboard into strips and crush dry leaves by hand or with a mower. Either way, you’ll notice the difference within a couple of weeks.
There’s also the turning debate, which usually goes like this: you start motivated, stirring every other day like a competitive baker. Then life happens. The compost still works. In fact, many folks find their sweet spot is a quick stir once a weekor whenever they remember. If you’re the “set it and forget it” type, a monthly mix can still produce compost; it just takes longer. A helpful mindset is to treat turning like tidying: doing it more often keeps things fresher, but skipping it doesn’t mean you failed.
Pest worries are another common experience, especially if you’ve heard horror stories about rodents. The reality is: most pest problems come from the wrong ingredients (meat/dairy/oil) or exposed food scraps. People who avoid those inputs, keep scraps covered with browns, and use a lidded bin tend to have far fewer issues. If your neighborhood wildlife is particularly bold, lining air holes with mesh and keeping the bin in a less “hidden buffet” spot (not tucked behind dense shrubs) can help.
Finally, there’s the moment you harvest your first batch. It’s oddly satisfyinglike finding money in a coat pocket, except it’s compost and you made it. Gardeners often describe it as a shift in how they see “waste.” Once you’ve watched coffee grounds and leaves turn into rich, dark compost, it’s hard not to look at kitchen scraps as future garden fuel. And yes, you may become the person who says things like “I’ve got great compost going right now.” Welcome. We have tomatoes.