Table of Contents >> Show >> Hide
- Why a Terra Cotta Pot Fountain Works So Well
- Pick Your “Gorgeous” Fountain Style
- Materials Checklist
- Step-by-Step: Build a Terra Cotta Pot Fountain That Looks Expensive
- Step 1: Choose the location (and be smarter than gravity)
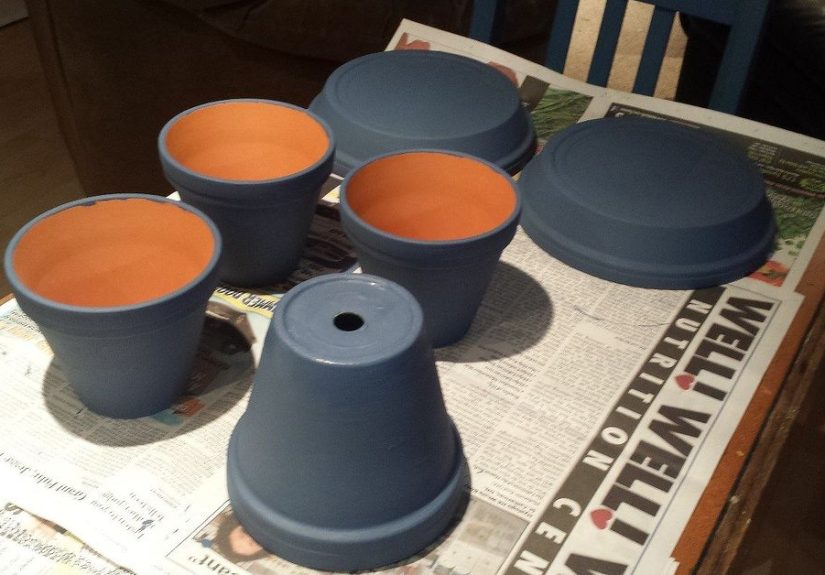
- Step 2: Seal the drainage hole(s) like you mean it
- Step 3: Consider sealing the inside of the terra cotta (optional, but helpful)
- Step 4: Create a hidden platform for the pump
- Step 5: Route tubing and test the pump height
- Step 6: Add a support surface (for tiered versions)
- Step 7: Rock it out (the pretty part)
- Step 8: Fill, plug in, and fine-tune the flow
- Make It Look Designer-Level (Without Designer-Level Spending)
- Maintenance: Keep Your Fountain Cute (Not Crunchy)
- Winterizing: How to Avoid the “Spring Surprise Crack”
- Troubleshooting: Quick Fixes for Common Issues
- Why This Project Is Worth It
- Real-Life Experiences and Lessons From Making a Terra Cotta Pot Fountain
Terra cotta pots are basically the “little black dress” of the garden world: classic, reliable, and somehow always the right vibe.
But if you’ve already got a small army of empty clay pots (or you’re tired of planting yet another “thriving” basil that immediately chooses drama),
here’s a prettier plan:
Turn terra cotta pots into a bubbling, bird-attracting, stress-lowering DIY garden fountain.
It’s one of those upgrades that looks like you hired a landscape designer… but secretly you just used silicone caulk, river rocks,
and the kind of determination that only shows up when you want your backyard to feel like a boutique hotel courtyard.
Why a Terra Cotta Pot Fountain Works So Well
It’s small-space friendly (and commitment-phobic)
A full pond is gorgeous. It’s also a project, a lifestyle, and (sometimes) a money pit. A container fountain gives you the soothing sound of running water
with way less excavation, wiring drama, or “what is that smell?” moments.
It’s a sensory upgrade that’s instantly noticeable
Water features add motion, sound, and sparklethree things your garden can’t get from mulch, no matter how expensive that mulch was.
Even a gentle burble can make a patio feel calmer, cooler, and more inviting for outdoor hangs.
Terra cotta looks better as it ages
Terra cotta develops a natural patina over timemineral marks, soft weathering, a little “ancient courtyard” energy.
In other words: it gets prettier the longer you have it. That’s rare. Most of us don’t even get that perk.
Pick Your “Gorgeous” Fountain Style
Before you grab tools, decide what kind of water feature you want. Here are three reliable looks that work beautifully with terra cotta:
1) The “Single Pot Bubbler” (Beginner + Minimalist)
One larger pot becomes the basin. A pump pushes water up through a small nozzle or bubbler head, then water trickles back over rocks.
This is the easiest build and the least likely to make you say, “So… hypothetically… how do I un-do a decision?”
2) The “Tiered Pot Fountain” (Classic + Cottage Garden)
Two or three pots create a gentle cascade. Water flows from the top pot into the bottom basin.
It’s charming, slightly whimsical, and looks great tucked into a flower bed or next to a seating area.
3) The “Half-Buried Courtyard Fountain” (High-End Look)
You sink the base pot slightly into the ground or surround it with pavers for a built-in feel. This is how you make it look “permanent”
even if your commitment level is “I once quit a Netflix series after Season 2.”
Materials Checklist
You can adapt the exact sizes, but this list covers the essentials for most DIY terra cotta pot fountains.
Must-haves
- Terra cotta pots (one large for the basin; optional smaller pots for tiers)
- Submersible fountain pump (sized for your desired height/flow)
- Vinyl tubing that fits your pump outlet
- Silicone sealant (outdoor/waterproof) to seal drainage holes
- Rubber hole plugs or stoppers (optional, but very helpful)
- River rock or decorative stones to hide the pump and create a finished look
- GFCI-protected outlet and an outdoor-rated extension cord if needed
Nice-to-haves
- Liquid water sealant (especially helpful for porous terra cotta)
- Bricks or an upside-down plastic bucket to elevate the pump and create a hidden “pump cave”
- Plastic saucer (for supporting a top pot in a tiered version)
- Fine mesh pump bag/pump sock to reduce clogs from debris
- Outdoor fountain nozzle head (bubbler, spout, bell, etc.)
Step-by-Step: Build a Terra Cotta Pot Fountain That Looks Expensive
This tutorial focuses on the most versatile build: a large terra cotta basin with a centered bubbler and optional tiers.
You can stop at the bubbler (simple, elegant), or add a smaller pot up top (tiered, extra charming).
Step 1: Choose the location (and be smarter than gravity)
Set the fountain where you’ll actually enjoy it: near a seating area, by a garden path, or where it can become a focal point.
Place it on a level surface. If the ground is uneven, your fountain will look like it’s leaning in for gossip.
- Use a GFCI outlet for safety.
- Create a drip loop in the cord (cord dips lower than the outlet) so water can’t run into the plug.
- Hide cords thoughtfully under mulch, behind pots, or along edgingwithout pinching the cord.
Step 2: Seal the drainage hole(s) like you mean it
Terra cotta pots usually have drainage holes, which is fantastic for plants and terrible for fountains.
The simplest approach is a rubber plug + silicone sealant. Apply silicone around the plug, press it firmly into place,
then seal around it again for good measure. Let it cure fully (usually overnight).
If your pot has multiple drainage holes, seal every single one. Water is persistent. It will find the one hole you “forgot”
like it’s an Olympic sport.
Step 3: Consider sealing the inside of the terra cotta (optional, but helpful)
Terra cotta is porous, which means it can “weep” water slowly through the clay and evaporate fasterespecially in heat.
If you want less refilling and fewer mineral rings, apply a water sealant rated for wet environments to the inside of the basin.
Let it dry completely before adding water.
Step 4: Create a hidden platform for the pump
Pumps work best when they’re not buried under a mountain of rock and regret. You want water to circulate freely and the intake to stay clear.
Two easy solutions:
- Bricks method: Set the pump on bricks so it sits a few inches below the water line.
- Upside-down bucket method: Drill holes in the bottom of a plastic bucket, flip it upside down, and set the pump on top.
This creates a “cave” for cord management and airflow around the pump.
Step 5: Route tubing and test the pump height
Attach tubing to your pump outlet. Decide how high you want water to rise.
A good rule: measure from the water level to the highest point where you want water to emerge,
then choose a pump rated for a greater pumping height (you can always dial flow down).
If your design includes a top pot or fountain head, make sure the tubing reaches comfortably without kinking.
Kinks reduce flow and cause the kind of fountain sound that can only be described as “sad.”
Step 6: Add a support surface (for tiered versions)
For a tiered fountain, you need a stable “shelf” to hold the top pot. A plastic saucer or sturdy plate-like insert can work well
if it fits snugly inside the rim of the larger pot. Drill a center hole in the saucer so the tubing can pass through cleanly.
Step 7: Rock it out (the pretty part)
Rinse your river rock before using it. Dusty rock turns your first fill into “mystery soup.”
Then arrange stones around the pump to hide it while keeping water flow unobstructed.
Want an upgraded look? Mix textures:
- River rock + a ring of larger stones for structure
- A few pieces of driftwood for organic charm
- Glass pebbles as small “sparkle accents” near the water surface
Step 8: Fill, plug in, and fine-tune the flow
Fill the basin to about an inch below the rim. Turn on the pump and adjust the flow control.
You’re aiming for a soothing burblenot a water cannon that soaks your shoes and scares local wildlife.
Spend a few minutes watching how water lands. If it splashes too much, lower the flow, reposition stones,
or change the nozzle head. Small tweaks make a big difference.
Make It Look Designer-Level (Without Designer-Level Spending)
Style it like a “moment,” not an appliance
The fastest way to make a pot fountain look intentional is to stage it.
Surround it with low plants (think creeping thyme, dwarf mondo grass, or small hostas in shade),
or tuck it into a border of flowering perennials so it feels integrated into the garden.
Lean into terra cotta’s warm color palette
Terra cotta plays especially well with:
- Lavender, rosemary, and salvias (Mediterranean vibe)
- White flowers (crisp, classic contrast)
- Deep greens and silvers (elegant, calming)
Add subtle lighting
A small solar spotlight aimed at the fountain makes water movement visible at night.
It’s the easiest “wow” factor you can add without doing math or reading instructions.
Maintenance: Keep Your Fountain Cute (Not Crunchy)
Top off water more often than you think
Outdoor fountains lose water to evaporation and splash. In warm weather, check the level every day or two.
Pumps should stay fully submergedrunning dry is the fastest way to shorten pump life.
Prevent algae with placement and routine
Algae happens when sunlight + warm water + nutrients throw a party. You can crash that party with:
- Partial shade (cooler water = slower algae growth)
- Regular refreshes (drain and refill as needed, especially if debris collects)
- Gentle scrubbing (a brush and water can do a lot)
If you’re aiming to make it bird-friendly, keep the water clean and consider adding a few flat stones near the surface
so smaller birds have secure footing.
Clean the pump on a schedule
Every month or two (more often if you have leaves), unplug the pump, remove the intake cover, and rinse out debris.
If mineral buildup happens, a brief soak in a vinegar-and-water solution can help dissolve depositsthen rinse thoroughly.
Winterizing: How to Avoid the “Spring Surprise Crack”
In freezing weather, water expands and can damage both pots and pumps.
Before hard freezes: drain the basin, clean surfaces, dry everything, and store the pump indoors.
Cover the fountain if it remains outside.
Troubleshooting: Quick Fixes for Common Issues
“The flow got weak.”
- Check for a clogged intake or tubing kink.
- Clean the pump filter.
- Top off water level (low water can reduce output).
“It’s splashing everywhere.”
- Lower the flow control.
- Switch to a gentler nozzle or remove the nozzle head entirely.
- Reposition stones to break the fall of water.
“The pump is noisy.”
- Noise often means low water or debris in the impeller area.
- Unplug, clean, refill, and test again.
Why This Project Is Worth It
A terra cotta pot fountain is one of the rare garden projects that’s both practical and magical.
It upgrades your space, attracts birds, adds relaxing sound, and turns unused pots into a centerpiece.
Plus, you get the bragging rights of saying, “Oh this? I made it.”
(You don’t have to mention the part where you resealed one tiny plug twice. That stays between you and the silicone tube.)
Real-Life Experiences and Lessons From Making a Terra Cotta Pot Fountain
Here’s what people usually don’t tell you about a DIY terra cotta pot fountain: the build is the easy part. The first week is where you learn the real secrets.
Not scary secretsmore like “why is my fountain suddenly doing interpretive dance?” secrets.
Experience #1: The splash pattern will surprise you. You’ll think you set the flow to “gentle babble,” then the wind shows up and your fountain becomes
a tiny, highly motivated sprinkler. The fix is almost always simple: reduce the flow a notch, swap to a calmer nozzle, or rearrange the top rocks so water falls
onto a broad surface instead of dropping like a mini waterfall. A couple of flat stones can act like splash guards while still looking natural.
Experience #2: Evaporation is real. Terra cotta is porous and warm weather pulls moisture fast. The first time you check your fountain and the water line
is mysteriously lower, you’ll assume a squirrel stole it. (To be fair, squirrels do steal things. But not usually water.) The more likely culprit is heat, sun,
and splash. If you want less refilling, seal the inside of the pot, move the fountain into partial shade, and keep the water level high enough that the pump stays fully submerged.
Experience #3: Birds will show up… and they will judge your cleanliness. Fresh, moving water is incredibly attractive to birds, especially if you add a few
stable stones near the surface so they can perch without slipping. But if debris collectsfallen leaves, pollen, garden soilbirds may visit less often.
The good news is that small fountains are quick to refresh: dump, rinse, refill, and you’re back in business.
Experience #4: Mineral rings are basically the fountain’s autograph. Hard water often leaves pale deposits on terra cotta and rocks. At first, it can look like
your fountain is “aging aggressively.” Over time, many people end up loving that weathered look, because it reads as old-world and authentic. If you don’t love it,
occasional scrubbing and using distilled water for topping off can slow buildup. (Your fountain doesn’t require distilled water, but your aesthetic might.)
Experience #5: You’ll adjust it more than onceand that’s normal. A DIY fountain is a living feature. Rocks settle. Tubing shifts.
A pump sock gets filled with debris faster during leaf season. The trick is to treat the first week like a “soft opening.” You’re testing the flow, learning the sound,
and dialing in the look. Once it’s tuned, maintenance becomes a quick rhythm: top off water, rinse debris, clean the pump periodically, and enjoy the calm.
The best part? After a few days, the fountain stops feeling like a project and starts feeling like a placea little corner of your garden that’s always doing something
beautiful, even when the rest of the yard is having an off week. And honestly, that’s the whole point.