Table of Contents >> Show >> Hide
- Why Roses Fade So Fast in the First Place
- How I Set Up the Rose Test
- Method 1: Plain Water and Good Intentions
- Method 2: The DIY Home Hack
- Method 3: The Florist-Style Routine That Actually Worked
- The Real Winner: Not a Hack, but a System
- What I Learned From Testing All Three Methods
- Best Tips If You Want Your Roses to Last Longer
- So, Which Method Should You Use?
- My Extended Experience With These Rose Methods
- Conclusion
- SEO Tags
Roses are dramatic. That is part of their charm. They arrive looking like they just stepped off a movie set, then three days later they can act like they have been through a messy breakup, a heat wave, and a tax audit. I love roses enough to keep buying them anyway, but I finally got tired of pretending every wilted bouquet was “romantic.” So I did what any curious flower lover would do: I tested three popular ways to keep cut roses fresh and watched which one actually held up.
If you have ever searched for how to make roses last longer, you already know the internet is full of advice. Some tips come from florists and garden experts. Others sound like they were invented at 2 a.m. by someone staring into a refrigerator while holding a penny and a can of lemon-lime soda. I wanted a straight answer. Which method helps cut roses in a vase stay beautiful the longest, and which ones are mostly wishful thinking?
So I tested three approaches: plain water and minimal care, a DIY home hack, and a florist-style routine built around clean tools, fresh cuts, flower food, and cool placement. One method clearly outperformed the others. And yes, one loser made my roses look like they were filing a formal complaint.
Why Roses Fade So Fast in the First Place
Before getting into the test, it helps to understand why roses can be a little high-maintenance after they are cut. Once roses leave the plant, they lose their built-in water supply. From that moment on, everything depends on how well the stems can pull water upward. If the stem ends are blocked, crushed, or sitting in dirty water, hydration drops fast. Petals soften, necks bend, and the bouquet starts doing that tragic droop that says, “Remember me as I was.”
On top of that, bacteria love stagnant vase water. Leaves sitting below the water line break down, microbes multiply, and the stem’s ability to absorb water gets worse. Heat, direct sun, drafts, and even ripening fruit can also speed up aging. In other words, cut rose care is not magic. It is mostly a game of keeping the stems open, the water clean, and the flowers cool.
How I Set Up the Rose Test
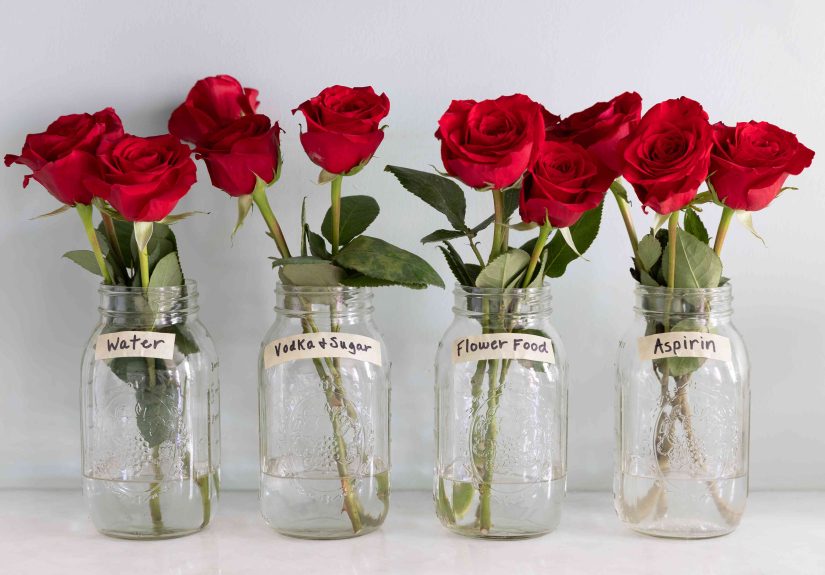
To make this experiment fair, I bought three similar bunches of fresh roses on the same day. All three bouquets had roughly the same stem length, bloom stage, and overall quality. I brought them home, sorted them into three vases, and kept the vases in the same room so temperature and light would be as consistent as possible.
I checked the roses morning and evening for seven days, looking for the things most people care about: petal firmness, color, drooping, browning, water clarity, and overall appearance. I also took notes on smell, because a funky vase can ruin the vibe long before the petals fall.
Method 1: Plain Water and Good Intentions
What I did
For the first vase, I kept things very simple. I filled a clean vase with tap water, gave the stems a quick trim, and arranged the roses without much extra fuss. No flower food. No refrigerator trick. No daily maintenance. Basically, this was the method most of us use when life is busy and the flowers are lucky we even found a vase.
What happened
Day one looked promising. Fresh roses are forgiving like that. On day two, they still looked pretty good, although the outer petals started softening. By day three, the water was getting cloudy and a couple of blooms had that tired, slouchy look that says the party is ending early. By day four, the petals were curling, the heads were tilting, and the whole bouquet had lost its crisp, polished feel.
This method was not a total disaster, but it delivered exactly what you would expect from minimal care: decent short-term beauty and a quick fade. If your goal is to enjoy roses for a day or two, plain water can get you there. If your goal is to keep them looking fresh for longer, this is not the winner.
Method 2: The DIY Home Hack
What I did
For the second vase, I tested a homemade approach inspired by the kinds of tricks people pass around online and in family kitchens. Instead of commercial rose care products, I used a DIY mix designed to act like flower food. The logic behind these mixes is always the same: one ingredient feeds the flowers, another helps acidify the water, and something else is supposed to slow bacteria.
Now, to be fair, homemade vase solutions can sound reasonable on paper. Sugar can feed blooms. Acid can help with water uptake. Some antibacterial ingredient may help water stay cleaner. But in practice, DIY mixes are easy to overdo, underdo, or simply get wrong. That is a problem when roses are already one dramatic sigh away from collapse.
What happened
This vase started strong, just like the plain-water group. On day two, the roses looked slightly perkier than the first bouquet, which gave me hope. I had a brief and foolish moment where I thought I had cracked the code with pantry supplies. Then day three arrived, and the water started looking murky faster than I expected. By day four, the stems looked less fresh, and a few blooms were aging unevenly. Some petals were opening too quickly, while others looked tired and papery.
The DIY method was not the worst, but it was inconsistent. It felt like babysitting a science fair project that had just enough promise to keep you from throwing it out immediately. The roses did not crash overnight, but they did not stay reliably fresh either. If you are the sort of person who enjoys measuring tablespoons of ingredients for flowers, this method may entertain you. If you simply want better vase life, there is a more dependable option.
Method 3: The Florist-Style Routine That Actually Worked
What I did
The third vase got the full treatment. I started with a thoroughly cleaned vase. Then I removed any leaves that would sit below the water line, because soggy leaves are basically a bacterial welcome mat. I recut each stem at an angle with a sharp tool, added fresh water mixed with commercial flower food, and set the vase in a cool area away from direct sunlight, heating vents, and fruit.
Every two days, I emptied the vase, rinsed it, replaced the water, added more flower food, and trimmed the stems again. I also removed any fading outer petals and kept an eye on water level. On two nights during the test, I even moved the vase to a cooler spot to mimic the “overnight chill” trick that florists often recommend for extending freshness.
What happened
This bouquet was the clear winner. Not “kind of better.” Not “I squinted and maybe it looked fresher.” I mean clearly, visibly, no-debate better. By day four, when the first vase looked tired and the second looked suspicious, the florist-style roses still had upright heads, firmer petals, cleaner water, and better color. By day six, the difference was obvious even from across the room. The winning bouquet still looked like a bouquet. The others looked like a life lesson.
The biggest difference seemed to come from the combination of steps, not one magical trick. The clean vase reduced bacterial buildup. The angled fresh cuts improved water uptake. Removing submerged leaves kept the water cleaner. The flower food gave the roses a steadier support system. And the cool location helped slow stress and dehydration. None of these steps is glamorous, but together they work.
The Real Winner: Not a Hack, but a System
If you were hoping the winning method involved a penny, aspirin, mouthwash, vodka, soda, or a mysterious splash of whatever was hiding in the back of the pantry, I regret to inform you that roses prefer boring competence. The method that really worked was the florist-style system: clean vase, fresh stem cuts, leaves out of the water, commercial flower food, regular water changes, and a cool location.
That may not sound thrilling, but it is excellent news. It means you do not need a weird trick. You need a routine. And routines are repeatable. Once you know how to keep roses fresh, you can use the same framework again and again with better results.
What I Learned From Testing All Three Methods
1. Cleanliness matters more than people think
A vase that looks clean is not always truly clean. Any leftover residue can speed up bacterial growth, and bacteria are terrible roommates for cut roses. The better I cleaned the vase, the better the roses performed.
2. Fresh cuts are not optional
Recutting stems felt fussy at first, but it made a visible difference. Roses need open pathways to drink water. A quick trim every couple of days helps keep that system working.
3. Leaves in water are a fast track to gross water
This one is easy and worth doing every time. If a leaf sits in the water, it starts the countdown to murk, odor, and flower decline.
4. Flower food earns its reputation
I know commercial packets can feel like the side character in the bouquet wrapping, but they are useful. The roses in the properly fed vase lasted longer and aged more gracefully.
5. Cool beats cozy
Your roses may look lovely on a sunny windowsill, but they will not thank you for it. Cooler placement helped the winning bouquet stay fresher. Flowers are not trying to tan.
Best Tips If You Want Your Roses to Last Longer
- Start with the freshest roses you can find, with firm petals and healthy green stems.
- Wash the vase thoroughly before use.
- Trim stems at an angle with a sharp tool before arranging.
- Remove all leaves below the water line.
- Use commercial flower food when possible.
- Change the water and refresh the vase every two to three days.
- Keep the bouquet in a cool room away from direct sunlight and heat sources.
- Do not place roses near ripening fruit.
- Remove spent blooms or damaged petals promptly.
So, Which Method Should You Use?
If you just want roses to survive the dinner party, plain water may be enough. If you enjoy experimenting, a DIY mix can be mildly interesting. But if you want the bouquet to stay attractive as long as possible, skip the random hacks and use the florist-style method. It was the only one in my test that felt dependable from start to finish.
That is the real takeaway from this experiment. The best answer to how to keep cut roses fresh is not one secret ingredient. It is a handful of practical steps done consistently. The winning method did not feel flashy, but it absolutely felt effective.
My Extended Experience With These Rose Methods
After the official seven-day test ended, I kept thinking about why the third method felt so much better in real life, not just on paper. The answer was not only that the roses lasted longer. It was that they stayed enjoyable longer. There is a difference. A bouquet can technically still be alive while also looking like it needs a nap, a therapist, and maybe a tiny blanket. The florist-style roses kept their shape, color, and overall “I belong in this room” energy for more of the week.
What surprised me most was how little time the winning method actually took once I stopped treating it like a major event. Cleaning the vase was a two-minute job. Trimming the stems took maybe another minute. Swapping the water every couple of days was easier than making coffee, and far less emotionally charged. Once I got into the rhythm, it felt less like maintenance and more like common sense.
I also noticed that the room itself mattered more than I expected. The bouquets near warmth always seemed to age faster, even when everything else was the same. That made me rethink where I place flowers in my home. Sure, the sunny kitchen counter looks charming, but charm does not hydrate roses. A cooler side table in indirect light turned out to be much better for vase life, even if it was slightly less dramatic for social media. My roses did not care about aesthetics. They cared about survival.
The home-hack method taught me another useful lesson: just because a tip sounds scientific does not mean it performs consistently. It is easy to fall in love with clever shortcuts, especially the ones that use ingredients already in your kitchen. I get the appeal. There is something deeply satisfying about believing your vinegar or sugar or mystery pantry item has secret florist powers. But when I compared the bouquets side by side, the difference was hard to ignore. The hacky method felt like improvisation. The florist-style method felt like a plan.
And maybe that is why this experiment was so satisfying. It replaced vague flower folklore with something practical. Now when I bring home roses, I am not guessing. I know the routine that gives them the best shot. I know what to skip. I know what is worth the tiny bit of effort. Best of all, I get more days with roses that look elegant instead of exhausted. That feels like a solid return on investment for a bouquet that was never exactly cheap in the first place.
So yes, I tried three methods to keep my roses fresh, and one really worked. Not because it was magical. Not because it was trendy. Because it respected how cut flowers actually function. Clean water, clean stems, clean vase, cool room, regular care. That is the formula. It is not glamorous, but neither is watching expensive roses fold on themselves by day three. I know which experience I prefer.
Conclusion
If you want roses that hold their beauty instead of fading fast, the florist-style routine is the best method I tested. Plain water got me a short burst of prettiness. The DIY hack was interesting but unreliable. The full care method was the only one that consistently kept the bouquet fresher, cleaner, and more attractive for longer. When it comes to rose care in a vase, the winner is not a random trick. It is a smart, repeatable routine.


