Table of Contents >> Show >> Hide
- Why Woven Basket Planters Work So Well
- Pick the Right Basket (So You Don’t Create a Moldy Surprise)
- Method 1: Basket as a Decorative Sleeve (The Easiest, Cleanest Option)
- Method 2: Basket as the Planter (Lined + Drained for Outdoor Use)
- The Drainage Talk (Because It Matters More Than Basket Aesthetics)
- Indoor vs. Outdoor: Two Different Games
- Plant Ideas That Look Great in Basket Planters
- Styling Tricks (The “Young House Love” Finish)
- Troubleshooting Common Basket Planter Problems
- Maintenance: How to Make a Woven Basket Planter Last
- Conclusion: The Quick Win That Makes Plants Look “Decorated”
- Real-Life Experiences: What I Learned After Using Woven Basket Planters Everywhere (Yes, Everywhere)
A woven basket planter is the home-decor equivalent of putting on a crisp blazer over sweatpants: suddenly everything looks intentional.
If you’ve got a basic plastic nursery pot (functional, but not exactly “wow”) and a lonely basket (cute, but currently holding… charger cords and regret),
you’re halfway to a warmer, more styled plant moment.
In this guide, you’ll learn two foolproof methods for using a woven basket as a planterthe “basket-as-a-sleeve” cachepot approach
(the Young House Love–inspired classic) and the “basket-as-the-planter” lined approach (best for outdoor seasonal arrangements).
We’ll cover drainage, liners, watering without chaos, and plant pairing ideas that look expensive even if your basket came from a thrift store.
Why Woven Basket Planters Work So Well
Woven basket planters add texturesomething smooth ceramic pots can’t always do. They soften hard edges, warm up minimalist rooms,
and make a “plant corner” feel more like part of your decor instead of a random jungle situation.
- They hide ugly pots. The basket cover turns a cheap grow pot into a styled woven basket planter in seconds.
- They’re easy to swap. Change baskets with the seasons (or your mood) without repotting.
- They play nicely with many styles. Coastal, boho, farmhouse, moderntexture is the universal translator of decor.
Pick the Right Basket (So You Don’t Create a Moldy Surprise)
Not all baskets are created equal. Some are sturdy “I can hold blankets and still look cute,” and some are more “I will disintegrate if you look at me with a watering can.”
Choose wisely, and your plant basket will look great longer.
Basket shopping checklist
- Size: Your basket should be 1–2 inches wider than your pot so it slips in without scraping.
- Shape: Straight sides are easiest. Tapered baskets can work, but measure at the base and the opening.
- Weave: Tighter weaves contain mess better. Loose weaves can still work with a liner.
- Handles: Cute, yes. Structural support, also yes. But don’t lift a planted basket by floppy handles unless you enjoy plant-based jump scares.
- “Not too precious” rule: If you’d cry over it, don’t use it as a planter. Baskets wear over time.
Method 1: Basket as a Decorative Sleeve (The Easiest, Cleanest Option)
This is the approach most people love because it’s low-risk and high-reward: you keep the plant in its real pot
(with proper drainage), and the woven basket functions like a stylish outfit for your planter.
Young House Love popularized this simple idea by slipping a woven basket over a basic planterinstant texture, instant upgrade.
What you’ll need
- A woven basket
- A plant in a pot with drainage holes (nursery pot or plastic/terracotta pot)
- A waterproof catch option: plant saucer, drip tray, or a hidden plastic liner
- Optional: a riser (small upside-down saucer, plastic stand, or a few cork trivets) to keep airflow under the pot
Step-by-step: basket planter sleeve method
- Protect the basket. Place a shallow plastic tray or saucer inside the basket. This keeps stray moisture from touching the weave.
- Drop in the potted plant. Put your pot inside the basket. If it’s wobbly, use a folded towel or a ring of cardboard under the tray to level it.
- Hide the “plant mechanics.” If the nursery pot is visible around the edges, tuck in preserved moss, a folded burlap strip, or even a neutral fabric band.
- Water smart. The cleanest routine: remove the pot, water it in the sink or tub, let it drain fully, then return it to the basket.
(Yes, it’s one extra step. No, you won’t regret it when your basket doesn’t smell like a swamp.)
Best for: indoor plants, renters, people who want the woven basket planter look without any DIY drama, and anyone who has ever overwatered a plant “just a little.”
Method 2: Basket as the Planter (Lined + Drained for Outdoor Use)
If you want to plant directly into a basket, you absolutely canbut you must line it and provide drainage.
Without drainage, you’re basically creating a tiny root bathtub. Plants hate that. (They may look calm, but they are silently judging you.)
What you’ll need
- A sturdy woven basket (preferably thicker weave)
- A liner: plastic drop cloth, heavy trash bag, landscape fabric, or a fitted plastic bucket insert
- Something to create drainage holes (scissors, utility knife, or a drilldepending on your basket and liner)
- Potting mix (not garden soil)
- Plants suited for containers
- Optional: waterproofing spray or sealant for outdoor use
Step-by-step: lined basket planter method
- Waterproof (optional but recommended outdoors). If the basket will live on a porch or patio, apply a waterproofing spray/sealant to help it resist moisture.
Let it dry completely. - Add your liner. Fit the liner inside the basket so it covers the bottom and sides. Keep it neat at the rimfold excess inward so it doesn’t show.
- Create drainage. Cut 4–6 drainage holes in the liner near the bottom. Space them out.
If your basket has a very tight base, you can also add small holes through the basket bottom (carefully) so water can escape. - Use a drip strategy. For indoor use, set the basket on a tray. For outdoor use, elevate it slightly so water can drain freely.
- Add potting mix and plant. Fill partway with potting mix, arrange plants, then backfill and press gently. Water thoroughly and let it drain.
Best for: outdoor seasonal color, porch planters, herb baskets, and places where a little aging and patina won’t ruin your day.
The Drainage Talk (Because It Matters More Than Basket Aesthetics)
A woven basket planter looks charming, but your plant still needs the basics: airflow, drainage, and a watering routine that doesn’t turn roots into soup.
If you remember nothing else, remember this: a basket is decor; drainage is survival.
Simple drainage rules
- If it’s indoors: Use the sleeve method or add a hidden tray/liner. Protect floors and furniture like the responsible adult you are.
- If it’s outdoors: Drainage holes are non-negotiable. Elevate the basket so water doesn’t pool underneath.
- Skip the “rocks at the bottom” myth. It doesn’t magically fix drainage. Good potting mix and holes do.
Indoor vs. Outdoor: Two Different Games
Indoor woven basket planter tips
- Keep water away from the weave. Use a tray or remove the pot to water.
- Watch humidity hotspots. Bathrooms are great for some plants, but baskets can stay damp longer in humid rooms.
- Prevent mildew. If you see white fuzz or smell “basement vibes,” dry the basket thoroughly and improve airflow.
Outdoor woven basket planter tips
- Seal the basket. Waterproofing helps it last longer in sun and rain.
- Use tougher plants. Outdoor baskets dry faster, especially in heat and wind.
- Expect aging. Patina is charming. Total collapse is not. Replace the basket when it starts to soften or sag.
Plant Ideas That Look Great in Basket Planters
The best basket planters lean into texture-on-texture: airy leaves, trailing vines, or clusters of blooms that soften the rim.
Here are practical combos and specific examples you can steal without guilt.
Easy indoor basket planter pairings
- Pothos or philodendron: Trails beautifully and forgives inconsistent watering.
- Snake plant: Upright structure; great if you want “I keep plants” energy with minimal maintenance.
- ZZ plant: Glossy leaves, slow growth, and thrives on neglect (the houseplant equivalent of an introvert).
- Bird’s nest fern: Adds lush, sculptural drama without needing a giant pot.
Outdoor basket planter combos (porch-ready)
- Begonias + coleus: Color without needing full sun all day.
- Sweet potato vine + upright spike plant: Classic thriller/filler/spiller look.
- Herb basket: Basil, thyme, parsley, and trailing oreganopretty and useful.
Styling Tricks (The “Young House Love” Finish)
The magic of a woven basket planter is that it’s not just a potit’s a styling tool. It adds warmth, it hides plastic, and it can anchor a vignette.
To get that layered, lived-in look, think in threes: plant + something tall + something grounding.
Three quick styling formulas
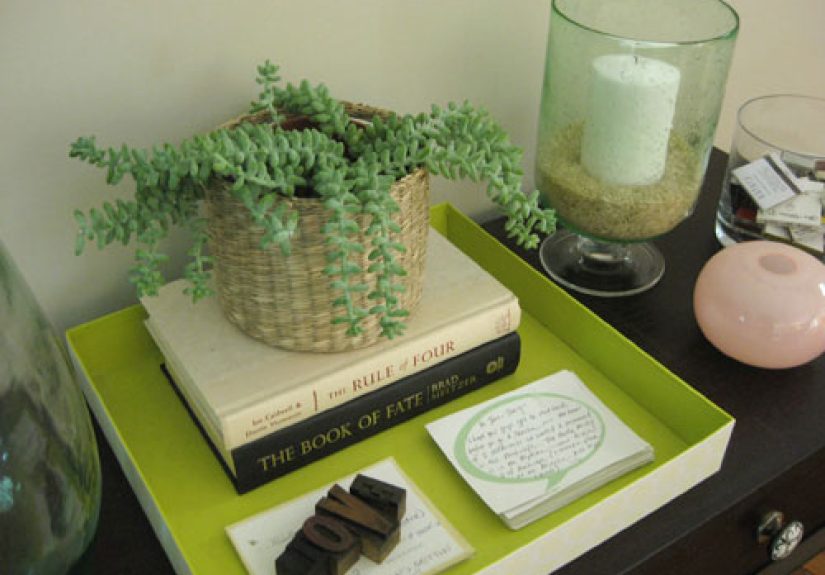
- Entry console: basket planter + stack of books + a candle or small lamp.
- Kitchen counter: herb basket + cutting board leaned behind + a bowl of lemons (because we all apparently live in a magazine).
- Living room corner: large basket planter + smaller plant on a stand + textured throw blanket nearby.
Bonus tip: If the basket is slightly too wide for your pot, tuck in folded kraft paper, a neutral cloth, or preserved moss around the pot’s edge
so everything looks intentionallike you planned it and didn’t just “make it work” five minutes before someone came over.
Troubleshooting Common Basket Planter Problems
Problem: Water leaks through and stains floors
Solution: Add a rigid tray inside the basket, or switch to the sleeve method and water the pot outside the basket. Consider a waterproof liner that extends up the sides.
Problem: Moldy smell or fuzzy spots on the basket
Solution: Let the basket dry fully, improve airflow, and make sure moisture isn’t sitting against the weave. Wipe gently with a mild soap solution,
then dry thoroughly in a bright, ventilated space.
Problem: Basket handles stretch or sag
Solution: Don’t lift the planted basket by handles. If you must move it, lift from the bottom like it’s a birthday cake you actually care about.
Problem: Plants dry out too fast outdoors
Solution: Use a thicker liner, choose more water-retentive potting mix designed for containers, and pick plants that handle heat better.
Grouping planters together can also reduce drying from wind.
Maintenance: How to Make a Woven Basket Planter Last
- Rotate and rest: If you keep reusing the same basket outdoors, give it a “break season” so it can dry out completely.
- Replace liners: Liners wear out faster than baskets. Swap them when they get brittle or torn.
- Clean occasionally: Dust and soil buildup dulls the weave. A soft brush works well.
- Reseal outdoors: Reapply waterproofing as needed if the basket stays outside year-round.
Conclusion: The Quick Win That Makes Plants Look “Decorated”
Using a woven basket as a planter is one of those rare DIY wins that’s fast, forgiving, and instantly visible. The sleeve method is perfect for indoor plants:
keep the pot functional, keep the basket dry, and water like a person who enjoys not replacing furniture.
The lined method works best outdoors when you add drainage, protect the basket, and accept that charm sometimes comes with a little weathered character.
Whether you’re copying the classic Young House Love basket-over-planter vibe or building a lined porch basket planter full of color,
you’re basically turning “I own a plant” into “I styled a home.” And honestly? We love that journey for you.
Real-Life Experiences: What I Learned After Using Woven Basket Planters Everywhere (Yes, Everywhere)
The first time I tried a woven basket planter, I was wildly confident and only mildly informedan iconic combination.
I slipped a basket over a nursery pot, stepped back, and thought, “That’s it. I’m a person with taste now.”
Two weeks later, I discovered the dark side of confidence: I watered the plant while it was still in the basket, didn’t notice the tiny drip,
and ended up with a faint ring stain that looked like my coffee table had developed an emotional support halo.
That’s when I learned the single most practical lesson: the sleeve method is amazing, but only if you treat the basket like it’s allergic to water.
After that, my routine became simple: carry the pot to the sink, water thoroughly, let it drain, then return it to the basket.
It felt fussy at first, but the payoff was realno mildew smell, no warped wood, and no mysterious dampness that makes you question your life choices.
My second experiment was outdoors, and it was a classic “I want it to look like a magazine porch” moment. I lined a basket, cut drainage holes,
planted a mix of leafy and trailing plants, and set it near the front door. It looked incredible for exactly long enough to take photos.
Then a heat wave arrived, the basket dried out faster than I expected, and my plants started looking like they were negotiating for better working conditions.
The fix wasn’t complicated: I moved the planter to a spot with morning sun and afternoon shade, watered earlier in the day,
and chose tougher plants the next time around. Outdoor basket planters can be stunning, but they reward consistency.
I also learned that basket material matters more than you think. A super soft seagrass basket looked dreamy indoors,
but it was prone to getting floppy if it stayed even slightly damp. Meanwhile, a sturdier rattan-style basket held its shape beautifully
and made the whole arrangement look more “designed.” If you’re going to use a basket long-term, sturdier is usually better.
If you’re doing a short seasonal display (say, a summer porch moment), you can get away with something lighter.
The most unexpectedly useful trick came from pure laziness: if a basket is a little too big, don’t obsess over finding the perfect pot.
I started using simple shimsfolded cardboard, extra saucers, even a ring cut from a shipping boxto level pots and raise them slightly.
That little bit of lift improved airflow and made it easier to slide a drip tray underneath. It’s not glamorous,
but neither is realizing your “effortless” decor has been quietly soaking through the bottom.
Finally, the best basket planter “upgrade” wasn’t a new basket at allit was styling. Once I began pairing the basket planter with something tall
(a lamp, a vase, or even a framed photo leaned behind it) and something grounding (a small stack of books or a tray),
the plant stopped feeling like a random object and started feeling like part of the room. That’s the real secret:
the woven basket gives you texture, but the little supporting details give you intention.
If you’re on the fence, start small: pick one plant you already own, find one basket you already have, and try the sleeve method.
Worst case, you learn something. Best case, your room instantly looks warmerand you’ll start side-eyeing every basket in your house like,
“Would you like a second career as decor?” Spoiler: most baskets say yes.


