Table of Contents >> Show >> Hide
- What a Vernier Caliper Does (and When It’s the Wrong Tool)
- Meet the Parts: A Quick Caliper Tour
- Before You Measure: The 30-Second Accuracy Checklist
- How to Measure with a Vernier Caliper
- How to Read a Metric Vernier Caliper (Step-by-Step)
- How to Read an Inch Vernier Caliper
- Zero Error: When Your Caliper Doesn’t Start at Zero
- Tips for Measuring Like You Mean It
- Care, Storage, and Calibration Basics
- Common Problems and Quick Fixes
- Hands-On Experiences: Real Lessons From Real Measuring (Extra Practical Stories)
- Conclusion
A vernier caliper is the multitool of measuring instruments: it can check outside diameters, inside diameters, depths,
and step measurementsoften more accurately than a ruler and faster than a micrometer. The only catch? You have to
speak its language: the main scale plus the vernier scale.
This guide will walk you through using a vernier caliper the right way (without “death-gripping” the jaws), reading
metric and inch verniers with confidence, and avoiding the classic mistakes that make your measurement look precise
while being quietly wrong. By the end, you’ll be measuring like someone who actually gets invited back to the shop.
What a Vernier Caliper Does (and When It’s the Wrong Tool)
A vernier caliper measures linear dimensionsthink thickness, diameter, width, and depthtypically with a resolution
such as 0.02 mm (metric vernier) or 0.001 in (inch vernier). It’s ideal for quick, accurate checks on parts like
bolts, tubing, 3D prints, wood stock, coins, bearings, and drilled holes.
What it’s not: a magic wand for ultra-tight tolerances. If you need extremely high precision on a critical dimension
(or you’re measuring something delicate that changes shape with pressure), a micrometer or specialized gauge may be
the better choice. Calipers are fantasticjust don’t ask them to be something they’re not.
Meet the Parts: A Quick Caliper Tour
Most vernier calipers look similar. Once you know the parts, the “how do I use this thing?” panic disappears.
- Main scale (beam): The fixed scale along the body (in mm or inches).
- Vernier scale (slider): The smaller sliding scale that lets you read fractions of the main scale.
- Outside jaws: The larger jaws for measuring external dimensions (outside diameter, thickness).
- Inside jaws: The smaller upper jaws for measuring internal dimensions (inside diameter, slots).
- Depth rod (depth gauge): A thin rod that extends from the end for measuring hole depth.
- Step faces: The back “shoulders” that can measure step height (like a ledge or recess).
- Thumbwheel / fine adjustment (if present): Helps move the slider smoothly.
- Lock screw: Locks the slider so your reading doesn’t wander off while you’re squinting at it.
Before You Measure: The 30-Second Accuracy Checklist
This is where good measurements are born. Most “bad caliper readings” come from skipping these basics.
- Clean the measuring faces. Wipe the jaws (and the part) to remove dust, oil, chips, or burrs.
- Close the jaws gently and check zero. With the jaws lightly closed, the zero on the vernier should
line up with zero on the main scale. If it doesn’t, you may have zero error (we’ll handle that later). - Check for damage. Nicks, burrs, or bent jaws can ruin measurements fast.
- Mind temperature. Metal expands with heat. If you’ve been holding the part like it’s a hand warmer,
you’re “measuring” your body heat too. - Use consistent pressure. Calipers are “feel” tools. Too much force can change the reading.
How to Measure with a Vernier Caliper
1) Outside Measurements (Thickness, Outside Diameter)
- Open the outside jaws slightly wider than the part.
- Place the part between the jaws, as square/perpendicular as possible.
- Close the jaws until they just contact the part. Think “firm handshake,” not “bench press.”
If your caliper has a thumbwheel, use it for smoother control. - Gently “rock” the caliper a tiny amount to ensure you’re seated on the true widest point (useful on round parts).
- Lock the slide (optional), then read the scales.
Tip: When measuring round stock (like a bolt), rotate the part slightly and re-check. If your reading
jumps around, you may be tilted or squeezing too hard.
2) Inside Measurements (Inside Diameter, Slot Width)
- Open the inside jaws and insert them into the hole/slot.
- Expand the jaws until both inside faces contact the internal walls.
- Keep the caliper aligned with the diameter (for holes) or square with the slot.
- Use light, consistent pressure; lock and read.
Tip: Inside jaws are smaller and easier to misalign. A tiny angle can give you a smaller reading than
the true diameter. Take your time and re-check from another angle.
3) Depth Measurements (Hole Depth, Recess Depth)
- Place the caliper’s flat end firmly on the surface surrounding the hole.
- Extend the depth rod down until it touches the bottom of the hole.
- Keep the base flat on the surface (no rocking).
- Lock and read the scales.
Tip: If the caliper base is tilted, the depth rod will lie to you. Depth readings love a flat reference
surfacegive them one.
4) Step Measurements (Ledge or Shoulder Height)
- Use the step faces on the back of the caliper.
- Rest one step face on the higher surface and slide until the other face contacts the lower surface.
- Lock and read.
Step measurement is surprisingly handy for checking a machined shoulder, a 3D-printed recess, or the depth of a rabbet
in woodworking.
How to Read a Metric Vernier Caliper (Step-by-Step)
Metric vernier calipers commonly have a main scale in millimeters and a vernier that lets you read finer increments
(often 0.02 mm or 0.05 mm). The exact resolution is usually printed on the caliper.
The Core Idea
Your final reading is:
Main Scale Reading + Vernier Scale Reading.
- Main scale reading: The last whole mm mark to the left of the vernier’s zero.
- Vernier scale reading: Find the single vernier line that aligns best with a line on the main scale.
Multiply that vernier line number by the caliper’s resolution (least count).
Example: Reading a 0.02 mm Metric Vernier
Imagine the vernier zero is past 24 mm but not yet at 25 mm. That means your main scale is
24 mm.
Now scan the vernier lines. Suppose the 8th vernier line lines up perfectly with a main-scale line.
With a 0.02 mm least count:
- Vernier reading = 8 × 0.02 mm = 0.16 mm
- Total = 24.00 mm + 0.16 mm = 24.16 mm
Pro Reading Tip (Metric)
Don’t overthink “perfect alignment.” Choose the line that matches most cleanly. If two lines look equally aligned, your
eyes are begging for better lightingor you’re holding the caliper at an angle. Adjust your view so you’re looking
straight down at the scale to reduce parallax.
How to Read an Inch Vernier Caliper
Inch vernier calipers can look intimidating because they layer multiple increments. A common setup uses:
0.025 in divisions on the main scale and 0.001 in resolution on the vernier scale.
(Your specific model may vary, but the method is the same.)
The Core Idea
You’ll usually read inches in parts:
- Whole inches from the main scale.
- “Tenths” or larger subdivisions depending on the beam markings.
- 0.025-inch increments from the main scale (common on some vernier designs).
- 0.001-inch increment from the vernier line that aligns.
The best strategy is to follow your caliper’s marking scheme consistently and write the value as you gobecause trying
to “keep it all in your head” is how you end up confidently announcing a measurement that belongs to a different
universe.
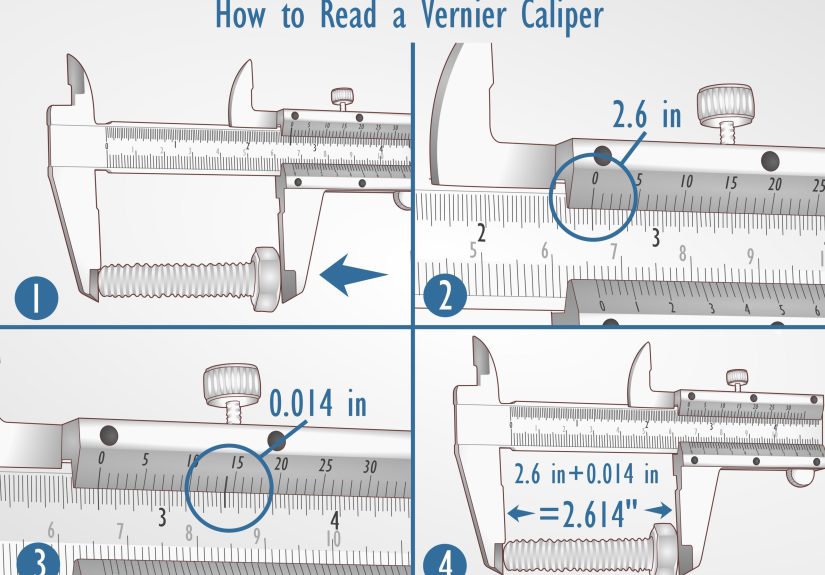
Example: A Typical 0.001 in Vernier Reading
Suppose the vernier zero is just past 1.200 inches on the main scale. So your main scale is 1.200 in.
Now find which vernier line aligns. If the 13th vernier mark aligns and each mark equals 0.001 in:
- Vernier reading = 13 × 0.001 in = 0.013 in
- Total = 1.200 in + 0.013 in = 1.213 in
Reality check: Inch verniers reward patience. Use strong light, keep your eye directly above the scale,
and lock the slider if your hands like to “help” at the wrong time.
Zero Error: When Your Caliper Doesn’t Start at Zero
Sometimes, when the jaws are gently closed, the vernier zero doesn’t line up with the main zero. That’s called
zero error. It can happen from minor wear, a bump, debris on the faces, or a caliper that simply needs
adjustment or calibration.
How to Handle It (Without Tears)
First, clean the jaws again and re-check. If it still doesn’t zero:
- Positive zero error: The caliper reads a small positive value when closed (it’s “starting ahead”).
Correction: Actual measurement = Observed measurement − (zero error) - Negative zero error: The caliper reads slightly below zero when closed (it’s “starting behind”).
Correction: Actual measurement = Observed measurement − (negative zero error)
(which means you’re effectively adding the magnitude)
If you’re doing precision-critical work, don’t just “math your way out” foreverget the caliper checked, especially if
the error changes depending on how you close the jaws.
Tips for Measuring Like You Mean It
These habits separate “I measured it” from “I measured it and trust it.”
Use Gentle, Consistent Pressure
Calipers don’t have the same force-control features as many micrometers. If you squeeze harder, you can slightly flex
the jaws or compress soft materials. Practice on a known object (like a gauge block or a drill shank) until your
readings repeat.
Measure More Than Once
Take at least three readings, especially on round parts or inside measurements. If you get 24.16 mm, 24.18 mm, and
24.15 mm, your “truth” is likely near the clusterand your technique may need a tiny alignment tweak.
Square the Tool to the Feature
Tilt is the silent measurement thief. For thickness, keep jaws perpendicular to the faces. For inside diameter, align
across the true diameter. For depth, keep the base flat.
Watch for Burrs and Edge Rounding
Burrs can add material where you don’t want it; rounded edges can reduce contact area and change where the jaws sit.
If a dimension matters, deburr the part and measure on clean, consistent surfaces.
Use the Lock Screw for Reading (Not for Crushing)
Locking the slide helps you read without the measurement drifting. But lock after you’ve applied the correct pressure
don’t tighten the lock like you’re securing a spaceship hatch.
Care, Storage, and Calibration Basics
A vernier caliper can last a long time if you treat it like a measuring instrument, not a paint can opener.
- Wipe after use: Remove fingerprints and moisture. Lightly oil if recommended for your caliper.
- Store in a case: Keeps dust off the scale and protects the jaws from damage.
- Avoid drops: One fall can introduce jaw misalignment or a permanent zero error.
- Verify periodically: Check against known standards (like gauge blocks) across a few points in the
measuring range. If you use calipers for serious work, formal calibration schedules are worth it.
If you work in a quality-controlled environment, you’ll often see references to standards and best practices for
caliper verification and calibration. Even if you’re a hobbyist, the lesson is simple: don’t assume your tool is
perfect foreverprove it occasionally.
Common Problems and Quick Fixes
“My readings aren’t repeatable.”
- Clean the jaws and part.
- Reduce measuring force.
- Check for burrs or a tilted caliper.
- Try measuring closer to the beam (less chance of jaw flex on some designs).
“I can’t find a vernier line that aligns.”
- Improve lighting and view straight down to reduce parallax.
- Lock the slide so it doesn’t creep.
- Make sure you’re reading the correct vernier (some calipers have dual scales).
“Zero doesn’t line up, but only sometimes.”
- Look for debris on the measuring faces.
- Check if the slider is loose or sticky.
- If the problem persists, the caliper may need service or calibration.
Hands-On Experiences: Real Lessons From Real Measuring (Extra Practical Stories)
The first time most people use a vernier caliper, they assume it works like a fancy ruler: clamp, read, done. Then
reality shows up and says, “Nice try.” My favorite early lesson comes from measuring a 3D-printed part that was
supposed to be 20.00 mm wide. I got 19.92 mm, 20.08 mm, and 20.01 mmthree measurements that could not possibly all be
“the answer” unless the part was secretly quantum. The fix wasn’t buying a new caliper. It was learning to keep the
jaws square to the surface and using a consistent, gentle pressure instead of squeezing like I was testing the part’s
willpower.
Another classic experience: measuring inside diameters. Inside jaws are small, and holes are sneaky. If the caliper is
even slightly angled, you’ll measure a chord instead of the true diameter and get a smaller number. I once “proved” a
drilled hole was undersized, swapped drill bits, drilled again, and still “proved” it was undersized. Plot twist: the
hole was fine; my angle was not. The moment I started gently rocking the caliper inside the hole to find the maximum
reading (while staying aligned), the measurement suddenly behaved like a grown-up.
Depth measurement has its own personality. I used to measure countersinks and recesses by holding the caliper in the
air like a microphonedramatic, but inaccurate. When the base isn’t flat against the reference surface, the depth rod
gives you a reading that’s more “interpretive dance” than metrology. Once I made it a rule to plant the caliper base
flat and steady, my depth readings became repeatable. Not perfect, but at least consistently honest.
And then there’s the vernier scale itselfthe part that scares people off. I’ve taught friends the trick by comparing
it to finding the one matching sock in a laundry basket. You’re scanning for the single line that matches perfectly.
Once you find it, you’re not “doing math,” you’re just translating a pattern into a number. The first few reads are
slow, sure. But after a dozen practice measurementscoins, drill bits, hex keys, even a pencilyou’ll start spotting
the alignment line quickly. Your eyes learn the game.
One more practical lesson: write down the main scale reading before hunting for the vernier match. It sounds basic,
but it prevents brain glitchesespecially on inch verniers where multiple subdivisions are in play. I’ve seen smart
people find the correct aligned vernier line and then add it to the wrong base value. The result looks beautifully
precise…and is beautifully incorrect. A quick scribble like “Main = 1.200 in” anchors the reading so you don’t drift.
Finally, the “feel” issue is real. Calipers don’t automatically control force, and soft materials (wood, plastic,
rubber) will happily compress under pressure. I once measured a rubber grommet three times and watched the diameter
shrink as I got more confidentbecause my confidence came with extra squeezing. The fix was treating the jaws like
contact sensors, not clamps. Light contact, consistent technique, multiple readings, andwhen in doubtmeasure a hard
reference item to check your touch. The caliper isn’t fragile, but your measurement can be.
Conclusion
Using a vernier caliper well is a mix of technique and reading skill. Clean the jaws, confirm zero, choose the right
measuring feature (outside, inside, depth, or step), and apply gentle, consistent pressure. When reading, take the
main scale value first, then find the single vernier line that aligns and add that fraction based on the caliper’s
resolution. With a little practice, you’ll get fast, repeatable measurements you can actually trustand you’ll stop
blaming the tool for what was really a “human settings” problem.


