Table of Contents >> Show >> Hide
- Why a Dresser Makes a Great Bench Base
- Pick the Right Dresser (Your Future Self Will Thank You)
- Tools and Materials
- Safety First: Old Furniture Can Hide New Problems
- Step-by-Step: Turn an Old Dresser Into a Bench Seat
- Step 1: Plan your bench layout (the “don’t wing it” moment)
- Step 2: Remove drawers, hardware, and drawer slides
- Step 3: Decide how much to cut (and where)
- Step 4: Reinforce the frame (this is what makes it a real bench)
- Step 5: Build the open bench cavity (optional, but popular)
- Step 6: Add the seat top (plywood or the original dresser top)
- Step 7: Fix surface damage (holes, gouges, and the “oops” zone)
- Step 8: Sand, clean, and prep for finish
- Step 9: Prime and paint (or stain and seal)
- Step 10: Add the comfort factor (a cushion that looks like it belongs)
- Step 11: Style upgrades that make it look custom
- Common Mistakes (and How to Avoid the Bench of Regret)
- FAQs: Quick Answers Before You Grab the Saw
- of Real-World Experience: What This Project Feels Like (and What You’ll Learn)
- Conclusion
Old dresser, meet your second life. If you’ve got a tired chest of drawers taking up space (or haunting your garage like a wooden ghost of “someday”), turning it into a bench seat with storage is one of the smartest upcycles you can do. You get a functional place to sit, a spot to stash shoes/bags/blankets, and the smug satisfaction of rescuing furniture from a landfill. Also: you’ll never look at a curb-side dresser the same way again.
This guide walks you through a sturdy, good-looking dresser-to-bench transformationthe kind that works in an entryway, mudroom, hallway, or even at the foot of a bed. We’ll cover planning, safe prep, structural reinforcement (because benches have to hold actual humans), finishing like a pro, and cushion options that don’t scream “I stapled this in five minutes” (unless you want them to).
Why a Dresser Makes a Great Bench Base
A dresser is basically a ready-made box frame: it already has vertical sides, internal supports, and storage compartments. Converting it into a bench usually means removing or rearranging some drawer sections, reinforcing the frame, and adding a strong seat top. The best part: you can keep drawers (or convert openings into cubbies) so your bench still earns its keep.
Best places to use a dresser bench seat
- Entryway bench: sit down to put on shoes, store hats/scarves inside.
- Mudroom bench: add hooks above and you’ve got a mini landing zone.
- Kid-friendly storage bench: keep toys in drawers, keep chaos in check (sort of).
- Bedroom bench: stash extra linens and pretend you live in a fancy catalog.
Pick the Right Dresser (Your Future Self Will Thank You)
Not every dresser is a good bench candidate. Some were built to last decades; others were built to last until the moving truck shows up. Here’s how to choose wisely.
Look for these “yes” signs
- Solid frame: it doesn’t rack (twist) when you push on the corners.
- Real wood or sturdy plywood: better for screws and reinforcement.
- Simple shape: flat sides and a level base make the conversion easier.
- Depth of at least ~16 inches: enough seat depth to be comfortable.
Proceed with caution if…
- It’s mostly particleboard/MDF and already crumblingstill possible, but reinforcement and fastening must be gentle and strategic.
- Veneer is peelingfixable, but you’ll need patching, sanding, and patience.
- It smells like a basement time capsulecleaning and sealing can help, but don’t trap odors under paint without prep.
Tools and Materials
You don’t need a full woodshop. You do need the basicsand a willingness to measure twice and cut once (or measure once, cut once, and then measure again while questioning your life choices).
Tools
- Drill/driver + bits
- Jigsaw or circular saw (jigsaw is great for notches and tight cuts)
- Pry bar and hammer (for removing drawer guides and trim)
- Measuring tape, square, pencil
- Clamps (helpful, not mandatory)
- Sander or sanding block (80/120/220 grit is a solid lineup)
- Safety gear: gloves, eye protection, and a quality dust mask/respirator
Materials
- Seat top: 3/4-inch plywood or the original dresser top (if solid)
- 1×3 or 1×4 boards for internal bracing and seat supports
- Wood screws (1-1/4″ and 2″ are common), wood glue
- Wood filler (for old hardware holes and dings)
- Primer + paint (or stain + topcoat)
- Optional: beadboard panel, trim/molding, hinges (for lift-top seat), new knobs/pulls
- Foam + batting + upholstery fabric (for cushion), plus a staple gun
- Optional: furniture feet, leveling pads, or casters
Safety First: Old Furniture Can Hide New Problems
Before you sand like a movie montage, take a beat. Older painted furniture can contain lead-based paint. If you suspect an older finish, treat dust like the enemy: contain it, clean it, and keep it out of your lungs and living space. Work in a ventilated area, use a HEPA vacuum if possible, and wear proper protection.
Quick safety checklist:
- Work outside or in a well-ventilated garage with doors open.
- Lay down a drop cloth to catch dust and paint chips.
- Wear eye protection and a respirator rated for fine dust.
- Keep kids and pets away from the workspace.
- Lift carefullydressers are heavier than they look (and more spiteful than they look, too).
Step-by-Step: Turn an Old Dresser Into a Bench Seat
This method creates a classic bench: open space (or cubbies) up top, drawers down below. You can customize the layout, but the structural logic stays the same: remove what you don’t need, reinforce what remains, then add a strong seat.
Step 1: Plan your bench layout (the “don’t wing it” moment)
Decide what you want the finished bench to do:
- Option A: Keep bottom drawers for hidden storage.
- Option B: Convert drawers to cubbies (great for baskets and shoes).
- Option C: Split storageone side drawers, one side open compartment.
Measure your dresser and pick a comfortable bench height. Many benches land around 18 inches seat height, but you can go a bit higher if you’re building an entryway perch for taller adults. If your dresser is too tall, you can cut it downjust be prepared for extra reinforcement work.
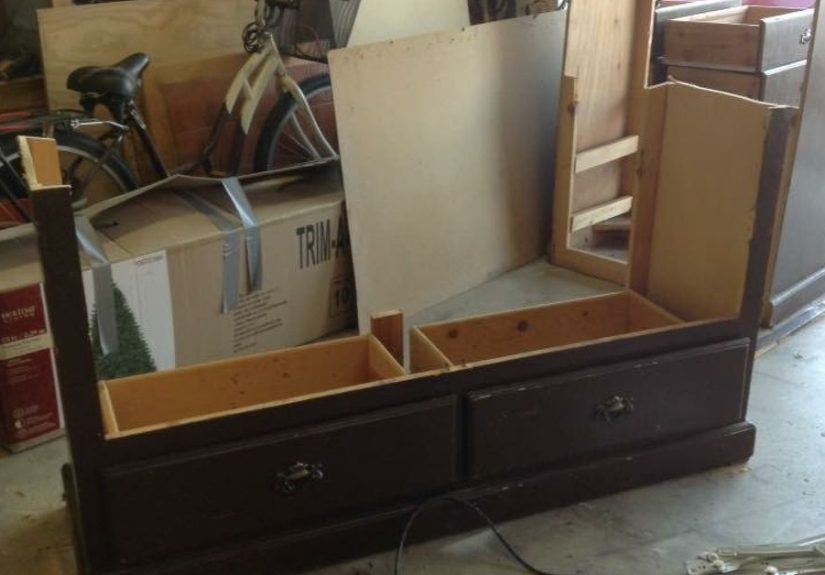
Step 2: Remove drawers, hardware, and drawer slides
- Pull out all drawers.
- Remove knobs/pulls and set aside if reusing.
- Unscrew drawer slides and guides inside the dresser (anything that blocks a seating cavity).
- If there’s a center divider that won’t fit your plan, mark it for removal later.
Tip: Put screws in labeled bags. “Mystery Screw: Probably Important” is not a system. It’s a cry for help.
Step 3: Decide how much to cut (and where)
Many dresser benches keep the dresser’s main outer shell intact. If you want the bench shorter, you can cut off the top portion (often removing the top drawer row area). Use painter’s tape to mark cut lines and a square to keep them straight.
- Minimal-cut method: remove internal guides and add a seat top over the existing frame.
- Shorten-and-convert method: remove the top section so the bench feels purpose-built, not “dresser wearing a bench costume.”
Step 4: Reinforce the frame (this is what makes it a real bench)
Dressers were designed to hold clothes, not repeated human plops. To prevent sagging or wobble, add supports where the seat will sit.
- Add horizontal cleats (1×3 or 1×4) along the inside left and right walls, level with where the seat top will rest.
- Add a front-to-back center support if the bench span is wide (especially if you removed internal dividers).
- If you kept drawers, reinforce around the drawer openings so the front frame stays rigid.
- Use wood glue + screws for strength (pre-drill to avoid splitting).
If your household includes “people who sit dramatically,” add an extra brace. No one ever regretted a sturdy bench.
Step 5: Build the open bench cavity (optional, but popular)
If you want an open seating cavity (instead of drawers all the way up), remove the top drawer dividers and guides in that section. You can cover the interior back wall with beadboard or reclaimed drawer fronts for a finished look.
Step 6: Add the seat top (plywood or the original dresser top)
Your seat top needs to be strong, flat, and securely attached.
- Cut a piece of 3/4-inch plywood to match the dresser’s top footprint (or slightly overhang for comfort).
- Dry-fit it and notch corners if needed.
- Attach it from underneath through your cleats/supports so the screw heads don’t show.
- If you want a lift-top seat, hinge the plywood at the back and add a lid support hinge so it doesn’t slam shut.
Pro tip: If the original dresser top is solid wood and in good shape, you can reuse it as the seatjust reinforce beneath it the same way you would plywood.
Step 7: Fix surface damage (holes, gouges, and the “oops” zone)
Fill old hardware holes, deep scratches, and dents with wood filler. Let it dry fully, then sand smooth. For veneer that’s lifting, glue it down and clamp. For veneer that’s missing, patch with filler or replace with a trim detail that looks intentional.
Step 8: Sand, clean, and prep for finish
Sanding isn’t about punishing yourself; it’s about giving primer and paint something to grip. Sand glossy surfaces to dull them, then remove dust thoroughly (a vacuum + tack cloth or damp microfiber works well). Clean surfaces so your finish sticks to woodnot to dust.
Step 9: Prime and paint (or stain and seal)
Choose your vibe:
- Painted bench: best for mixed materials and heavily worn surfaces.
- Stained bench: best for solid wood with nice grain and minimal patching.
For paint, apply primer first, especially over stained or glossy wood. Then add 2–3 thin coats of paint, letting each coat dry fully. Lightly sand between coats if you want a smoother finish, and always wipe away dust before the next coat.
For durability (especially in entryways), finish with a protective topcoat suited to your paint type.
Step 10: Add the comfort factor (a cushion that looks like it belongs)
A bench seat becomes dramatically more useful when it’s comfortable. You’ve got options:
- Simple foam cushion: cut upholstery foam to size, wrap in batting, staple fabric underneath a plywood base.
- Tufted cushion: prettier, more effort, more “I definitely have my life together.”
- No cushion: works if you prefer a clean lookjust sand the seat edges slightly so it’s not a shin-hunter.
Smart move: Attach the cushion with Velcro strips so you can remove it for cleaning. Because shoes, dogs, and life happen.
Step 11: Style upgrades that make it look custom
- Add beadboard to the back or inside walls for a mudroom look.
- Install new hardware (modern pulls, vintage knobs, or something delightfully weird).
- Add trim around the base to hide old damage and “frame” the piece.
- Use baskets in cubbies for a tidy, intentional finish.
- Mount hooks above the bench for coats and bagsinstant command center.
Common Mistakes (and How to Avoid the Bench of Regret)
Mistake 1: A seat top that sags
Fix: Add center supports and side cleats. Use 3/4-inch plywood (or thicker) for the seat. Don’t rely on thin panels for a sitting surface.
Mistake 2: Wobble and racking
Fix: Tighten the frame with internal bracing, corner blocks, and wood glue. If the base is uneven, add leveling feet or furniture pads.
Mistake 3: Paint that chips easily
Fix: Prep better (sand + clean), prime when needed, and use a durable paint/topcoat system. Thin coats beat thick coats every time.
FAQs: Quick Answers Before You Grab the Saw
Do I have to cut the dresser?
No. Many successful dresser bench seats use the existing shell and simply remove internal drawer hardware where needed, then add a reinforced seat top.
Can I keep all the drawers?
You can, but then it’s more of a “dresser with a cushion” than a bench conversion. If your goal is a true bench seat, most designs create at least one open seating section.
What’s the best paint for an entryway bench?
Look for a durable furniture paint or cabinet-grade enamel, and consider a protective topcoat if the bench will see heavy use.
of Real-World Experience: What This Project Feels Like (and What You’ll Learn)
Turning an old dresser into a bench seat sounds straightforwarduntil you meet the dresser’s personality. And yes, furniture has personality. Some pieces are cooperative and square; others are… spiritually “off by 1/8 inch” everywhere. One of the most common experiences DIYers report is the moment they remove the drawers and realize the inside looks like a wooden roller coaster: random supports, stubborn rails, and a few mysterious blocks that seem to exist purely to confuse modern humans.
The first lesson you’ll learn is that planning saves your sanity. When you sketch your bench layoutdrawers below, open cavity above, maybe cubbiesyou stop making decisions mid-cut. That matters because once you remove a divider, you can’t exactly glue your confidence back into place. A quick dry-fit with painter’s tape marking your “seat line” makes it easier to visualize where bracing should go and whether your cushion will look snug or like a mattress trying to escape.
The second big experience: reinforcement is the difference between “bench” and “dangerous suggestion of a bench.” Dressers are designed to carry weight vertically through side panels and internal supports, but sitting introduces a different kind of stress. If you remove too many internal pieces without replacing them with cleats and a center brace, the seat top can flex. People often describe the first “test sit” as a moment of trutheither a triumphant success or a suspicious creak that makes everyone stand up at the exact same time. The cure is simple: add more support than you think you need, especially across wider spans.
Another real-world surprise is how much time goes into surface prep. It’s tempting to rush to the “fun part” (paint color! new knobs! dramatic reveal!), but sanding and cleaning are where the finish is won or lost. Many DIYers say the project felt 60% prep, 30% building, and 10% admiring themselves for being “the kind of person who upcycles.” If you’re painting, expect at least two coats of primer/paint and enough drying time that you’ll start narrating your life like, “I can’t go out tonight. My bench is drying.”
Finally, you’ll gain a weirdly satisfying skill: making imperfect furniture look intentional. A tiny gap becomes a trim detail. A patched area becomes a painted accent. An uneven floor becomes an excuse to add leveling feet and call it “custom.” By the end, the best part isn’t just the bench seatit’s the confidence that the next time you see a sad old dresser, you won’t see junk. You’ll see a future mudroom hero with storage, style, and a story.
Conclusion
When you turn an old dresser into a bench seat, you’re not just making furnitureyou’re building function: a place to sit, storage that actually works, and a piece with character that big-box benches rarely have. Take your time with planning and reinforcement, prep your surfaces like you mean it, and choose finishes that fit how the bench will be used. Then add a cushion, step back, and enjoy the moment when your “old dresser” becomes the most complimented seat in the house.


