Table of Contents >> Show >> Hide
- Quick “Do I Need Help Now?” Check
- What You’ll Want on Hand
- 15 Steps to Treat an Open Wound
- Step 1: Pause and size it up (yes, this counts as first aid)
- Step 2: Wash your hands (or glove up)
- Step 3: Stop the bleeding with steady pressure
- Step 4: Rinse the wound under clean running water
- Step 5: Clean the skin around it with mild soap
- Step 6: Remove visible debris only if it’s easy and shallow
- Step 7: Pat drydon’t scrub
- Step 8: Keep the wound comfortably moist (yes, moist)
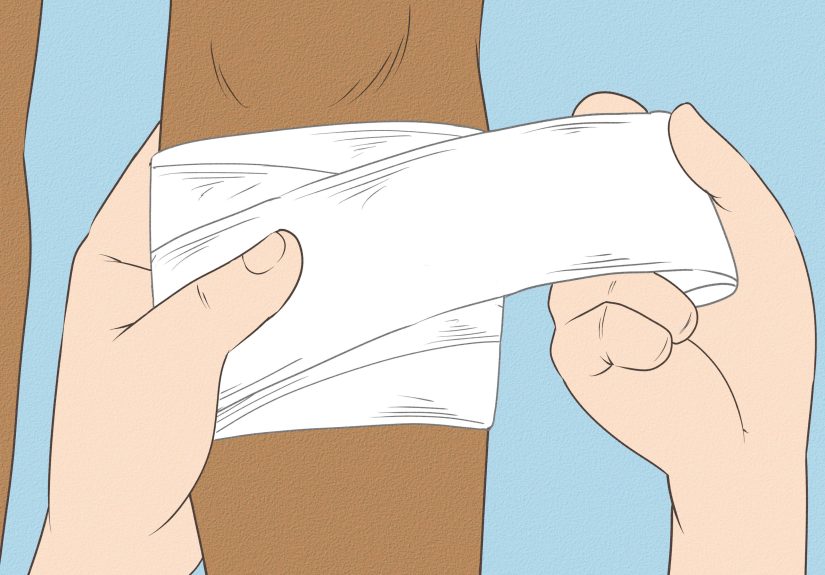
- Step 9: Cover it with a clean dressing
- Step 10: Change the dressing at least daily (or sooner if wet/dirty)
- Step 11: Manage swelling and throbbing the smart way
- Step 12: Avoid the “wound sabotage” habits
- Step 13: Watch for infection like a detective, not a doom-scroller
- Step 14: Think about tetanus (and bites/punctures especially)
- Step 15: Know when to get stitches or urgent care
- Extra Guidance by Wound Type
- Why These Steps Work (The Quick Healing Science)
- Common Mistakes That Slow Healing
- Real-World Examples (So You Can Picture It)
- Experiences Related to “How to Treat an Open Wound: 15 Steps” (About )
- Conclusion
Important: This guide is for general first-aid and everyday minor wounds. If you’re a teen, loop in a trusted adult. If the bleeding is heavy, the wound is deep/gaping, it came from a bite, or you’re not sure what you’re looking at, get medical help right away.
Quick “Do I Need Help Now?” Check
Skip the internet and get urgent care or call emergency services if any of these are true:
- You can’t stop bleeding after steady pressure.
- Blood is spurting or soaking through layers of cloth/bandages quickly.
- The wound is deep, jagged, gaping, or on the face, genitals, hands, or over a joint.
- You see something embedded (glass/metal/wood) that you can’t remove easily, or a large object is stuck in place.
- The injury came from an animal or human bite, a dirty/rusty object, or a puncture wound.
- There’s numbness, trouble moving the area normally, or severe pain.
- You notice signs of infection (worsening redness, warmth, swelling, pus, fever, or red streaking).
What You’ll Want on Hand
You don’t need a TV medical drama setup. A simple “wound-care snack tray” usually does the job:
- Clean running water (or sterile saline if available)
- Mild soap
- Clean gauze or a clean cloth
- Bandages (adhesive bandages, gauze pads, paper tape, or rolled gauze)
- Petroleum jelly (or a small amount of antibiotic ointment, if appropriate)
- Alcohol wipes (for cleaning tweezers, not for pouring in the wound)
- Tweezers (only for shallow debris you can see and remove easily)
- Optional: nonstick dressing, elastic wrap, disposable gloves
15 Steps to Treat an Open Wound
Step 1: Pause and size it up (yes, this counts as first aid)
Take a breath. A surprising number of “panic-worthy” cuts are actually manageable with calm pressure and cleaning. Check: where is it, how big is it, and is bleeding slowing down? If the wound is deep, gaping, caused by a bite, or bleeding won’t stopjump to Step 15 (get help).
Step 2: Wash your hands (or glove up)
Your hands are basically tiny germ taxis. Wash with soap and water before touching the wound. If you’re helping someone else and you have disposable gloves, use them.
Step 3: Stop the bleeding with steady pressure
Use clean gauze or a clean cloth and press firmly on the wound. Keep pressure steadydon’t “peek” every 10 seconds like it’s a text notification. If blood soaks through, add another layer on top. If bleeding is life-threatening and on an arm or leg, a tourniquet may be appropriate if one is available and you know how to use it, and you should get emergency help immediately.
Step 4: Rinse the wound under clean running water
Once bleeding is controlled, rinse the wound with clean running water. This is one of the best ways to lower infection risk because it flushes out dirt and bacteria. Think “gentle waterfall,” not “power washer.”
Step 5: Clean the skin around it with mild soap
Wash the surrounding skin with mild soap and water. Try not to get soap deep into the wound. Also: skip the old-school “this will sting but it’s good for you” options like hydrogen peroxide or iodine directly in the woundthose can irritate tissue and slow healing.
Step 6: Remove visible debris only if it’s easy and shallow
If you see a small speck of dirt or sand, you can try removing it with tweezers cleaned with alcohol. If debris is stuck, deep, or you can’t get it out easily, don’t digget medical care. Your goal is clean healing, not an amateur archaeology expedition.
Step 7: Pat drydon’t scrub
Gently pat the area dry with clean gauze or a clean towel. Scrubbing can restart bleeding and irritate the tissue that’s trying to heal.
Step 8: Keep the wound comfortably moist (yes, moist)
Contrary to the “air it out” myth, many minor wounds heal better when they’re kept slightly moist. A thin layer of petroleum jelly helps prevent drying and scab overgrowth, which can slow healing and worsen scarring.
If you choose an antibiotic ointment, use a thin layer and stop if you develop a rash or irritation. Petroleum jelly is often enough for clean minor cuts and scrapes.
Step 9: Cover it with a clean dressing
Covering the wound keeps it clean and protected from friction (and from the universe’s favorite hobby: finding your wound and bumping it on everything). Use a bandage, nonstick pad, or sterile gauze secured with tape.
Step 10: Change the dressing at least daily (or sooner if wet/dirty)
Remove the bandage, rinse/clean gently, reapply a thin layer of petroleum jelly (or ointment if appropriate), and cover again. If the bandage gets wet, sweaty, or dirty, change it soonerbacteria love a damp “hangout spot.”
Step 11: Manage swelling and throbbing the smart way
Elevate the injured area when possible. A cool compress near (not directly on exposed tissue) can help with swelling. For pain, only use over-the-counter medication if it’s safe for you and allowed by your parent/guardianfollow label directions and avoid mixing meds that shouldn’t be combined.
Step 12: Avoid the “wound sabotage” habits
- Don’t pick scabs or scratch healing skin.
- Don’t blow on it (your breath is not sterile, no matter how minty you feel).
- Don’t soak it in a tub/pool until it’s well sealed and healing; brief showers are usually better than long soaks.
- Don’t use harsh chemicals in the wound (peroxide/iodine/alcohol can be irritating).
Step 13: Watch for infection like a detective, not a doom-scroller
Check once or twice a day. Early warning signs include increasing redness that spreads, worsening swelling, warmth, increasing pain, pus-like drainage, bad odor, fever, or red streaking. If you notice these, contact a healthcare professional promptly.
Step 14: Think about tetanus (and bites/punctures especially)
Tetanus prevention depends on the type of wound and your vaccine history. Dirty wounds, punctures, and bites are higher risk than clean shallow scrapes. If you’re not up to date on your tetanus shotsor you’re not surethis is a great moment to ask a parent/guardian and contact a clinic. Some situations require a booster, and certain high-risk wounds may require additional medical prevention.
Step 15: Know when to get stitches or urgent care
Go in for medical care if the cut is deep, gaping, jagged, on the face/hand/over a joint, caused by a bite, or if you can’t stop bleeding. Timing can matter: many cuts that need closure are ideally treated within hours, and infection risk can rise the longer a wound stays open. If you’re unsure, it’s better to be seen than to “wait and hope.”
Extra Guidance by Wound Type
Scrapes (abrasions)
Scrapes often look dramatic because they ooze, but they’re usually shallow. Rinse thoroughly to remove grit (this is the big one), keep it moist with petroleum jelly, and cover with a nonstick dressing. Change daily.
Puncture wounds
Punctures can be small on the outside but deeper than they look. They’re harder to clean thoroughly, so consider medical adviceespecially if the object was dirty, it’s a foot puncture, or you’re not sure about tetanus protection.
Bites (animal or human)
Bites deserve professional attention because infection risk is higher. Wash with soap and water right away and seek medical care promptly, even if the wound seems “not that bad.”
Why These Steps Work (The Quick Healing Science)
Wound healing is a team effort: your body stops bleeding, sends in inflammation to clean up, rebuilds tissue, and then strengthens the area over time. Keeping a wound clean reduces infection risk. Keeping it gently moist helps new skin cells move across the surface more efficiently, often improving comfort and minimizing scarring. Covering it protects that process from friction, dirt, and accidental re-injury (like the classic “caught my cut on my hoodie zipper” incident).
Common Mistakes That Slow Healing
- Over-disinfecting: Harsh chemicals can irritate tissue and delay healing.
- Letting it dry out completely: Cracking and thick scabbing can prolong healing and worsen scarring.
- Changing bandages too rarely: Old, wet dressings invite bacteria to throw a party.
- Ignoring pain that’s getting worse: Increasing pain can be a warning sign, especially with spreading redness or swelling.
- Skipping medical care for high-risk wounds: Bites, deep cuts, and punctures often need professional evaluation.
Real-World Examples (So You Can Picture It)
Example 1: The kitchen slip
You nick your finger while slicing fruit. You wash your hands, apply steady pressure for a few minutes, rinse under running water, wash around it with soap, apply a thin layer of petroleum jelly, and bandage. You change the bandage the next day and keep an eye out for spreading redness. If the cut gapes open when you relax your finger, that’s a clue you might need medical closure.
Example 2: The bike scrape
You wipe out on a sidewalk and scrape your knee. You rinse for longer than you think you need (getting the grit out matters), pat dry, apply petroleum jelly, cover with a nonstick dressing, and change it daily. It heals faster when it’s protected from friction, especially if you’re walking a lot.
Experiences Related to “How to Treat an Open Wound: 15 Steps” (About )
Most people don’t plan to practice wound careit just shows up like an uninvited guest. One minute you’re opening a package, playing a sport, or helping in the kitchen, and the next minute you’re staring at a cut thinking, “Okay… now what?” A common experience is realizing that the first few seconds matter most: people who get calm pressure on a wound quickly usually feel more in control, and they often stop the bleeding faster than the folks who keep swapping tissues like they’re trying to confuse the cut into quitting.
Another real-life lesson: rinsing takes longer than you want it to. If you’ve ever had a scrape with tiny bits of dirt, you know the temptation is to do a quick splash and call it a day. But people often report that the wound that was rinsed thoroughly (even if it was annoying) tends to heal with fewer problems. It’s not glamorous, but flushing out grit is one of those “boring steps” that quietly wins the game. Think of it like cleaning a smoothie blender: you can ignore the stuck bits, but future-you will have regrets.
There’s also the myth-busting moment many people run into: the idea that a wound must “air out.” Plenty of folks try leaving a cut uncovered, only to discover it cracks, sticks to clothing, or gets bumped repeatedly. Keeping a wound lightly moist with petroleum jelly and covered with a clean dressing often feels better and can reduce the whole “why does this hurt every time I move?” situation. A lot of people learn this after the first bandage removal, when the dressing comes off easily and the wound looks calmer than expected.
Bandage changes are another experience-driven skill. At first, people tend to either change dressings too often (because they’re worried) or not often enough (because it’s inconvenient). The sweet spot is usually consistent daily cleaning and changing, plus extra changes if the dressing gets wet or dirty. And yessomeone always learns the hard way that blowing on a wound doesn’t help. It’s basically sending tiny airborne “guests” to a healing party that did not ask for them.
Finally, many people say the biggest confidence boost is knowing when to stop DIY-ing. Recognizing “this might need stitches,” “this is a bite,” or “I’m not sure about tetanus protection” can be the difference between a smooth recovery and a stressful week. The most practical experience-based takeaway is simple: do the basics well (pressure, rinse, protect, monitor), and don’t hesitate to get help when the wound is high-risk or not improving. That’s not overreactingthat’s smart first aid.
Conclusion
Treating an open wound well is mostly about doing a few simple things consistently: stop the bleeding, rinse thoroughly, keep it clean, keep it gently moist, cover it, and watch for warning signs. When in doubtespecially with deep cuts, bites, punctures, or uncontrolled bleedingget medical care. Your future self (and your skin) will thank you.