Table of Contents >> Show >> Hide
- First, Pick Your Strategy (This Choice Determines Everything)
- Before You Touch Anything: A Smart Pre-Flight Checklist
- Method 1 (Recommended): Clone the Old Drive to the New Drive
- Step-by-Step Cloning Workflow
- Step 1: Connect the New Drive
- Step 2: Open Your Cloning Tool and Choose “Disk Clone”
- Step 3: Copy All Needed Partitions (Not Just C:)
- Step 4: Expand the Main Partition (If the New Drive Is Larger)
- Step 5: Run the Clone and Let It Finish
- Step 6: Swap Drives (If Needed) and Set Boot Order
- Step 7: Boot and Verify
- Step 8: Only After You’re ConfidentWipe or Repurpose the Old Drive
- Method 2: Use a System Image Backup (Windows Built-In Approach)
- Method 3: Clean Install + Transfer Data + Reinstall Programs
- “Can I Just Copy Programs Over?” (The Honest Answer)
- Mac Users: Time Machine + Migration Assistant Makes This Smoother
- After the Transfer: A Quick “Don’t Skip This” Checklist
- Troubleshooting: Common Problems (and What They Usually Mean)
- FAQ
- Real-World Experiences (The Stuff Guides Don’t Always Mention) Extra Notes
- Experience #1: “I Cloned to a Bigger Drive… Why Do I Still Have the Same Space?”
- Experience #2: “Everything Copied… But My Favorite App Won’t Open”
- Experience #3: “I Tried Copy/Paste for Program Files and Now Nothing Works”
- Experience #4: “My New SSD Boots… But It Boots the Old Drive Instead”
- Experience #5: “I Upgraded Hardware and Windows Activation Got Grumpy”
- Experience #6: “I Forgot About BitLocker and Now I’m Staring at a Recovery Screen”
- Conclusion
Upgrading to a new hard drive (or SSD) is one of the few life choices that can make you feel instantly smarter. Your computer boots faster, apps open before you can finish blinking, and that “low disk space” warning finally stops haunting you like a tiny digital ghost.
But then reality shows up holding a clipboard: How do I move everythingfiles, settings, and my actual programswithout breaking Windows or spending my weekend reinstalling 47 apps? Good news: you have a few solid options, and one of them is usually painless.
First, Pick Your Strategy (This Choice Determines Everything)
There are two main ways to transfer your life to a new drive. One keeps your programs. One usually doesn’t. Choosing the right approach is the difference between “done in an hour” and “why is my printer angry?”
Option A: Clone or Image the Old Drive (Best for Moving Programs)
A clone is a near 1:1 copy of your old drive onto the new one. When it works (and it usually does), you boot up on the new drive and everything looks the same: Windows, apps, settings, bookmarks, filesthe whole crew.
Option B: Clean Install + Restore Data (Best for a Fresh Start)
This means installing Windows/macOS on the new drive, then copying your files back and reinstalling programs. It’s cleaner, but it’s more workespecially if your software collection is “every tool I’ve ever downloaded since 2016.”
If your #1 goal is transferring programs, cloning or restoring a full system image is the usual winner. If your #1 goal is getting rid of weird glitches, bloatware, or malware, clean install is often the healthier choice.
Before You Touch Anything: A Smart Pre-Flight Checklist
Think of this as putting a seatbelt on your data. You might not crash, but if you do, you’ll be glad you weren’t raw-dogging your operating system.
1) Back Up the Stuff You Can’t Replace
- Personal files: Documents, photos, videos, school/work folders.
- App data: Game saves, project files, Outlook data files, creative libraries.
- Browser essentials: bookmarks and password manager backups (if needed).
You can back up to an external drive, a cloud service, or a full backup system. The goal is simple: if the cloning or install goes sideways, you still have your important stuff.
2) Make Sure the New Drive Can Hold the Old Drive’s Used Space
If your old drive is 1TB but you’re only using 320GB, you can clone to a 500GB drive. If you’re using 700GB, you can’t magically cram it into 500GB (compression is not wizardry). Delete junk or move big files off first if needed.
3) Gather Installers and License Info (Just in Case)
Even with cloning, some apps will ask you to sign in again, re-activate, or confirm a license. Take a few minutes to locate:
- Logins for major software (Adobe, Microsoft 365, CAD tools, etc.).
- Any product keys you still rely on.
- Install files for niche tools you don’t want to hunt down later.
4) If You Use Drive Encryption (BitLocker), Plan for It
If your system drive is encrypted with BitLocker, cloning and boot changes can trigger recovery prompts. At minimum, make sure you can access your BitLocker recovery key. In some cases, temporarily suspending protection before major boot-component changes can prevent drama.
5) Create Recovery Media (So You Can Fix Boot Issues)
If Windows doesn’t boot after the move, recovery media can save you. A recovery drive or rescue USB from your cloning tool is the “spare tire” of drive upgrades.
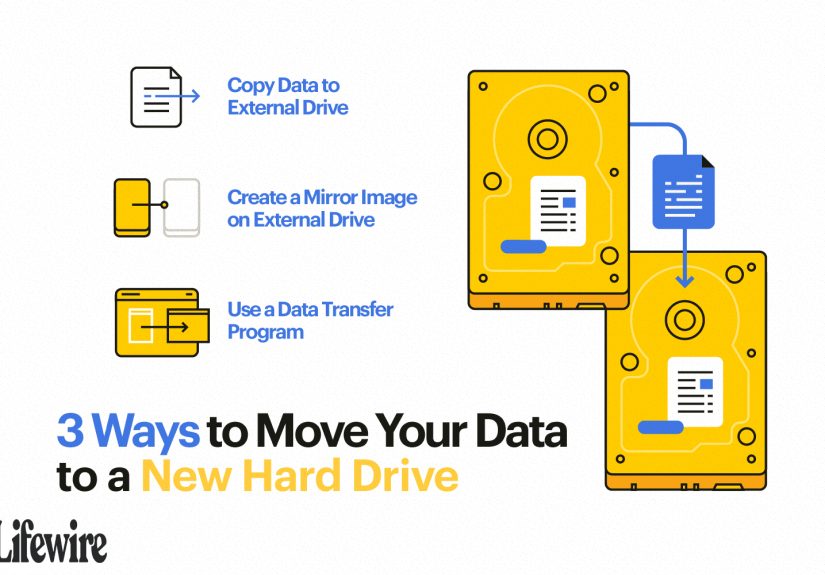
Method 1 (Recommended): Clone the Old Drive to the New Drive
Cloning is the closest thing to “move everything, keep programs, don’t start over.” You can do it with reputable cloning tools (some SSD makers also provide migration software). The exact buttons differ, but the logic is the same.
Step-by-Step Cloning Workflow
Step 1: Connect the New Drive
- Desktop: Install the new drive internally if you have space.
- Laptop: Use a USB-to-SATA/NVMe enclosure or adapter, then swap the drive after cloning.
Step 2: Open Your Cloning Tool and Choose “Disk Clone”
Pick the source (your old drive) and the destination (your new drive). Triple-check this. Selecting the wrong destination can wipe the wrong diskaka the opposite of your goals.
Step 3: Copy All Needed Partitions (Not Just C:)
On modern Windows systems, boot files often live in separate partitions (like EFI/System partitions). If you only clone the main Windows partition, the new drive might not boot. Most cloning tools handle this automatically when you choose the entire disk.
Step 4: Expand the Main Partition (If the New Drive Is Larger)
If you’re moving from a smaller drive to a larger one, make sure the clone uses the extra space. Many tools can “resize to fit” during the clone, but it’s worth verifying before you hit Start.
Step 5: Run the Clone and Let It Finish
Cloning time depends on how much data you’re copying and how fast your connection is. Keep the machine plugged in and avoid doing anything “interesting” during the copythis is not the moment to install GPU drivers.
Step 6: Swap Drives (If Needed) and Set Boot Order
- If the new drive is now internal, reboot and enter BIOS/UEFI.
- Set the new drive as the first boot device.
Step 7: Boot and Verify
If Windows loads normally, do a quick reality check:
- Open a few key apps (browser, Office, your must-have tools).
- Confirm you can access Documents, Desktop, Downloads.
- Check storage capacity shows the new drive size.
Step 8: Only After You’re ConfidentWipe or Repurpose the Old Drive
Don’t erase the old drive on “Day 0.” Keep it intact until you’ve had a few successful boots and you’re sure your data and programs behave normally. Then you can format it for extra storage or keep it as an emergency fallback.
Method 2: Use a System Image Backup (Windows Built-In Approach)
If you prefer Microsoft’s built-in tools, creating a system image is a classic path: you capture a full image of your current setup and restore it onto the new drive. It’s a bit more old-school than modern cloning tools, but it can work well.
High-Level Steps
- Create a system image and store it on an external drive.
- Create or have recovery media ready.
- Install the new drive.
- Boot into recovery and restore the system image to the new drive.
This method is especially handy if you can’t directly connect both drives at once, or if you want a “snapshot” you can restore later.
Method 3: Clean Install + Transfer Data + Reinstall Programs
Clean installing is the “spring cleaning” method: you install a fresh OS, bring your files back, and reinstall the apps you actually use (not the ones you downloaded once in a panic).
When a Clean Install Is the Better Move
- Your system is unstable, slow, or possibly infected.
- You want to remove years of clutter and mystery startup items.
- You’re changing more hardware than just the drive (especially motherboard swaps).
How to Do It Without Losing Your Mind
- Install the OS on the new drive (Windows installer or macOS recovery tools).
- Update fully (OS updates first, drivers second, optional tweaks last).
- Restore your personal files from backup.
- Reinstall programs from original installers/app stores.
- Sign in and reactivate paid apps as needed.
“Can I Just Copy Programs Over?” (The Honest Answer)
Usually, no. Most Windows programs don’t live in a single folder like a houseplant you can pick up and move. They scatter settings into the registry, system folders, services, drivers, and background components. Copying Program Files to a new drive often results in apps that don’t launch, don’t update, or throw errors like they’re auditioning for a drama series.
When Copying Programs Can Work
- Portable apps designed to run from a folder (common with some utilities).
- Some games with launchers that can “find existing files” (Steam/Epic often support moving libraries).
- Creative libraries (photos, samples, assets) that can be relocated if the app supports changing library paths.
If you truly need programs transferred “as-is,” cloning (or a full-image restore) is the method built for that job.
Mac Users: Time Machine + Migration Assistant Makes This Smoother
On macOS, the common approach is: back up with Time Machine, make sure macOS is installed on the new drive, then use Migration Assistant to bring over user accounts, apps, and settings. This is one of the rare times technology behaves politely.
After the Transfer: A Quick “Don’t Skip This” Checklist
1) Confirm You’re Booting From the New Drive
It’s surprisingly easy to think you’re on the new SSD when you’re still booting the old drive. Confirm in your system settings or disk management tools that the active system drive is the new one.
2) Confirm TRIM Is Enabled (SSD Performance)
Most modern systems handle this automatically, but it’s worth ensuring your SSD is operating in its optimal mode. Performance issues after a move are often configuration problems, not “bad SSD luck.”
3) Watch for Activation and License Prompts
A drive swap usually doesn’t trigger Windows activation by itself, but major hardware changes can. If activation complains after a bigger rebuild, signing in with the Microsoft account linked to your digital license can help.
4) Keep the Old Drive Untouched for a Week (If Possible)
If you can, keep the old drive intact for a few days as an “oh no” option. Once you’re confident everything is stable, then wipe it and reuse it.
Troubleshooting: Common Problems (and What They Usually Mean)
Problem: The New Drive Won’t Boot
- Likely cause: boot order not set to the new drive, or missing EFI/System partitions in the clone.
- Try: Set boot priority in BIOS/UEFI; run Windows recovery “Startup Repair” using recovery media.
Problem: Windows Boots, but Some Apps Act Weird
- Likely cause: licensing re-check, missing background service, or corrupted app config carried over.
- Try: Re-sign into the app; repair install; reinstall the problematic app (keep its data folders backed up first).
Problem: BitLocker Recovery Key Prompts Appear
- Likely cause: boot environment change, firmware/TPM-related changes, or encryption state mismatch.
- Try: Use your recovery key; confirm encryption settings; consider suspending protection before certain firmware-level changes in the future.
FAQ
Is cloning safe for my data?
Cloning is widely used for upgrades and migrations, but it’s only “safe” if you have a backup first. The safest workflow is: backup important files, clone, verify, then repurpose the old drive.
Do I need to reinstall Windows when I get a new drive?
Not if you clone or restore a system image. If you do a clean install, then yesWindows must be installed fresh.
Can I move programs to a new drive without cloning?
Most installed programs should be reinstalled because they rely on system registrations and components. Some portable apps and certain game libraries are exceptions.
Should I upgrade from HDD to SSD?
If your computer still boots from a spinning hard drive, moving to an SSD is one of the biggest performance upgrades you can make. It often feels like upgrading the whole machine, not just storage.
Real-World Experiences (The Stuff Guides Don’t Always Mention) Extra Notes
Here are some common, very-human scenarios people run into when transferring data and programs to a new hard driveplus what usually helps. Consider this the “experience DLC” at the end of the article, except it’s free and doesn’t require a 20GB download.
Experience #1: “I Cloned to a Bigger Drive… Why Do I Still Have the Same Space?”
This happens all the time. The clone worked, Windows booted, programs opened… and yet the new 1TB drive shows a C: drive that looks like the old 256GB layout. Usually the extra space is sitting there unallocated, quietly waiting for attention. The fix is typically simple: extend the main partition (either during the cloning wizard or afterward in Disk Management). People often assume cloning automatically “stretches” partitions like a comfy sweatshirt. Sometimes it does. Sometimes it just copies the old layout exactly. The lesson: before you celebrate, check that your partitions actually use the new drive’s full capacity.
Experience #2: “Everything Copied… But My Favorite App Won’t Open”
When cloning, most apps come over perfectly. The ones that complain are often the ones with stricter licensing or background services. Creative suites, security tools, VPNs, certain pro utilities, and some older “one-device-only” licenses may ask to be reactivated. In practice, the fix is typically to sign in again, deactivate the old device (if the vendor requires it), and re-activate on the new setup. People sometimes panic and assume the clone “failed.” More often, it’s just the software doing license housekeeping. Pro tip: if you rely on one expensive program, test it first after the move before you wipe the old drive.
Experience #3: “I Tried Copy/Paste for Program Files and Now Nothing Works”
This is the rite of passage. Many folks try copying Program Files to the new drive because it feels logical. But installed programs are more like restaurants than sandwiches: the visible part is only a piece of the operation. They depend on registry entries, installed components, services, and system integrations. People who try this often end up reinstalling anywayjust after a detour through confusion. The lesson: if you want programs to move intact, clone the whole system or reinstall properly. Save the copy/paste approach for files, portable apps, and media libraries.
Experience #4: “My New SSD Boots… But It Boots the Old Drive Instead”
This one is sneaky because it feels like success. You cloned, restarted, everything looks normal… but you’re still booting from the old drive because the boot order never changed (or the motherboard chose the previous boot entry). People discover this later when they remove the old drive and suddenly the computer refuses to boot. The fix is to confirm the boot device in BIOS/UEFI and verify which disk actually contains the active system partitions. It’s also why keeping the old drive intact for a few days is such a stress reducer.
Experience #5: “I Upgraded Hardware and Windows Activation Got Grumpy”
A simple drive swap usually doesn’t trigger activation issues. But if you combined the drive upgrade with major hardware changes (especially a motherboard swap), Windows may decide it’s basically a new device. People often experience this as a sudden activation warning after what felt like a successful transfer. The practical workaround is commonly tied to linking your digital license to your Microsoft account and using the Activation troubleshooter when needed. It’s not fun, but it’s typically solvableand it’s another reason to keep login details handy before you start.
Experience #6: “I Forgot About BitLocker and Now I’m Staring at a Recovery Screen”
Encryption is greatright up until you change the boot environment and the system asks for a recovery key at the worst possible time. In many real situations, the solution is simply having the recovery key available (saved to your Microsoft account or printed/stored securely). People who plan ahead breeze through this. People who don’t… learn new words. The lesson: if your drive is encrypted, treat recovery keys like house keys. You can’t just “vibe” your way back inside.
Conclusion
Transferring data and programs to a new hard drive doesn’t have to be a tech nightmare. If you want your programs to come along without reinstalling, cloning (or restoring a full system image) is usually the fastest path. If you want a cleaner system, a fresh install plus a careful restore of files is the long waybut often the tidy way.
Whichever route you choose, the winning formula is consistent: backup first, move second, verify third, wipe last. Do that, and you’ll get the speed upgrade you wantedwithout sacrificing your files or your weekend.