Table of Contents >> Show >> Hide
- Before You Start: The Safety Rules That Matter
- Tools You’ll Probably Need (and a Few You’ll Be Glad You Had)
- Know Your Sharpener Type (Because the Strategy Changes)
- Step-by-Step: Removing the Blade from a Handheld Pencil Sharpener
- Step-by-Step: Removing a Cutter/Blade Assembly from an Electric Pencil Sharpener
- Step 1: Unplug and empty the shavings tray
- Step 2: Check for a removable cutter cartridge
- Step 3: If you must open the housing, photograph everything
- Step 4: Separate the casing gently
- Step 5: Locate the cutter mechanism
- Step 6: Remove the cutter assembly, not loose blades (when possible)
- Step 7: Clean and inspect before reinstalling
- Step-by-Step: Removing Blades from a Manual Crank or Wall-Mount Sharpener
- What NOT to Do (aka “How to Keep This a Repair, Not a Story”)
- Safe Disposal: What to Do with an Old or Damaged Sharpener Blade
- Reassembly Tips (So Your Sharpener Works After You “Fixed” It)
- When to Stop and Get Help
- Frequently Asked Questions
- Real-World Experiences & Lessons People Learn the Hard Way (So You Don’t Have To)
- Experience #1: “The screw is microscopic and I dropped it… into the shadow realm.”
- Experience #2: “I loosened the screw and the blade snapped upward like it was offended.”
- Experience #3: “My electric sharpener ‘stopped working’ and I assumed it was broken.”
- Experience #4: “I tried to clean with something metal and now it’s worse.”
- Experience #5: “I opened the housing and found… gears. So many gears.”
- Experience #6: “Disposal felt awkward, so I wrapped it in tissue and tossed it.”
- Experience #7: “After reinstalling, the sharpener made a horrible noise.”
Pencil sharpeners are tiny, everyday heroesuntil the day they clog, chew pencils, or start making that
“I’m definitely not okay” grinding noise. When that happens, you may need to remove the blade (or cutter
assembly) to clean, replace, or unjam it. The good news: most sharpeners are simple. The bad news:
the blade is sharp, the screws are tiny, and your patience will be tested like you’re defusing a very small
office supply bomb.
This guide walks you through safe, realistic ways to remove a pencil sharpener bladewhether you’re dealing with
a handheld sharpener, a classic crank wall-mount, or an electric classroom beast. We’ll keep it practical, careful,
and just funny enough to make you feel brave. (But not “hold my soda” brave.)
Before You Start: The Safety Rules That Matter
1) Decide if you should remove the blade at all
Sometimes you don’t need to remove anything. Many sharpening issues are caused by packed shavings or a small chunk
of broken graphite lodged near the cutting edge. If your sharpener is still under warranty, opening the housing may
void it. If the sharpener has a sealed cutter cartridge, replacing the cartridge can be safer than disassembling the
whole unit.
2) If it’s electric, unplug it. Fully.
“Off” isn’t the same as “safe.” If the sharpener plugs into a wall outlet, unplug it before you do anything else.
Don’t just turn it off and hope the universe respects your optimism. Unplug first, then empty the shavings tray.
3) Protect your hands and your workspace
- Use cut-resistant gloves if you have them, or at least snug work gloves.
- Work on a bright, flat surface (kitchen table, desk) with good lighting.
- Lay down a towel or rubber mat so tiny screws don’t roll away to start a new life under your fridge.
- Keep kids and pets out of the area while the blade is exposed.
4) Have a safe “blade landing zone” ready
The most common blade-related mistake is removing it and then… setting it down “somewhere safe,” aka “somewhere
future-you will accidentally touch.” Prepare a small container with a lid (a pill bottle, empty mint tin, or a
hard plastic case). Once the blade is out, it goes straight in there. No pit stops.
Tools You’ll Probably Need (and a Few You’ll Be Glad You Had)
The exact tool list depends on your sharpener style, but these cover most situations:
- Small Phillips screwdriver (often #0 or #00 for handheld sharpeners)
- Small flathead screwdriver (helpful for gentle pryingemphasis on gentle)
- Torx or security Torx bits (some sharpeners use tamper-resistant screws)
- Tweezers or needle-nose pliers (for lifting blades safely)
- Magnetic parts tray or a small bowl (to hold screws)
- Painter’s tape (to cover the cutting edge during handling)
- Soft brush (old toothbrush or small paintbrush for shavings and graphite dust)
- Compressed air (optional, for blowing out dustuse short bursts)
Know Your Sharpener Type (Because the Strategy Changes)
Handheld “single-hole” sharpeners
These usually have one blade held by one small screw. Simple, but the blade is tiny and can flip like a metal
potato chip if you’re not controlling it.
Two-hole or multi-size handheld sharpeners
Similar to single-hole, just with multiple blades. Treat each blade like its own mini project, and remove them
one at a time so parts don’t get mixed up.
Crank or wall-mount manual sharpeners
These have a cutter assembly inside. Some allow access through a cover; others require removing a side panel.
Springs and gears may be involvedmeaning: take photos as you go.
Electric pencil sharpeners
Electric models may use a removable cutter cartridge or an internal cutter assembly. Many have a safety feature
that stops operation when the shavings tray is removedbut you should still unplug it.
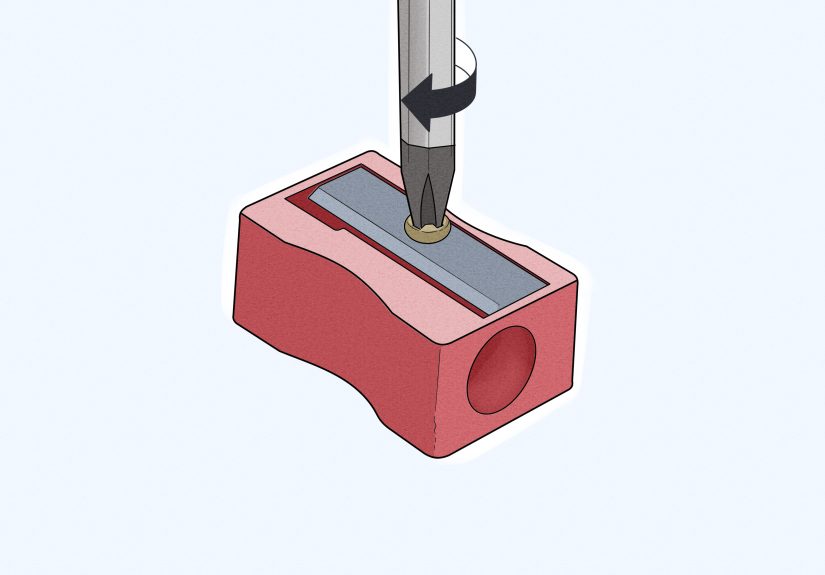
Step-by-Step: Removing the Blade from a Handheld Pencil Sharpener
Step 1: Empty and clean the sharpener first
If your sharpener has a shavings compartment, empty it. Tap out loose shavings. Use a small brush to remove dust
so your screwdriver can sit fully in the screw head.
Step 2: Stabilize the sharpener and control the blade
Place the sharpener flat on the table with the blade facing up. Put one finger (gloved is best) gently on the
non-sharp side of the blade to keep it from shifting when the screw loosens.
Step 3: Choose the correct screwdriver size
If the screwdriver is too small, it can strip the screw head. If it’s too large, it won’t seat properly.
The “right” size feels snug, with no wobble.
Step 4: Loosen the screw slowly
Turn counterclockwise in small, controlled turns. Keep gentle downward pressure so the screwdriver doesn’t slip.
Once the screw is loose, lift it out and place it in your parts tray.
Step 5: Lift the blade safely
Use tweezers or needle-nose pliers to lift the blade by a dull edge. If you must use fingers, pinch only the
non-sharp edge and keep the cutting edge pointed away from you.
Step 6: Cover and store the blade immediately
Place a small strip of painter’s tape over the cutting edge (fold it over so tape sticks to tape).
Then put the blade into your lidded container.
Common handheld problems (and fixes)
- Screw won’t turn: Press harder straight down, try a different screwdriver size, and clean debris from the screw head.
- Screw head is stripped: Stop. Forcing it can make things worse. Try a rubber band between screwdriver and screw for grip, or consider professional help.
- Blade is stuck to the body: Graphite dust can “glue” it. Gently wiggle with tweezersdon’t pry aggressively near the sharp edge.
Step-by-Step: Removing a Cutter/Blade Assembly from an Electric Pencil Sharpener
Step 1: Unplug and empty the shavings tray
Unplug the sharpener. Remove the shavings tray and empty it. This also gives you better visibility for any packed
debris or broken pencil bits.
Step 2: Check for a removable cutter cartridge
Some electric sharpeners are designed with a replaceable cutter unit (sometimes called a “blade cartridge” or
“cutter assembly”). If your model has a cartridge release, follow the manufacturer approach rather than opening
the entire housing. If the cartridge rotates or slides out, don’t force itlook for tabs, locks, or alignment marks.
Step 3: If you must open the housing, photograph everything
Before removing screws, take a quick photo of the bottom and sides. Then remove the visible housing screws.
Put screws in a tray and keep track of where each one came frombecause manufacturers love using two nearly identical
screws that are not, in fact, identical.
Step 4: Separate the casing gently
Use a plastic pry tool or a flathead screwdriver carefully along seam lines. Don’t jam metal tools deep inside.
The goal is to open the casing, not to audition for a demolition job.
Step 5: Locate the cutter mechanism
Most electric sharpeners have a helical cutter or multi-blade cylinder assembly. It may be held in with a bracket,
clips, or a few screws. Remove retaining screws slowly. If a spring is present, note its position.
Step 6: Remove the cutter assembly, not loose blades (when possible)
In many electric units, the “blade” is part of a cutter module. Removing the whole module is safer than trying to
separate individual cutting edges. Lift it out by non-sharp surfaces and set it into your prepared container.
Step 7: Clean and inspect before reinstalling
Use a brush to remove dust. Avoid metal picks near the cutting edges. If graphite chunks are stuck, use a wooden toothpick
or plastic tool. Inspect for bent parts, chips, or heavy dulling. If the cutter is damaged, replacement is usually safer
than “DIY sharpening” (which can change angles and reduce performance).
Step-by-Step: Removing Blades from a Manual Crank or Wall-Mount Sharpener
These sharpeners are built like tiny tanks, which is greatuntil you need to access the cutters.
The exact access panel varies by model, but the safety strategy is consistent.
Step 1: Stabilize the sharpener
- If it’s mounted, keep it mounted while you open the access panel.
- If it’s portable, clamp it to a table or have someone hold the base steady.
Step 2: Remove the shavings drawer and clear debris
Clean out shavings and dust. A clogged interior makes disassembly harder and increases the chance of slipping tools.
Step 3: Open the access cover or side panel
Remove screws holding the cover. Keep them organized. Take a photo of the cutter assembly before touching it.
Step 4: Identify how cutters are retained
Some manual sharpeners use a removable cutter head assembly secured with screws; others use a slide-out mechanism.
Avoid pulling on gears. Instead, focus on the part specifically designed to be removed (usually the cutter unit).
Step 5: Remove the cutter unit carefully
Once retaining screws/clips are released, lift the cutter unit out by dull surfaces. Keep fingers away from cutting edges.
Store it in a safe container if you’re not immediately reinstalling.
What NOT to Do (aka “How to Keep This a Repair, Not a Story”)
- Don’t work while the sharpener is plugged in. Ever. Even if it “won’t turn on.”
- Don’t use a kitchen knife as a screwdriver (it’s not a screwdriver; it’s a confidence test).
- Don’t pry against the cutting edgeblades chip, bend, and bite.
- Don’t leave blades loose on the table. Contain them immediately.
- Don’t modify blades or repurpose them. Handle for maintenance and safe disposal only.
Safe Disposal: What to Do with an Old or Damaged Sharpener Blade
Pencil sharpener blades are “sharps.” Treat them like razor blades: contain, cover, and dispose responsibly.
If you’re throwing the blade away:
- Cover the edge with tape (fold tape over so it seals the sharp edge).
- Place it in a rigid container (empty pill bottle, blade bank, thick plastic container) and label it “SHARPS.”
- Follow local guidelines for sharps disposal. Some areas allow sealed sharps containers in household trash; others prefer drop-off locations.
If you’re unsure, check your local waste authority guidance. The goal is to protect sanitation workers and anyone else
handling waste downstream.
Reassembly Tips (So Your Sharpener Works After You “Fixed” It)
Keep screws organized
Use a magnetic tray or group screws by location. If you have multiple screw lengths, keep them separated.
Mixing them can crack plastic housings or leave parts loose.
Take photos as you go
A quick photo before removing a part can save you 45 minutes of “where does this spring belong” archaeology later.
Test safely
For electric sharpeners, reassemble fully before plugging in. Then test with a standard graphite pencil (not a soft
waxy pencil) to reduce clogging and stress on cutters. If you notice loud grinding, stop and re-check assembly.
When to Stop and Get Help
You should pause and consider professional service or replacement if:
- The screw heads are stripped and you can’t remove them without drilling.
- The sharpener has cracked housing or exposed wiring.
- The cutter assembly is chipped, bent, or severely dull.
- You’re not confident you can reassemble it safely.
Sometimes the safest fix is a replacement cutter cartridgeor a new sharpenerespecially for heavy-duty electric models.
Frequently Asked Questions
Is it safe to remove the blade from a pencil sharpener?
It can be, if you unplug electric models, use the correct tools, control the blade while loosening screws, and store
the blade in a rigid container immediately after removal. The danger usually comes from rushing or using the wrong
screwdriver.
Why are some pencil sharpener screws “weird”?
Some manufacturers use tamper-resistant screws (like security Torx) to discourage disassembly. If your screw has a
star shape with a pin in the center, you’ll need a matching security bit. Don’t force a Phillips driver into it
that’s how screws get stripped.
Can I sharpen or “hone” the blade?
It’s usually not worth it. Pencil sharpener blades are small and rely on precise angles. DIY sharpening can change
the cutting geometry and make performance worse (or make the blade more likely to snag and break pencil cores).
Replacement is typically safer and more consistent.
Real-World Experiences & Lessons People Learn the Hard Way (So You Don’t Have To)
Here’s the honest truth: the “blade removal” part is rarely the hardest part. The hardest part is everything around it:
the tiny screw you can’t see, the dust that makes your screwdriver slip, and the moment you realize you should have
grabbed a container before you started. Below are common, real-life scenarios people run intoplus how to handle them
without turning your desk into a miniature disaster zone.
Experience #1: “The screw is microscopic and I dropped it… into the shadow realm.”
This happens constantly with handheld sharpeners. The screw comes out, you think you’ve got it, and it bounces once
and disappears. The fix is prevention: work over a towel or shallow tray, and keep a magnetic dish nearby. If it
already happened, don’t panic-sweep the floor like you’re searching for a contact lens in a cornfield. First, check
the folds of your towel, then your lap, then the underside of the sharpener itself (screws love to cling to plastic).
A flashlight held low to the floor can help you spot the reflection.
Experience #2: “I loosened the screw and the blade snapped upward like it was offended.”
Handheld blades can shift as tension releases. That’s why controlling the blade with a gloved finger matters.
People who skip this step often get a surprise “blade flip.” It’s rarely catastrophic, but it’s exactly the kind of
moment that causes a cut because your reflexes kick in and your hand moves the wrong way. A steady finger on the dull
side of the blade keeps it from springing or spinning as the screw comes free.
Experience #3: “My electric sharpener ‘stopped working’ and I assumed it was broken.”
A lot of electric sharpeners won’t run if the shavings tray isn’t seated correctly. People remove the tray, dump it,
put it back slightly crooked, and suddenly the sharpener acts like it’s on strike. Before you open the casing, reseat
the tray firmly. If the unit still jams, unplug it and inspect for broken pencil fragments. Many “dead sharpeners”
are actually just jammed or blocked.
Experience #4: “I tried to clean with something metal and now it’s worse.”
It’s tempting to poke at compacted graphite with a paperclip or tiny screwdriver. The problem is that metal tools can
nick cutting edges or bend delicate partsespecially in electric cutters. People often report that after aggressive
poking, the sharpener chews pencils or breaks leads. A soft brush and a wooden toothpick are safer. If you need to
remove something stuck, gentle pressure and patience beat stabbing motions every time.
Experience #5: “I opened the housing and found… gears. So many gears.”
Manual crank and some electric sharpeners have more internal parts than you expect. The best habit here is taking
photos at each stage. People who don’t take photos often end up with leftover parts at the end, like an IKEA build
with “bonus screws” that definitely are not bonus. If you’re nervous, remove only what’s necessary to access the
cutter assembly, and avoid disassembling gear trains unless the manufacturer specifically instructs it.
Experience #6: “Disposal felt awkward, so I wrapped it in tissue and tossed it.”
This is commonand risky. Tissue tears, tape loosens, and now someone else can get hurt. The better move is simple:
tape the sharp edge, place the blade in a rigid container, and label it. Many people repurpose a pill bottle or a
small plastic jar. The goal is not fancy; it’s safe. If you’re in a household with kids, this step matters even more,
because an uncontained blade can be found later in the worst possible way.
Experience #7: “After reinstalling, the sharpener made a horrible noise.”
A harsh grinding sound after reassembly usually means something isn’t seated correctlyoften the cutter module or a
bracket. The safest response is to stop immediately, unplug (if electric), and re-check alignment. People who keep
“testing” through the noise often end up damaging the cutter or motor. Think of it like shoes: if it hurts, don’t
keep walkingfix the fit.
The big takeaway from all these experiences is surprisingly wholesome: slow down, contain the blade, and treat tiny
screws like they cost $100 each. If you do that, blade removal becomes a calm, controlled maintenance tasknot a
dramatic tale you tell later with hand gestures and regret.


