Table of Contents >> Show >> Hide
- Why an Upcycled Christmas Bauble Centerpiece Works So Well
- What You Need
- How to Make an Upcycled Christmas Bauble Centerpiece
- Easy Design Variations to Try
- How to Make It Look More Expensive Than It Is
- Mistakes to Avoid
- Styling Tips for Different Spaces
- How to Store and Reuse It Next Year
- Final Thoughts
- Extra Experience: What It Really Feels Like to Make One
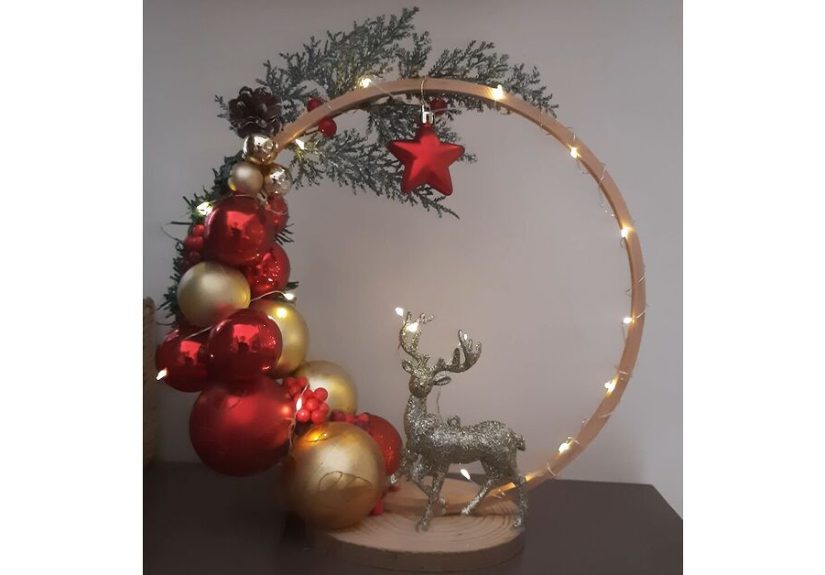
If your holiday decorating bin looks like it survived a glitter storm, congratulations: you already have the raw materials for a gorgeous centerpiece. An upcycled Christmas bauble centerpiece is one of the easiest ways to turn leftover ornaments, thrifted bowls, ribbon scraps, and a few evergreen sprigs into something that looks delightfully high-end. It is festive, budget-friendly, and forgiving enough that even if your hot glue gun judges you, the finished result still comes out looking charming.
Better yet, this project solves a very real seasonal problem: what exactly do you do with the random ornaments that no longer match the tree, the slightly scuffed baubles that are too pretty to throw away, or the extra décor you bought in a moment of peppermint-fueled optimism? You turn them into a Christmas table centerpiece that feels intentional, stylish, and a little smug in the best possible way.
In this guide, you will learn how to make an upcycled Christmas bauble centerpiece step by step, how to make it look polished instead of chaotic, and how to customize it for everything from a formal dining table to a tiny apartment coffee table. The goal is simple: create a holiday centerpiece with personality, sparkle, and zero wasteful drama.
Why an Upcycled Christmas Bauble Centerpiece Works So Well
A great centerpiece needs three things: shape, texture, and shine. Christmas baubles already bring the shine. Greenery adds texture. A tray, bowl, vase, or cake stand gives the arrangement shape. Once those three ingredients meet on a table, you are halfway to a festive masterpiece.
The “upcycled” part is what makes this project extra satisfying. Instead of buying a whole new arrangement every year, you can reuse ornaments from old themes, thrift inexpensive vessels, repurpose ribbon from gift wrap, and add natural elements like pinecones, dried orange slices, or clipped evergreen branches. The result feels collected rather than store-bought. In other words, it has character. And during the holidays, character is what keeps your décor from looking like it came out of a catalog that also sells very expensive candles and mild emotional pressure.
What You Need
- Old or mismatched Christmas baubles in a few sizes
- A base such as a shallow bowl, cake stand, footed compote, tray, punch bowl, or glass hurricane
- Fresh or faux greenery
- Mini pinecones, dried orange slices, ribbon, bells, or wooden beads
- Battery-operated fairy lights for sparkle
- Floral wire, glue dots, or a low-commitment hot glue approach
- Optional filler: cranberries, faux berries, cinnamon sticks, bottlebrush trees, or small houses
Use what you already own first. That is the whole magic trick. A dusty silver bowl from the back of the cabinet? Perfect. A chipped cake stand that only looks chipped if you stare at it like a detective? Also perfect. A pile of ornaments with missing hooks and mysterious glitter residue? Ideal, honestly.
How to Make an Upcycled Christmas Bauble Centerpiece
1. Choose a Base That Does Some of the Work for You
Your base sets the tone. A cake stand feels classic and elegant. A glass hurricane or vase looks clean and modern. A punch bowl makes the arrangement fuller and more dramatic. A tray or wooden dough bowl creates a low, relaxed centerpiece that works beautifully on dining tables where people still need to see each other and not just the ornament mountain between them.
If you are aiming for a centerpiece that looks expensive, start with a vessel that has height or presence. Even a simple thrifted bowl can look chic once it is filled with layered materials. If the container has a strong shape, you can keep the decorating simple and let the baubles do the talking.
2. Pick a Color Story Before You Dump Everything In
This is the difference between “designer holiday table” and “ornament storage bin exploded.” Choose one of these easy color directions:
- Classic: red, gold, green
- Vintage glam: mercury glass, blush, champagne, silver
- Scandinavian: white, wood, sage, soft metallics
- Candy-shop fun: pink, aqua, red, striped ribbon
- Natural rustic: bronze, cream, greenery, citrus, pinecones
Gather ornaments in a limited palette, then mix finishes. A combination of matte, glossy, glittered, and metallic baubles creates visual depth. If everything is equally shiny, the arrangement can feel flat. If everything is equally glittery, it can start to look like a craft store sneeze.
3. Build a Greenery Nest
Before the ornaments go in, create a soft base with greenery. This gives the baubles something to sit against and keeps the arrangement from looking too stiff. Tuck in faux cedar, eucalyptus, pine, fir, or magnolia leaves around the bottom and edges of your vessel. If you are using fresh clippings from your yard or tree trimmings, trim them into short sections so they layer neatly instead of poking out like tiny holiday spears.
The greenery acts like visual camouflage. It hides empty spaces, covers stems or wiring, and makes the centerpiece feel full without requiring thirty-seven additional ornaments you do not actually own.
4. Place the Largest Baubles First
Start with the biggest ornaments and space them out evenly. These create the structure of your arrangement. If you place all the large pieces in one spot, the centerpiece will look lopsided. Think of them like furniture in a room: put the major pieces down first, then decorate around them.
Set the largest baubles low and slightly tucked into the greenery so they look anchored. If you are using a glass vessel, press a few statement ornaments against the inside surface where they can be clearly seen. This instantly makes the whole arrangement feel fuller from every angle.
5. Add Medium and Small Ornaments to Fill the Gaps
Now add medium and mini baubles between the larger ones. Rotate colors and finishes as you go. A metallic ornament next to a matte one is more interesting than metallic next to metallic, over and over again. Fill awkward spaces with tiny ornaments, berries, pinecones, or cinnamon sticks.
This is also the moment to add texture. Dried orange slices, jingle bells, wooden stars, velvet ribbon, or bead garlands help break up the roundness of the baubles. Without those contrasting shapes, the arrangement can feel a little too spherical, like your table has been attacked by very cheerful bubbles.
6. Layer in Light and Height
If your centerpiece needs more drama, add battery-operated fairy lights or place a hurricane with a flameless candle in the center. A cluster of bottlebrush trees or a few small decorative houses can also add height without overpowering the baubles.
For longer tables, build the arrangement in a stretched shape rather than a tight circle. Use a runner or tray as your foundation, then repeat groups of greenery, ornaments, and accents down the center. That gives you a collected holiday tablescape instead of one lonely bowl trying to carry the whole season by itself.
7. Secure Only What Truly Needs Securing
If your centerpiece will live on a dining table with kids, pets, or enthusiastic elbow-talkers, use glue dots, floral wire, or a few discreet dabs of hot glue to keep unstable pieces in place. But do not glue every single ornament unless you want future-you to mutter dark things while packing away decorations in January.
A lightly secured arrangement is easier to store, refresh, and restyle next year. Upcycled décor should stay flexible. The point is to reuse it, not fossilize it.
Easy Design Variations to Try
Vintage Christmas Bauble Centerpiece
Use faded metallic ornaments, velvet ribbon, bottlebrush trees, and a silver bowl or pedestal stand. Add soft warm lights for a nostalgic look that feels like your stylish grandmother opened an antique booth and won.
Natural and Rustic Ornament Centerpiece
Combine cream, bronze, or muted green baubles with pinecones, dried oranges, cedar sprigs, and twine bows. A wooden tray or dough bowl works especially well here. This style feels cozy, layered, and less “mall Santa,” more “charming cabin with excellent pie.”
Modern Minimalist Christmas Centerpiece
Choose white, silver, black, or champagne ornaments in one or two finishes. Use a glass vase or sleek bowl, keep greenery minimal, and let negative space do some of the work. The result feels crisp and elegant without trying too hard.
How to Make It Look More Expensive Than It Is
The secret is not buying more things. The secret is editing. Use fewer colors. Repeat shapes. Add one natural element. Choose one hero material, like velvet ribbon or dried citrus, and repeat it throughout the arrangement. Grouping similar tones together creates a more intentional look than tossing in every ornament that survived Christmases past.
Another trick is mixing shiny ornaments with matte and textured materials. Pinecones, frosted greenery, dried orange slices, or wooden beads make even inexpensive baubles look elevated. And if your ornaments have seen better days, turn scratched sides inward. That is not cheating. That is styling.
Mistakes to Avoid
- Using too many colors: festive does not have to mean visually noisy.
- Making it too tall: centerpieces should not block conversation.
- Skipping texture: all-bauble arrangements can look flat without greenery or natural accents.
- Over-gluing: secure the unstable pieces, not your entire holiday future.
- Using open flames too close to greenery or ornaments: choose flameless candles when possible.
Styling Tips for Different Spaces
For a dining table: Keep the arrangement low and elongated. A tray with layered greenery and ornaments works beautifully.
For a coffee table: Use a round bowl or compote and keep the palette soft so it does not overwhelm the room.
For a kitchen island: Try a pedestal bowl with citrus, ornaments, and a few evergreen stems for something fresh and casual.
For a small apartment: Use a glass vase or compact bowl. A petite bauble centerpiece can still deliver major holiday charm without swallowing every square inch of surface space.
How to Store and Reuse It Next Year
If you built your centerpiece with reusable layers rather than a glue-based emotional breakdown, storing it is easy. Remove fragile ornaments, wrap them in tissue or old gift bags, and keep the greenery, ribbon, and filler pieces together in one bin. Save your color palette notes if you want to remake the exact design next season.
You can also refresh the centerpiece every year using the same foundation. Swap red ribbon for velvet burgundy. Trade silver baubles for blush or bronze. Add bells one year, dried oranges the next, or tiny houses when you want that collectible village energy without committing to an entire faux snow suburb.
Final Thoughts
An upcycled Christmas bauble centerpiece is proof that holiday decorating does not have to be expensive, perfect, or brand-new to be beautiful. In fact, it is often better when it is not. Reused ornaments bring history. Thrifted containers add charm. Handmade details make the arrangement feel personal. And when everything comes together, the centerpiece does more than decorate a table. It tells a story about creativity, resourcefulness, and refusing to let one lonely glitter ornament retire before its time.
So gather your leftover baubles, rescue that forgotten bowl, and build something festive out of what you already have. Your table will look merry, your storage bin will finally thin out a little, and your holiday décor will have the kind of character that no prepackaged centerpiece can fake.
Extra Experience: What It Really Feels Like to Make One
One of the most surprising things about making an upcycled Christmas bauble centerpiece is how quickly it turns from “I am just using up old decorations” into “Why do I suddenly feel like a holiday stylist with opinions about ribbon width?” The project has a way of sneaking up on you. You start with a bowl, a few forgotten ornaments, and maybe a clipped branch from the yard. Ten minutes later, you are holding two different pinecones at arm’s length like a judge on a reality show, deciding which one has the better attitude.
The experience is genuinely fun because it is low stakes. Unlike a Christmas tree, which can feel like a full production with lights, ladders, cords, and a mild identity crisis about whether this year is “classic red” or “woodland elegant,” a bauble centerpiece is small enough to experiment with. You can try a layout, hate it, rearrange it, and fix it without needing an entire evening and a supportive soundtrack.
It is also the kind of holiday craft that works for real life, not just beautifully lit magazine spreads. If your ornaments are scratched, the centerpiece still works. If your greenery is a little uneven, the centerpiece still works. If you run out of matching baubles halfway through and have to suddenly “introduce a contrasting metallic,” the centerpiece still works. In fact, those little imperfections usually make it look better, because the finished piece feels layered and lived-in rather than stiff and overly coordinated.
For families, it can become one of those unexpectedly cozy traditions. Kids can sort ornaments by size or color. Someone can tie bows. Someone else can “help” by moving the same three ornaments around for twenty minutes and calling it design strategy. If you are decorating solo, it is still satisfying in a quieter way. There is something deeply pleasant about making a holiday centerpiece with a mug of something warm nearby while your house slowly starts looking festive around you.
Another real-world bonus is that guests notice it. People may not comment on every wreath, garland, or decorative pillow in your home, but they absolutely notice a good table centerpiece. It sits right in the middle of everything, casually collecting compliments while pretending not to. And when you get to say, “Oh, I made it from leftover ornaments,” there is a special little thrill in that sentence. It sounds resourceful, stylish, and just smug enough to be enjoyable.
Best of all, the centerpiece often becomes more meaningful over time. Maybe you use a few ornaments from your first apartment, a ribbon saved from last year’s gifts, or a tiny bauble that used to hang on a childhood tree. Those details give the arrangement emotional weight without making it sentimental mush. It becomes more than décor. It becomes part memory box, part table art, part holiday tradition. And that is probably why this project sticks. It is easy, affordable, and visually festive, yes. But it is also personal. It lets your holiday style look polished while still feeling like you. Glitter, history, quirks, and all.