Table of Contents >> Show >> Hide
- Before You Build: Safety, Rules, and Smart Placement
- Planning Your DIY Paver Fire Pit
- Materials and Tools Checklist
- Step-by-Step: How to Build an Easy Firepit from Pavers
- Step 1: Lay out your circle
- Step 2: Excavate for a stable base
- Step 3: Add gravel and compact like you mean it
- Step 4: Add a thin leveling layer
- Step 5: Set the first course (the “everything depends on this” course)
- Step 6: Add the steel ring insert (recommended)
- Step 7: Stack additional courses with a staggered pattern
- Step 8: Cap it off (optional, but it looks professional)
- Step 9: Finish the inside and the surrounding area
- Common Mistakes (and How to Avoid Them)
- Firepit Safety and Use Tips
- What Does It Cost to Build a Paver Fire Pit?
- Maintenance: Keep Your Backyard Fire Pit Looking Good
- Frequently Asked Questions
- Real-World Experiences: What Building a Paver Fire Pit Actually Feels Like (and What You Learn)
- The first surprise: dirt has opinions
- Base prep is where most “easy” projects earn their title
- Dry-fitting is the adult version of “measure twice, cut once”
- The steel ring insert is the “boring” upgrade you’ll brag about later
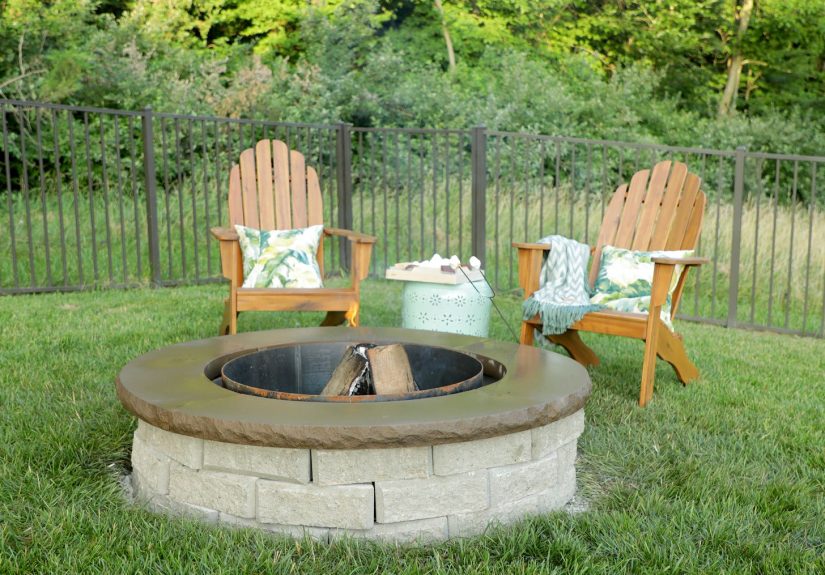
- You’ll become strangely passionate about chairs
- The best part: the first night is a victory lap
- What experienced DIYers wish they did from the start
- Conclusion
A backyard firepit is basically a grown-up version of a campfireexcept you don’t have to sleep on the ground
or pretend that marshmallows count as dinner (no judgment if they do). The good news: you can build an easy,
good-looking paver fire pit in a weekend with basic tools, a little patience, and a strong commitment to
keeping things level. The better news: once it’s done, your yard instantly becomes “the hangout house.”
This guide walks you through how to make an easy firepit from pavers (or retaining wall blocks), including
planning, materials, a step-by-step build, safety must-dos, and the small details that keep your DIY fire pit
from turning into a leaning tower of “we’ll fix it later.”
Before You Build: Safety, Rules, and Smart Placement
1) Check local rules (seriously)
Fire pits are regulated differently depending on your city, county, HOA, and sometimes even the mood of your
neighborhood group chat. Many places require setbacks from structures and property lines, limit fire pit size,
or restrict burning during dry seasons or burn bans. If you’re not sure, check your city website or call your
local fire department’s non-emergency line for guidance.
2) Choose a safe spot
A common rule of thumb is to place a wood-burning fire pit well away from anything that can burnyour house,
fences, sheds, low branches, and that one shrub that’s somehow always crispy. Many guides suggest
at least 10–25 feet from structures when space allows, and a clear overhead zone (no branches, pergolas,
or awnings above your flames). Build on a non-combustible, level surface like pavers, gravel, stone, or concrete.
3) Call before you dig
In the U.S., you can typically dial 811 to mark underground utilities before you excavate. Even a “small” fire pit
project can involve digging deep enough to hit something expensive and exciting (and not in a good way).
4) Use heat-smart materials
Regular concrete blocks and pavers can crack or spall from repeated high heat, especially if moisture gets trapped.
The easiest way to protect your build is to use a steel fire pit ring insert and/or line the inside with
fire-rated bricks. Think of it like a heat shield that keeps your pavers from slowly turning into a science experiment.
Planning Your DIY Paver Fire Pit
Pick a size that fits your life
Most DIY paver fire pits land in the “cozy circle” range:
- Inside diameter: about 30–36 inches (good for a manageable fire and easy seating distance)
- Outside diameter: about 48–60 inches (depends on block size and number of rings)
- Height: 12–18 inches (usually 2–4 courses of blocks)
If you’re using a steel ring insert, choose the insert first, then build around it. That keeps the “math”
from turning into “interpretive landscaping.”
Decide: freestanding ring or in-ground style?
The most beginner-friendly approach is a freestanding ring made from retaining wall blocks set on a compacted base.
It’s stable, tidy, and doesn’t require a deep pit. In-ground styles can be great too, but they usually involve
more digging and drainage considerations.
Materials and Tools Checklist
Materials
- Retaining wall blocks or fire pit blocks (typically 24–48 blocks depending on size/height)
- Capstones (optional but recommended for a finished look and comfy edge)
- Crushed gravel (for the base; often 3/4" minus or similar)
- Leveling sand (a thin layer for final leveling)
- Steel fire ring insert (highly recommended for longevity)
- Fire bricks (optional interior linerespecially helpful if you skip the ring)
- Construction adhesive rated for masonry (for upper courses/caps if desired)
- Decorative gravel or stone (to finish around/inside base area)
Tools
- Shovel, rake
- Hand tamper or plate compactor (renting is often worth it)
- Level (a long level is your best friend)
- Measuring tape, stakes, and string
- Rubber mallet
- Wheelbarrow (unless you enjoy carrying gravel like it’s a personality trait)
- Safety gear: gloves, eye protection
Step-by-Step: How to Build an Easy Firepit from Pavers
Step 1: Lay out your circle
- Mark the center point with a stake.
- Tie string to the stake and measure out your radius (half your outside diameter).
- Use marking paint, flour, or even a light sprinkle of sand to trace a circle.
Tip: Dry-fit a few blocks along the circle line to confirm the size and spacing. Adjust now, not after you’ve
moved 400 pounds of gravel.
Step 2: Excavate for a stable base
A long-lasting paver fire pit depends on what’s underneath. Many guides recommend excavating roughly
6–12 inches total, depending on your soil, climate, and whether you’re building a small seating pad around it.
The goal is a compacted gravel base with a thin leveling layer on top.
- Remove grass and topsoil within your circle (and a little extra room around it).
- Dig to your planned depth.
- Rake the bottom roughly flat.
Step 3: Add gravel and compact like you mean it
Pour in crushed gravel in layers (lifts). Compact each layer before adding the next. This is the part that
separates “beautiful firepit” from “why is it sinking on one side by July?”
- Add 3–6 inches of crushed gravel (depending on total excavation depth).
- Compact thoroughly with a tamper or plate compactor.
- Check level in multiple directions.
Step 4: Add a thin leveling layer
Spread a thin layer of leveling sand (often around an inch or less) and screed it smooth. This gives you a
fine-tuning layer for the first course of blocks.
Step 5: Set the first course (the “everything depends on this” course)
Place your first ring of blocks on the leveled base. Use a level to check each block and the overall ring.
Adjust by tapping with a rubber mallet or adding/removing a little sand under individual blocks.
- Check level: side-to-side and front-to-back for each block
- Check the ring: rotate your level around the circle; fix low spots now
Step 6: Add the steel ring insert (recommended)
Center the steel ring insert inside your first course. You want a small gap between the ring and your blocks
(varies by ring design). The ring protects your pavers from direct flame and intense heat, helping prevent
premature cracking and discoloration.
Step 7: Stack additional courses with a staggered pattern
For stability, stack the next course so vertical seams don’t line up with the seams below (like brickwork).
Dry-stack is common for the lower rings; for upper courses and caps, a masonry adhesive can add security.
- Place the second course, staggering joints as best you can.
- Check level again. Yes, again. Always again.
- Add a third course if you want more height (12–18 inches total is a sweet spot).
Step 8: Cap it off (optional, but it looks professional)
Capstones create a clean finished edge and a comfortable place to rest a mug of cocoaor your hands while you
warm up. Dry-fit caps first, then use a small amount of masonry adhesive to secure them if desired.
Step 9: Finish the inside and the surrounding area
Inside the ring, many people add a layer of gravel for drainage. If you’re using fire bricks, set them along
the interior to protect the surrounding blocks. Around the outside, you can add decorative gravel or pavers
to create a tidy, non-muddy zone for chairs.
Common Mistakes (and How to Avoid Them)
Skipping compaction
Gravel that isn’t compacted is basically a slow-motion sinkhole. Compact in layers. Your future self will thank you.
Building on soil or grass
Soil shifts. Grass decomposes. Neither is interested in staying flat. A proper gravel base keeps your DIY fire pit stable.
Using random blocks with no heat protection
A steel ring insert and/or fire brick liner helps prevent heat damage. Regular concrete products can degrade over time
when repeatedly exposed to high temperatures and moisture.
Putting it too close to “flammable everything”
Keep a safe distance from structures and overhangs, and maintain a clear zone around the fire pit. Sparks travel farther
than your confidence says they will.
Firepit Safety and Use Tips
- Keep a fire extinguisher, bucket of water, or sand nearby whenever you burn.
- Use dry, seasoned wood to reduce smoke and popping embers.
- Avoid high winds, and always follow local burn bans.
- Consider a spark screen to contain embers.
- Never use gasoline or lighter fluid; use safe fire starters instead.
- Supervision matters: if kids or pets are around, keep the fire small and the seating distance generous.
- Let it cool completely before moving anything or disposing of ashes.
What Does It Cost to Build a Paver Fire Pit?
Costs vary by region and materials, but a simple paver fire pit is often one of the more budget-friendly backyard upgrades.
Your biggest price variables are:
- Block type (basic retaining wall blocks vs. premium fire pit kits)
- Steel ring insert (usually worth it for durability)
- Base materials (gravel and sand)
- Tool rentals (plate compactor can be a game-changer)
If you already own basic tools, the project can be surprisingly affordable for the “wow, you built that?” payoff.
Maintenance: Keep Your Backyard Fire Pit Looking Good
- Clean out ash after burns (once fully cooled) to reduce moisture retention.
- Check for wobble each seasonfreeze/thaw can nudge blocks over time.
- Re-secure capstones if any loosen.
- Cover the pit when not in use to keep water from pooling inside.
Frequently Asked Questions
Do I need mortar?
Not usually for a simple, dry-stacked fire pitespecially if the base is properly compacted and level. Many DIY builds
dry-stack the block rings and use masonry adhesive for capstones or top courses. Mortar can crack over time with heat cycles.
Can I build a fire pit directly on a paver patio?
Yes, as long as the patio is level, stable, and non-combustible. You still want heat protection (steel ring insert, fire bricks)
and safe clearances from structures, furniture, and landscaping.
How long does it take?
Many people complete this project in a weekend: day one for excavation and base prep, day two for stacking, caps, and finishing.
If you rent a plate compactor and have a helper, it often moves faster (and your back files fewer complaints).
Real-World Experiences: What Building a Paver Fire Pit Actually Feels Like (and What You Learn)
Let’s talk about the part no materials list can capture: the experience of building a paver fire pit. On paper, it’s
“dig, gravel, stack, done.” In real life, it’s a mini adventure starring you, a shovel, and a surprising amount of dirt that
apparently was hiding in your yard just to meet you.
The first surprise: dirt has opinions
The moment you start excavating, you learn your yard is not one consistent substance. You’ll hit a patch of soft soil, then
an area that feels like nature poured concrete overnight. If your yard has even a slight slope, you’ll also discover that
“level” is not a vibeit’s a measurable reality. One of the best practical tricks is to check level constantly and view it as
progress, not a delay. Every minute you spend leveling the base saves you hours of “why is it crooked?” later.
Base prep is where most “easy” projects earn their title
People love to talk about how pretty the blocks look. In practice, the most satisfying moment is when the base finally feels
solid underfootno squish, no wobble, no shifting gravel. If you’ve never used a hand tamper, it’s oddly therapeutic. If you
rent a plate compactor, it feels like driving a small, stubborn robot that only speaks “vibration.” Either way, compacting in
layers changes everything. The base becomes the part you don’t see but absolutely feel every time you sit down and notice the
fire pit is still level months later.
Dry-fitting is the adult version of “measure twice, cut once”
Dry-fitting blocks before committing is one of those moves that seems optionaluntil you do it once and realize it prevents
half the headaches. In real builds, you’ll often find that one block is slightly different, or your circle spacing needs a tiny
tweak to look symmetrical. Dry-fitting also helps you decide where you want seams to land and how you’ll stagger courses.
It’s the difference between a fire pit that looks intentional and one that looks like it was assembled during a sudden
neighborhood power outage.
The steel ring insert is the “boring” upgrade you’ll brag about later
At first, a ring insert can feel like an extra expense. Then you learn what it really does: it keeps flames and heat from
attacking the blocks directly. The first time you have a big, hot burn and notice your blocks aren’t getting roasted, you
understand the value. Over time, that ring helps reduce cracking and discoloration, and it makes the whole pit easier to keep
clean. It’s not glamorous, but it’s the kind of smart decision that makes your DIY project look like it came from a pro.
You’ll become strangely passionate about chairs
Once the pit exists, the next “experience” is realizing how the fire pit changes your outdoor layout. A circle of chairs that
felt roomy before can feel crowded once people actually sit down with snacks, blankets, and the inexplicable need to rotate
their chair three degrees to the left. Many DIY builders end up creating a simple gravel seating ring or adding a few pavers
around the pit just to keep chair legs from sinking into soil. It’s not just aestheticsit’s comfort. That small detail makes
the space feel finished, and it keeps your fire pit area from turning into a mud-heel magnet after rain.
The best part: the first night is a victory lap
Lighting the first fire feels different when you built the thing yourself. You notice how the flame sits inside the ring, how
the blocks radiate warmth, how the capstones feel smooth under your hands. You also learn a few practical habits fast:
keeping a small tool set nearby (tongs, heat-resistant gloves), storing firewood dry, and having a safe place for ash disposal.
And yes, you will absolutely stare at your fire pit like it’s a masterpiece. That’s allowed. You earned it.
What experienced DIYers wish they did from the start
- Overbuild the base: a little extra gravel and compaction pays back for years.
- Plan drainage: avoid low spots where water pools inside the pit.
- Keep it modest: smaller fires are easier to manage and kinder to materials.
- Think about smoke: place the pit where smoke won’t drift straight into doors or neighbors.
- Finish the surroundings: gravel or pavers around the pit makes the whole area feel intentional.
In the end, building an easy firepit from pavers isn’t just a quick weekend projectit’s a small upgrade that changes how you
use your yard. It creates a gathering point, a routine, and a reason to step outside when the evening air cools down. And if
your first marshmallow is a little too charred? Congrats. You’re officially a fire pit owner.
Conclusion
If you want a backyard project with high impact and manageable effort, a DIY paver fire pit is hard to beat.
The keys are simple: choose a safe location, build a solid compacted base, keep your first course perfectly level, and protect
your blocks with a steel ring insert and/or fire bricks. Do those things, and you’ll have an easy firepit from pavers that looks
great, burns safely, and stays steady season after season.