Table of Contents >> Show >> Hide
- Why People Love Drop Ceilings (Even If They Pretend Not To)
- Tools and Materials You’ll Actually Use
- Plan It First (Your Future Self Will Send Thanks)
- How to Install a Drop Ceiling: 14 Steps
- Step 1: Decide on your finished ceiling height
- Step 2: Sketch a quick layout (yes, even a messy one)
- Step 3: Plan tile layout so borders aren’t tiny slivers
- Step 4: Find joist direction and mark reference points
- Step 5: Mark a level reference line around the room
- Step 6: Install the perimeter wall molding (wall angle)
- Step 7: Snap layout lines for main tees (and cross-tee starting line)
- Step 8: Mark hanger locations and install hanger hardware
- Step 9: Hang and pre-bend the hanger wires to height
- Step 10: Hang the first main tee and level it
- Step 11: Install the remaining main tees (parallel and on-center)
- Step 12: Add 4-foot cross tees, then 2-foot cross tees to complete the grid
- Step 13: Square the grid and build out borders and obstacle cutouts
- Step 14: Install lights/vents properly, then drop in the ceiling tiles
- Pro Tips That Make Your Ceiling Look Expensive (Without Actually Being Expensive)
- Common Mistakes (and How to Fix Them Fast)
- FAQ
- Conclusion
- Bonus: of Real-World Drop Ceiling Experience (What People Learn the Hard Way)
A drop ceiling (also called a suspended ceiling) is basically a tidy, modular “second ceiling” that hangs below your joists.
It hides pipes, wiring, and ductwork while keeping everything accessiblebecause sometimes you really do want to find that mystery junction box again.
The goal: a straight, level ceiling grid that looks intentional (not like it was installed during an earthquake-themed team-building exercise).
Why People Love Drop Ceilings (Even If They Pretend Not To)
- Access: Pop a tile and you can reach plumbing, electrical, network cabling, and HVAC.
- Speed: No overhead drywall finishing marathon. The grid does the heavy lifting.
- Acoustics: Many tiles help absorb soundgreat for basements, offices, and media rooms.
- Flexibility: Easy to swap stained or damaged tiles and integrate lights/vents later.
Tools and Materials You’ll Actually Use
Exact items vary by ceiling system, but most drop ceiling installations use the same core lineup:
Materials
- Wall molding / wall angle (perimeter trim)
- Main tees (main runners / main beams)
- Cross tees (typically 4-foot and 2-foot pieces for 2×2 layouts)
- Ceiling tiles/panels (2×2 or 2×4)
- Hanger wire (often 18-gauge for residential; check your system’s guidance)
- Hanger hardware (screw eyes, lag screws, anchors, or system-specific hooks/brackets)
- Fasteners for wall molding (screws recommended for a tight hold)
- Optional: acoustical insulation batts (installed correctly per product guidance, not squishing tiles)
Tools
- Tape measure, pencil/marker, straightedge
- Laser level or water level (a laser makes you feel like a probecause it is a pro move)
- Chalk line and/or string lines
- Stud finder (or a very patient knocking routine)
- Drill/driver + bits, screwdriver
- Tin snips (for grid) and a sharp utility knife (for tiles)
- Pliers (for twisting wire), carpenter’s square
- Stepladder, safety glasses, work gloves
Safety note: If you’re working around electrical wiring or installing light fixtures, turn off power at the breaker and consider having a qualified adult or electrician handle wiring.
Also: ladders are not amusement park ridesuse them like you want to keep your ankles.
Plan It First (Your Future Self Will Send Thanks)
Drop ceilings look “pro” when two things happen: the grid is level, and the layout doesn’t leave you with skinny border tiles that look like someone tried to slice a pizza with a ruler.
A little planning prevents most headaches.
Pick the Right Height
Find the lowest obstruction (duct, pipe, beam) and choose a finished ceiling height below it.
Many guides recommend leaving several inches of clearance below obstructions so the grid can hang level and tiles can tilt up for installation.
Choose Grid Direction and Border Tile Size
Main tees typically run perpendicular to the joists and are commonly spaced on 4-foot centers for standard residential layouts.
For best appearance, aim for border tiles that are similar widths on opposite sides of the room (instead of one side being “normal” and the other being “a sad little strip”).
Acclimate Your Tiles
Ceiling panels can react to temperature and humidity. Many manufacturers recommend storing and installing tiles in controlled conditions and letting materials acclimate before installation.
Translation: don’t install tiles straight from a freezing garage and expect them to behave like calm adults.
How to Install a Drop Ceiling: 14 Steps
Step 1: Decide on your finished ceiling height
Measure your room and locate the lowest obstruction (pipes, ductwork, beams). Choose a finished ceiling height that clears everything and still leaves room to tilt tiles into place.
Many residential guides cite a minimum drop requirement (often around a few inches) so the system can install properly.Step 2: Sketch a quick layout (yes, even a messy one)
Draw the room to scale on graph paper or digitally. Mark soffits, columns, stairs, vents, and light locations.
This helps you estimate materials and plan where fixtures will land (ideally supported correctly, not “balanced and prayed over”).Step 3: Plan tile layout so borders aren’t tiny slivers
Standard tiles are 2×2 or 2×4. Centering the grid (or slightly shifting it) can help you avoid super-narrow border pieces.
Many installation worksheets use simple division and remainder math to balance borders on opposite sides.Quick example: If a wall-to-wall span isn’t a perfect multiple of 2 feet, split the leftover space so each border is similar.
Your ceiling will look symmetrical on purposewhich is the best kind of symmetrical.Step 4: Find joist direction and mark reference points
Main tees commonly run opposite the joists, so confirm joist direction first. If joists are hidden, use a stud finder or careful probing to locate them and mark their centers.
Some guides recommend snapping chalk lines to keep joist locations visible while you work.Step 5: Mark a level reference line around the room
Use a laser level (or water level) to mark a level line at the height of your new ceiling.
This line is your “truth.” Walls can be crooked. Your eyes can be optimistic. The level line does not lie.Step 6: Install the perimeter wall molding (wall angle)
Fasten wall molding along your level line, anchoring into studs where possible. Screws typically hold tighter than nails, especially on older walls that like to argue back.
Keep corners neatmiter outside corners or butt inside corners depending on the molding style.Step 7: Snap layout lines for main tees (and cross-tee starting line)
Mark where your main tees will run. A common residential layout places main tees at 4-foot centers.
Snap chalk lines or use string lines to visualize the runs. Also mark a starting line for the first row of cross tees so the grid starts square.Step 8: Mark hanger locations and install hanger hardware
Hangers commonly go at regular intervals along each main tee run (often about every 4 feet, depending on the system and load).
Install screw eyes/lag screws/anchors into framing per your ceiling system instructions.
If you’re adding lights or heavy fixtures, plan extra support at each corner of the fixturedon’t rely on the grid alone.Step 9: Hang and pre-bend the hanger wires to height
Cut wires long enough to reach from the structure down past the grid height so you can adjust.
Many guides suggest using strings or a laser reference so you can bend wires consistently at the right height before hanging the gridthis speeds leveling later.Step 10: Hang the first main tee and level it
Rest one end on the wall molding and attach the main tee to the hanger wires.
Typical instructions show threading wire through the appropriate holes, bending it up, then wrapping/twisting it securely multiple turns.
Use your level (or laser) to get the first main tee dead-oneverything else references this.Step 11: Install the remaining main tees (parallel and on-center)
Install additional main tees parallel to the first, following your layout lines. Many standard layouts keep mains at 4-foot centers.
Splice sections as needed using the manufacturer’s connectors. Re-check level oftensmall deviations add up fast over a long run.Step 12: Add 4-foot cross tees, then 2-foot cross tees to complete the grid
Cross tees snap into pre-punched slots in the main tees.
For many common layouts, 4-foot cross tees go in first (creating 2×4 openings), then 2-foot cross tees split those into 2×2 openings.Connection tip: Many systems install more smoothly if you insert the cross tee at a slight downward angle and listen/feel for a secure “click.”
Step 13: Square the grid and build out borders and obstacle cutouts
Before you cut a bunch of pieces, confirm the grid is square. A common method is measuring diagonals of a rectangular sectionif they match, you’re square.
If they don’t, adjust while the grid is still “forgiving.”Next, install border cross tees and any short pieces needed near walls. Many instructions describe measuring from the main tee to the wall molding and cutting tees to fit, then resting the cut end on the wall molding.
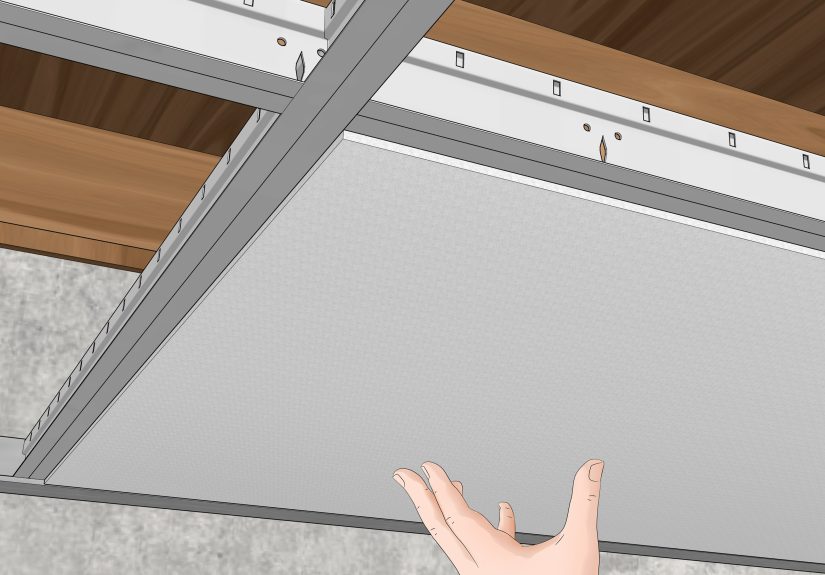
Work around vents, pipes, and boxes by planning where tees and tile cuts will landclean layout beats chaotic cutting every time.Step 14: Install lights/vents properly, then drop in the ceiling tiles
Install light fixtures and vents according to their instructionsmany require independent support (extra wires or framing) rather than relying only on the grid.
Then place tiles: angle each panel up through the opening, rotate it level, and lower it onto the grid flanges.For border tiles, measure carefully (check both ends of the opening), mark on the tile face, and cut with a sharp utility knife and straightedge.
Some guidance recommends cutting panels face-up for cleaner results.
Pro Tips That Make Your Ceiling Look Expensive (Without Actually Being Expensive)
- Level early, level often: Getting the perimeter and first main tee perfect makes everything else easier.
- Use a laser if you can: It speeds up marking height lines and wire bends and reduces “why is it waving?” moments.
- Don’t skimp on layout: Balanced borders look intentional and hide small wall irregularities.
- Respect humidity: Acclimate tiles and install in controlled conditions so panels stay flat and happy.
- Support fixtures correctly: If it’s heavy, give it its own supportyour grid will thank you by staying straight.
Common Mistakes (and How to Fix Them Fast)
“My grid isn’t level.”
Re-check the perimeter line and wall molding first. Then adjust hanger wiressmall twists can move a tee up/down.
If walls are uneven, shimming behind wall molding can help.
“My border tiles are super skinny.”
That’s a layout issue, not a cutting issue. If you haven’t installed many tiles yet, consider shifting the grid to balance borders.
Planning worksheets and centerline layout methods are designed to prevent this.
“Tiles are sagging or look wavy.”
Check humidity, tile acclimation, and whether tiles match the intended environment (basements often need moisture-resistant panels).
Also confirm grid connections are fully seated.
FAQ
Can I install a drop ceiling myself?
Many DIYers do, especially in basements and offices. The keys are careful layout, a level reference line, and patience with the grid.
If electrical work is involved, bring in a qualified adult or electrician.
What’s the typical spacing for main tees and hangers?
Many common residential layouts place main tees on 4-foot centers and place hanger points at regular intervals (often around 4 feet), but always follow your system’s instructions and local requirements.
What tiles should I use in a basement?
In damp areas, consider moisture-resistant tiles (often fiberglass or PVC-based options) and keep conditions controlled so panels stay stable.
Conclusion
Installing a drop ceiling is one of those projects that’s oddly satisfying because the results are immediate: a cleaner-looking space, better access to utilities,
and a ceiling that can evolve with your lighting and layout.
The “secret” isn’t secret at allmeasure carefully, keep everything level, and don’t rush the layout.
A square, level ceiling grid makes even budget-friendly tiles look sharp.
And remember: the grid is a system. When you follow the sequenceperimeter first, mains next, cross tees after, tiles lastyou’re not just building a ceiling.
You’re building fewer future problems (which is the most adult thing a ceiling can do).
Bonus: of Real-World Drop Ceiling Experience (What People Learn the Hard Way)
If you’ve never installed a suspended ceiling before, the biggest surprise is how much of the job is “invisible work.” The tiles are the glamorous finale, but the real
success happens earlier: layout, lines, and leveling. Most first-timers assume the grid will magically straighten itself once enough pieces are clipped together. It will not.
A ceiling grid is more like a shopping cart with one weird wheelif you start crooked, it only gets more committed to the bit.
One common real-life lesson is that walls are rarely as square as you think they are. You can measure a room three times, swear it’s rectangular, and still discover a wall
that bows just enough to make the last row of tiles look “off.” This is why balanced border tiles matter so much. When both sides are close to the same width, your eye reads
the ceiling as intentional. When one side is a 10-inch border and the other side is a 1-inch strip, the room suddenly looks like it’s wearing a shirt that shrank in the wash.
People who’ve done this once almost always say the same thing: “Next time I’m centering the layout first, even if it takes an extra hour.”
Another big takeaway: lights and vents change everything. On paper, it’s easy to place a light panel “somewhere around the middle.” In reality, a light fixture often needs its
own support and it looks best when it aligns with the grid cleanly. Experienced installers plan lighting early, then adjust grid placement slightly so fixtures land in full openings
(not half on a tile, half on your patience). If you’re replacing old lights, you may also discover that the “existing electrical box” is located exactly where you’d like a main tee to go.
That’s not bad luckit’s a rite of passage. The fix is usually to tweak the grid orientation or shift the layout so you’re not fighting the structure.
People also underestimate how much a laser level reduces stress. Yes, you can do it with a water level and string, and many have. But a laser makes it easier to keep the perimeter
line consistent, and it helps when you’re bending wires and checking grid height in multiple places. The ceiling ends up flatter because you’re not “averaging it by eye.”
If your budget allows one “nice tool” for this project, many DIYers say the laser level is the one that earns its keep.
Finally, the most practical, lived-in advice: keep tiles clean and handle them gently. Ceiling tiles show fingerprints and smudges like they’re auditioning for a crime scene show.
Set up a clean cutting surface, use a sharp blade, and don’t rush cuts near the wall. The last row is where the ceiling either looks professional or looks like it finished the job on
the drive home. Slow down there. When you’re done, step back, look across the grid lines, and enjoy the weirdly satisfying moment when the room suddenly feels “finished.”