Table of Contents >> Show >> Hide
- Why Lawn Edging Is the Fastest Way to Upgrade Curb Appeal
- Pick Your Weapon: Best Tools for Edging a Lawn
- Before You Start: The 7-Minute Setup That Saves You an Hour
- How to Edge Along a Sidewalk or Driveway (Crisp Concrete Borders)
- How to Edge Garden Beds With a Spade (Natural Trench Edging)
- How to Edge With a String Trimmer (Fast, Clean, and Slightly Noisy)
- How to Get Straighter Lines and Smoother Curves (Without Laser Equipment)
- Common Lawn Edging Mistakes (And How to Fix Them Fast)
- How Often Should You Edge Your Lawn?
- Finishing Touches That Make the Edge Look “Pro”
- Conclusion: A “Perfect Landscape” Is Mostly Just Great Borders
- Experience-Based Lessons: The Stuff You Only Learn After a Few Weekends
Mowing is the haircut. Edging is the clean neckline. And just like a fresh fade, crisp lawn edges make everything look more expensiveeven if your “landscape budget” is mostly vibes and a slightly haunted string trimmer.
If you want that sharp, magazine-worthy border along sidewalks, driveways, and garden beds, this guide will show you exactly how to edge your lawn (without accidentally “edging” a trench worthy of a medieval moat).
Why Lawn Edging Is the Fastest Way to Upgrade Curb Appeal
Lawn edging is the simple act of cutting a clean boundary where grass meets something else: concrete, mulch, pavers, a flower bed, a driveway, or that mysterious strip of dirt that appears every spring like it pays rent.
- It instantly looks neater. A clean lawn edge makes mowing lines pop and the whole yard feel intentional.
- It keeps grass from creeping. Defined borders slow the spread of turf into beds and reduce cleanup later.
- It makes mowing easier. Crisp edges reduce “missed strips” and minimize the need for repeated trimming.
- It protects garden beds. When you edge correctly, mulch stays in the bed and grass stays out (mostly).
Pick Your Weapon: Best Tools for Edging a Lawn
The “best” tool depends on what you’re edging and how sharp you want the result. Here are the common options (and when they shine).
1) String trimmer (weed whacker) for quick weekly touch-ups
Great for edging along sidewalks and driveways once a clean line already exists. It’s fast, flexible, and perfect for maintenance. It’s also the tool most likely to decorate your shins with grass confetti if you rush.
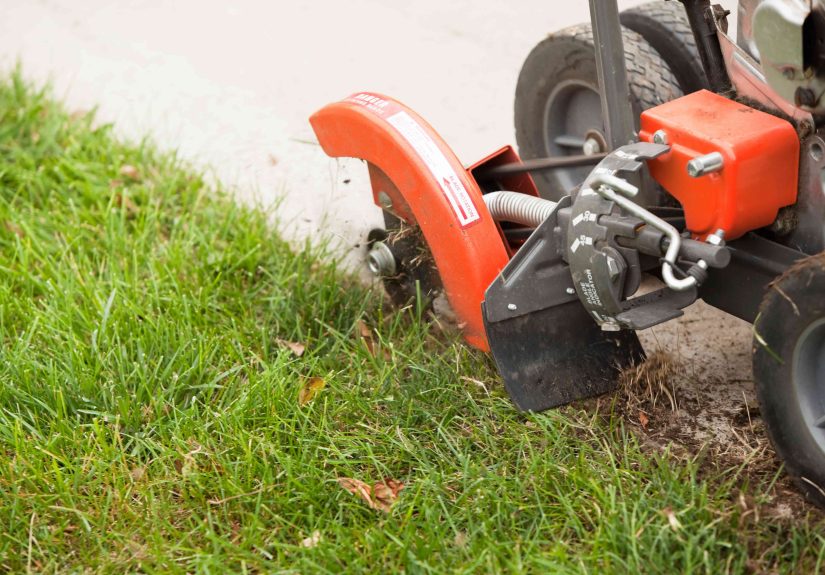
2) Dedicated lawn edger (manual or power) for crisp, straight borders
A lawn edger uses a blade (or manual cutter) to create a defined trench along hard edges. This is the move when your grass has started crawling over concrete like it owns the place.
3) Spade or half-moon edger for natural edging around beds
If you want that classic “trench edge” between lawn and mulch, a sharp spade or half-moon edger gives you the cleanest lookespecially for curved beds.
4) Installed landscape edging (steel, stone, brick, pavers) for long-term structure
If you’re tired of re-cutting edges, physical landscape edging can help. The key is choosing something that’s easy to mow against and set slightly below grade so it looks naturalnot like your flower bed is wearing a plastic helmet.
Before You Start: The 7-Minute Setup That Saves You an Hour
Skipping prep is how people end up with wavy lines, scalped turf, and a yard that looks like it lost a fight with a blender. Do this first:
- Mow first. Shorter grass makes your edge easier to see and prevents scalping.
- Clear debris. Remove rocks, sticks, gravel, and anything your tool could launch into orbit.
- Plan the line. Follow existing concrete edges, or mark new curves with a garden hose or rope.
- Check soil conditions. If the ground is baked hard, lightly water the edge area to soften it and reduce dust.
- Watch for hidden hazards. Be cautious near sprinkler heads, low-voltage lighting, and buried lines.
- Wear basic safety gear. Eye protection is non-negotiable; hearing protection is a smart upgrade for power tools.
- Pick a cleanup plan. Have a broom, blower, or rake ready so the finished edge looks finished.
How to Edge Along a Sidewalk or Driveway (Crisp Concrete Borders)
This is the most satisfying kind of lawn edging: concrete on one side, clean turf on the other. The goal is a sharp vertical cut with a slight trenchenough to define the border and stop grass from flopping onto the walkway.
Method A: Using a power lawn edger
- Set the edger on the hard surface. Roll the guide wheel along the sidewalk/driveway edge so the blade tracks the boundary.
- Choose a conservative depth. Start shallow (about 1–2 inches) and deepen only if needed. Too deep can look harsh and can invite erosion.
- Walk at a steady pace. Let the blade do the work. If you rush, the line will wobble. If you creep, you may chew up the edge.
- Keep it consistent. The “perfect” look comes from an even cut, not from digging to the center of the Earth.
- Clean the trench. Use a broom or blower to clear loose soil and clippings off concrete.
Method B: Using a manual edger (surprisingly effective)
- Line up the cutter. Place the tool so the blade sits right where grass overhangs the hard surface.
- Step down and rock. Press the blade into the soil and work your way forward in small bites for a straight line.
- Repeat to deepen. Two passes usually beat one angry pass.
- Remove loosened sod. Pull or scrape out the thin strip of cut grass that was creeping onto the concrete.
Pro tip: If your grass has built up a thick “lip” over the concrete, consider scraping the edge clean after cutting. A clean, vertical face is what makes the line look professional.
How to Edge Garden Beds With a Spade (Natural Trench Edging)
Trench edging (sometimes called a “cut edge”) is the classic look where the lawn side is a crisp vertical cut, and the bed side slopes down. It creates an air gap that discourages grass runners from easily crossing into the bed. It also looks fancy in a way that suggests you own a wide-brim hat and have opinions about mulch.
Step-by-step trench edging
- Lay out the shape. For curves, use a garden hose as a template. For straight runs, use string lines with stakes.
- Make the vertical cut (lawn side). Use a sharp spade/edger and cut straight down along your line.
- Create the angled cut (bed side). Make a second cut at an angle toward the bed, meeting the bottom of the first cut.
- Remove the wedge. Lift out the slice of sod/soil to form a clean “V” or trench profile.
- Dial in the depth. A few inches is typical for a clean visual edge. For aggressive turf or longer-lasting definition, many gardeners go deeperroughly in the 4–6 inch rangeespecially where grass keeps invading beds.
- Smooth the line. Use the spade to shave tiny high spots. Small fixes now prevent “snake edges” later.
- Mulch smart. Let mulch cover the sloped bed side lightly, but keep the vertical lawn face exposed for that crisp contrast.
What to do with the removed sod? If it’s mostly grass, you can compost it (grass-side down), patch thin spots, or use it to repair a chewed-up area elsewhere. If it’s mostly weeds, treat it like a bad sequel: don’t invite it back.
How to Edge With a String Trimmer (Fast, Clean, and Slightly Noisy)
A string trimmer is perfect for maintaining edges between deep “re-cuts.” The trick is turning trimming into edging: you want the cutting line vertical and the movement steady.
String trimmer edging technique
- Flip the trimmer head. Rotate the tool so the cutting string is vertical (many trimmers are designed for this).
- Keep the guard positioned correctly. Aim the deflector shield toward you so it blocks debris.
- Start on a hard edge. Put the line right at the boundary of concrete and grassdon’t “guess” an inch into the lawn.
- Walk the line. Move forward smoothly. Stop-and-start motion creates divots and wobbles.
- Don’t scalp. If you angle too far into the turf, you’ll expose soil and invite weeds. Keep the cut tight to the edge.
- Mind the mess. Direct clippings away from beds when possible (especially if mulch is dry and ready to fly).
Quick reality check: If your edge is already overgrown onto the sidewalk, a string trimmer can tidy it up, but a blade edger (or a spade cut) is often better for resetting a truly lost border.
How to Get Straighter Lines and Smoother Curves (Without Laser Equipment)
Perfect edges are less about strength and more about guidance. Use simple visual “rails”:
- For straight lines: Stretch a string between stakes, or lay a long board as a temporary guide.
- For curves: Use a garden hose to shape the curve, then adjust until it looks right from multiple angles.
- For symmetry: Measure key points (like distance from a patio) so curves don’t drift wider on one end.
- For consistency: Make two light passes instead of one aggressive passespecially with a spade.
Common Lawn Edging Mistakes (And How to Fix Them Fast)
“My edge looks wavy.”
Usually caused by moving too fast or not using a guide. Fix it by re-cutting the line with a string guide for straight runs, or by shaving small corrections with a spade for curves. Tiny adjustments beat big “corrections.”
“I scalped the grass and now it’s brown.”
That’s the trimmer angle. Keep the cut vertical at the boundary and avoid chewing into the turf surface. If you exposed soil, lightly rake, topdress with a thin layer of soil, and overseed (if appropriate for your grass type/season).
“My mulch keeps spilling into the trench.”
A little is finemulch can sit on the sloped bed side. But if it fills the whole trench, the edge disappears. Rake mulch back and consider slightly deepening the bed-side slope so mulch rests without burying the vertical lawn face.
“Grass keeps invading my flower beds.”
Maintenance frequency is the hidden secret. A crisp edge isn’t a one-time event; it’s a relationship. Touch up with a trimmer regularly, and re-cut trench edges when they soften. If invasion is constant, a deeper trench edge or a physical barrier (like steel edging) may help.
How Often Should You Edge Your Lawn?
The honest answer: as often as your grass grows like it’s training for a marathon. In peak growing season, many homeowners do a quick edge touch-up every 1–2 mowing cycles. A deeper “reset” edge (with an edger blade or spade) is usually needed less oftenthink seasonally or as the line starts to blur.
Finishing Touches That Make the Edge Look “Pro”
- Sweep the concrete. A crisp edge looks half-finished if clippings are scattered everywhere.
- Blow debris out of corners. Driveway edges and sidewalk joints love collecting dirt.
- Trim the overhang. If grass is still leaning over the edge, a quick pass with the trimmer cleans it up.
- Check from the street. The best view is the one everyone else sees. Adjust any obvious wobbles.
Conclusion: A “Perfect Landscape” Is Mostly Just Great Borders
If you only have time for one lawn upgrade, edge your lawn. It’s the fastest path to a clean, intentional look: mow first, pick the right edging tool, cut with a steady hand, then do the tiny cleanup that makes the whole thing pop.
And remember: your first edging attempt doesn’t need to be perfect. It just needs to be better than yesterday and ideally not shaped like a question mark.
Experience-Based Lessons: The Stuff You Only Learn After a Few Weekends
The internet makes lawn edging look like a single graceful pass followed by a slow-motion smile. Real life is more like: one pass, a second pass, a third “why is it doing that?” pass, and then a triumphant broom sweep that somehow feels like the most important step.
One pattern that shows up in a lot of yards is this: the first edging of the season always takes the longest. Over winter (or rainy weeks), soil compacts, grass creeps, and the edge line softens. That first spring reset is when a blade edger or spade feels like a superhero. After you restore the boundary, maintenance becomes almost unfairly easy. A quick string-trimmer touch-up starts taking minutes instead of an hour because you’re following a clean track, not inventing one.
Another common lesson: the yard will tell you which tool it prefers. If you have sandy soil, trench edging can feel like slicing cake, and you’ll get those crisp, sharp walls with minimal effort. In heavy clay, though, a spade can “grab” and chunk, leaving a jagged edge. In that case, watering lightly the day before (or even a couple hours before) makes the soil cut cleaner. People often assume they need more forcewhat they usually need is slightly softer soil and a sharper blade.
Curves are where confidence gets built. Lots of homeowners start with straight lines because they’re predictable. But once you realize a garden hose is basically a cheat code for shaping curves, the whole yard opens up. The best curves also tend to be gentler than you think. Super tight curves look fun on paper, but they’re harder to mow cleanly, and the edge gets “nibbled” into a wavy mess over time. A broad, smooth arc is easier to cut, easier to maintain, and still looks high-end.
Then there’s the “where did my mulch go?” moment. After a fresh trench edge, the bed looks perfectuntil the first heavy rain, or until someone aims a leaf blower like it’s a jet engine. Experienced yard folks usually adjust by keeping mulch slightly back from the vertical lawn face. Mulch can cover the sloped bed side, but if it fills the trench, the definition disappears. The clean look comes from contrast: dark mulch on one side, bright turf on the other, with a crisp line between them.
Finally, edging teaches patience in a very specific way: if you try to “fix everything” in one day, you’ll rush the detail work. The best-looking yards often happen in two stagesreset edges first, then come back later for small refinements. On that second pass, you’ll notice tiny wobbles, spots where the grass is still overhanging, or corners that need a little hand trimming. Those micro-fixes are what make neighbors ask, “Did you hire someone?” (You don’t have to tell them your secret is simply: slow down, clean up, and edge like you’re drawing a line you actually want to look at.)


