Table of Contents >> Show >> Hide
- What You’ll Need
- How This Word Trick Works (So It Feels Less Like Magic)
- Step 1: Write the Word “CAT” (Choose Your Style)
- Step 2: Turn Letters Into a Cat Silhouette (Thicken + Connect)
- Step 3: Add the Head and Ears (Instant Recognizability)
- Step 4: Add the Face, Paws, and Tail Details (Make It Cute on Purpose)
- Step 5: Ink, Erase, and Add Style (The Glow-Up)
- Troubleshooting: Fix Common “Why Does My Cat Look Like That?” Moments
- Fun Variations (Same Word, Different Cat Personalities)
- FAQ
- Conclusion
- Experience-Based Notes: What It’s Like to Practice This Trick (and Why People Get Hooked)
Want a cat doodle that starts as a spelling lesson and ends as something you’d absolutely put on a sticky note? This “word-to-picture” trick turns the letters C-A-T into a cat drawingtail, body, face, and all. It’s beginner-friendly, kid-approved, and oddly satisfying (like popping bubble wrap, but quieter).
You’ll get 5 clear steps, simple “pictures” you can copy, and a handful of upgrades so your cat doesn’t look like it just remembered it left the stove on.
What You’ll Need
- Pencil (any standard pencil works)
- Eraser (because confidence is great, but so is editing)
- Fine-tip marker or pen (optional for outlining)
- Color tools (optional): crayons, markers, colored pencils
- Paper (printer paper is perfect; fancy sketchbooks are also welcome)
Pro-tip: If you’re drawing with kids, set a “no eraser shame” rule. Erasers aren’t a sign of weakness. They’re tiny time machines.
How This Word Trick Works (So It Feels Less Like Magic)
The idea is simple: each letter becomes a body part. The C is naturally curvyperfect for a tail or the curve of a back. The A can become the belly and legs (or a chunky cat torso, depending on how many snacks your cat has had). The T can transform into the chest, front leg, or even a little “sit” posture.
You’re basically doing two art skills at once: letter shaping (turning typography into forms) and construction drawing (building a simple animal from shapes). The best part? It looks clever even if you’re a beginner.
Step 1: Write the Word “CAT” (Choose Your Style)
Start by writing CAT in large letters across your page. For the easiest transformation:
- Use rounded, bubble-like letters (sharp corners make it harder to “cat-ify”).
- Leave a little space between lettersclose enough to connect, not so close they become one blob.
- Try lowercase “cat” if you want a softer, cuter look.
If you’re working with kids: have them say “C-A-T” out loud while writing it. Congratulationsyou just snuck in literacy practice.
Step 2: Turn Letters Into a Cat Silhouette (Thicken + Connect)
Now we morph letters into body shapes. Lightly sketch around the letters to “inflate” them, then connect them like they’re holding paws.
How to map the letters
- C = Tail: extend the ends of the C into a tail curl. A little hook at the tip = instant cat energy.
- A = Body: round the A so it feels like a belly. You can soften the triangle shape into an oval-ish torso.
- T = Chest/Front: widen the T’s vertical stroke into a front leg or chest curve.
Don’t worry if it looks like a potato right now. Cats are basically potatoes with opinions. The details in the next steps will do the heavy lifting.
Step 3: Add the Head and Ears (Instant Recognizability)
Most “is it a cat?” confusion disappears the moment you add a head with ears. Draw an oval or circle above the body (often above the A/T area), then add two triangle ears on top.
Quick guidelines
- Place the head so it slightly overlaps the bodycats don’t float (unless you’re drawing a ghost cat, which is also valid).
- Angle the ears slightly outward for a relaxed cat; straight up for alert; sideways for “I heard the treat bag.”
- Add a tiny inner-ear line, not a full triangle, unless you want “bat-cat.”
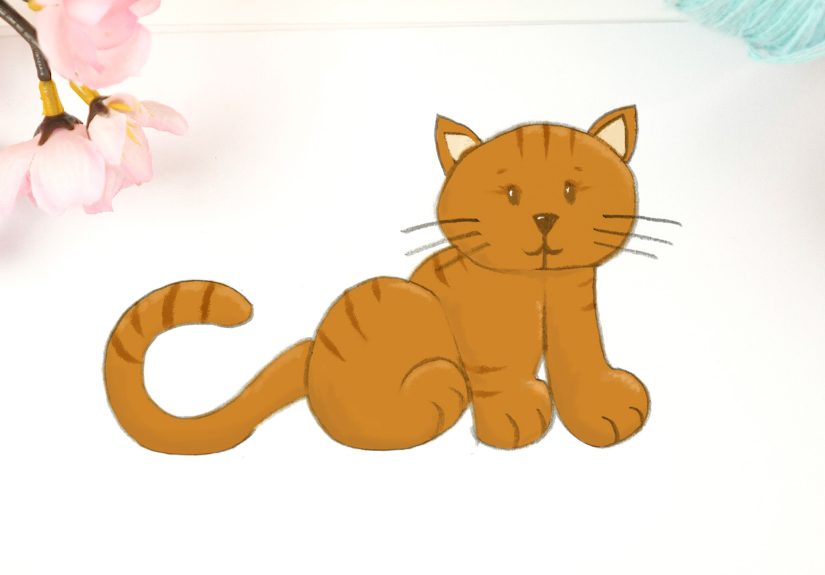
Step 4: Add the Face, Paws, and Tail Details (Make It Cute on Purpose)
Time for personality. Keep the face simple: two eyes, a tiny nose, a small mouth, and whiskers. Then define paws/feet at the bottom and refine the tail curl from the C.
Face options (pick one)
- Classic cute: big eyes + small nose + tiny “w” mouth.
- Chill cat: half-closed eyes and a straight mouth line.
- Cartoon surprise: round eyes and a little open “o” mouth.
Whisker tip
Draw whiskers in sets of 3 on each side. Keep them slightly curved, like gentle parentheses. If whiskers go straight out like laser beams, your cat will look like it’s buffering.
Step 5: Ink, Erase, and Add Style (The Glow-Up)
When you like your sketch, trace the final lines with a pen/marker. Let it dry for a few seconds, then erase pencil marks. Now choose your finishing style:
Three easy finishing styles
- Outline-only: clean line art, doodle-friendly, looks “intentional” even when done in 90 seconds.
- Simple shading: add a shadow under the belly and behind the tail curl for depth.
- Color + pattern: stripes, spots, a heart tag on the collargo full cat-fashion designer.
Optional but fun: write “CAT” faintly behind the drawing like a watermark. It’s the artistic equivalent of saying, “Yes, I meant to do that.”
Troubleshooting: Fix Common “Why Does My Cat Look Like That?” Moments
The letters look trapped inside the cat
Lighten your original word, then redraw the cat silhouette more confidently on top. The word is a starting scaffold, not a prison sentence.
My cat is lopsided
Make the head slightly smaller or shift it to center over the body. Also: uneven ears are normal. Real cats have asymmetrical vibes.
It looks like a bear (or a potato)
Sharpen the ear triangles and lengthen the tail curl. A longer tail and pointier ears scream “cat” in cartoon language.
Whiskers took over my whole page
Keep whiskers shorter than the width of the face. If whiskers are longer than the cat is wide, you’ve drawn a whisker creature with a cat accessory.
Fun Variations (Same Word, Different Cat Personalities)
1) Sleepy “cat nap” version
Tilt the head slightly and draw closed eyes (two soft curved lines). Add a little “Z” above the head if you want cartoon sleep mode.
2) Kitten version
Make the head bigger, the body smaller, and the eyes larger. That’s basically the universal formula for “aww.”
3) Fancy typography cat
Write the word in cursive “cat,” then turn the flowing c into a long curly tail. Add thicker downstrokes for a hand-lettered look.
4) Name-tag cat
Draw a collar and write a name on the tag. If you’re doing this in a classroom, kids love turning it into a pet “character card.”
FAQ
Should I use uppercase “CAT” or lowercase “cat”?
Either works. Lowercase tends to look softer and more “cute doodle.” Uppercase can look bold and graphicgreat for posters, signs, or logo-style sketches.
Can I do this with other words?
Yesthis is part of a larger idea sometimes called word art or calligram-style drawing, where letters form an image. Try “DOG,” “FISH,” or “BIRD” and see what shapes the letters naturally suggest.
How long should this take?
Once you’ve done it a couple times, you can sketch a CAT-to-cat in a few minutes. The first one might take longer, mostly because your brain will say, “Wait… letters can do that?”
Conclusion
Turning the word CAT into a cat drawing is one of those art tricks that feels like a party trickexcept the party is your notebook margin. Follow the 5 steps, use the pictures as training wheels, and then start remixing: sleepy cat, kitten, fancy script cat, whatever fits your mood.
Most importantly: don’t chase perfection. Cats don’t. They simply sit in the middle of your project and dare you to work around them.
Experience-Based Notes: What It’s Like to Practice This Trick (and Why People Get Hooked)
The first time people try “draw a cat from the word CAT,” the most common reaction is a mix of curiosity and suspicionlike your brain is watching a magician and quietly checking for hidden strings. That’s because you’re not just drawing an animal; you’re translating a symbol (a letter) into a shape (a tail, a belly, a leg). Once that clicks, it opens a whole new drawer in your creativity toolbox labeled: “Wait, I can make art out of anything.”
Beginners often start off pressing too hard when writing the word. It makes the letters feel “locked in,” and then it’s harder to reshape them. A lighter start helps because you give yourself permission to redraw on top. Think of the first “CAT” as scaffoldingtemporary structure, not final architecture. When you approach it like that, you stop fighting the letters and start using them.
Another common experience: the cat looks “not-cat” until the ears appear. People will stare at a pretty decent body shape and still feel unsure, but the moment you add two simple triangles, the drawing suddenly announces itself. It’s a great lesson in visual storytelling: a few signature features (ears, tail, whiskers) do more than a hundred tiny details. You can spend ten minutes perfecting the belly curve, but one confident ear line can deliver more recognition than all of it.
If you’re doing this with kids, it turns into a creativity chain reaction. One person adds stripes, another adds a bow tie, someone else adds a tiny crown and declares their drawing “King Cat the First.” The word-based starting point keeps everyone on roughly the same path, but the finishing details let each drawing become personal. That combinationshared structure plus individual flairis why this works so well in groups. It’s also why adults secretly enjoy it too (they just call it “typography practice” to sound responsible).
As you repeat the exercise, your hand starts learning shortcuts: you’ll naturally leave extra space after the C for a tail curl, you’ll round the A without thinking, and you’ll use line weight to suggest fur or shadow. The drawing becomes faster, cleaner, and more confident. And here’s the sneaky benefit: you’re training observation and controlspacing, proportions, symmetry, stroke confidencewithout it feeling like homework. It’s “just a cute cat,” but it’s also foundational drawing skill disguised as a doodle.
The best long-term “practice feeling” is this: you stop worrying about whether your cat is perfect and start enjoying how many personalities you can invent. One CAT becomes a grumpy cat. Next becomes a curious kitten. Next becomes an elegant cat with dramatic eyeliner and a collar that costs more than your rent. That’s the moment you’ve leveled upnot because your lines are flawless, but because you’re playing. And in drawing, play is basically rocket fuel.