Table of Contents >> Show >> Hide
- Why Convert a Photo to PDF on iPhone?
- Quick Prep Before You Start
- Way 1: Photos App + Print Gesture (Fastest “No-Setup” Method)
- Way 2: Files App + Create PDF (Best for Batch Conversion)
- Way 3: Notes App Workflow (Great for Comments, Markup, and Sharing)
- Which Method Should You Use?
- Troubleshooting: If Your iPhone Won’t Convert to PDF
- Privacy and Security Tips
- SEO-Friendly FAQs
- Conclusion
- Experience Section: Real-World Scenarios and Practical Lessons (Approx. )
Need to turn a photo into a PDF on your iPhone fastwithout downloading a mystery app that promises
“1000% HD magic conversion” and then asks for your blood type? You’re in the right place.
This guide walks you through 3 free ways to convert a photo to PDF on iPhone, including
built-in methods using Photos, Files, and Notes. You’ll also get
troubleshooting tips, quality settings, file-size hacks, and real-world examples so you can choose the best method
for homework, contracts, receipts, travel docs, or that one form that still thinks fax machines are cutting-edge.
Whether you need a single image PDF, a multi-photo PDF, or a neat share-ready file that works
everywhere, these step-by-step methods are beginner-friendly and quick.
Why Convert a Photo to PDF on iPhone?
Converting images to PDF is useful because PDF is consistent across devices. A PDF keeps your page layout cleaner,
often looks more professional, and is easier to upload to portals that reject plain image files.
- Better compatibility: Most schools, offices, and government forms accept PDF first.
- Multi-page convenience: Combine multiple photos into one file.
- Easier sharing: One PDF is simpler than sending 12 separate images.
- Cleaner archives: Great for receipts, IDs, paperwork, and travel confirmations.
Quick Prep Before You Start
Do this once and every method gets easier:
- Crop first: Trim background clutter in Photos before conversion.
- Set page order: If converting multiple images, rename or sort them first.
- Check readability: Zoom in and verify text is sharp.
- Pick destination: Decide if you want it in iCloud Drive or On My iPhone.
Way 1: Photos App + Print Gesture (Fastest “No-Setup” Method)
Best for
One photo (or a few photos) when you want the fastest route with zero app switching.
Steps
- Open Photos and select the photo you want.
- Tap Share.
- Scroll and tap Print.
- On the print preview, perform a pinch-out (zoom) gesture on the thumbnail.
- The preview opens as a PDF. Tap Share again.
- Choose Save to Files, then pick a folder and tap Save.
Why this works
The print preview acts like a hidden PDF generator. It’s quick, built-in, and surprisingly reliable.
Think of it as iPhone’s secret handshake.
Pro tips
- If colors look odd, turn off filters before conversion.
- For forms and receipts, use high-contrast edits in Photos first.
- If you don’t see “Print,” keep scrolling in the Share Sheet; it’s usually there.
Common mistake
People tap “Print” and expect a file to appear automatically. You must do the pinch-out on preview first to convert to PDF.
Way 2: Files App + Create PDF (Best for Batch Conversion)
Best for
Turning one or many images into a PDF and managing everything in folders.
Single-image conversion steps
- In Photos, choose your image and tap Share > Save to Files.
- Open the Files app and locate the image.
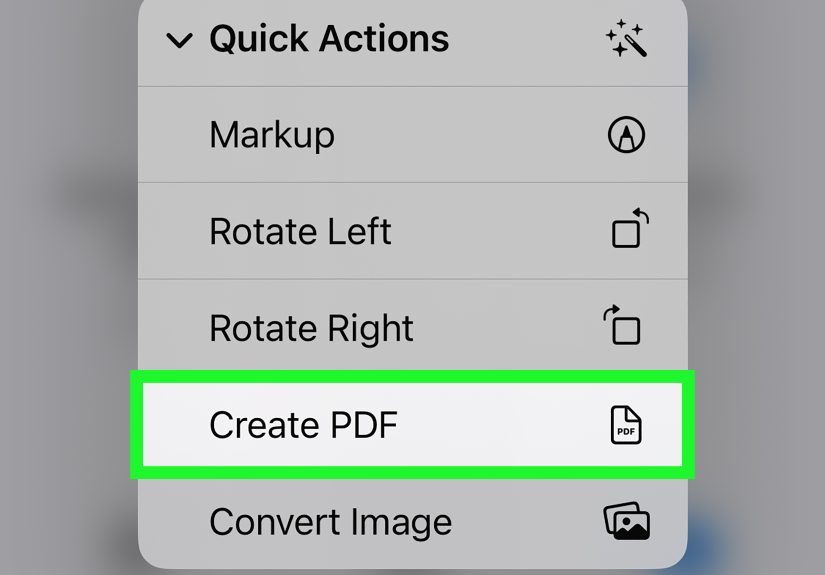
- Touch and hold the image file.
- Tap Quick Actions > Create PDF.
Multiple images to one PDF
- Save all desired photos to the same folder in Files.
- Tap the three-dot menu > Select.
- Select images in the order you want.
- Tap More (or three-dot menu) > Create PDF.
How to control page order
File order matters. If your pages come out wrong, rename images first (for example: page-01, page-02, page-03).
Then convert again.
Why this method is powerful
- Great for multi-page PDFs from multiple photos.
- Easy to organize in iCloud Drive folders.
- Keeps the workflow professional and reusable for future tasks.
Way 3: Notes App Workflow (Great for Comments, Markup, and Sharing)
Best for
Situations where you want to add context, annotations, or combine image content with text notes before exporting.
Steps to convert a photo to PDF through Notes
- Open Notes and create a new note.
- Tap the Attachment icon and add your existing photo.
- Open the note options (three dots), then choose Send a Copy.
- Tap Markup, then tap Done.
- Choose Save File To… and store the PDF in Files.
Bonus use case: paper photos and documents
If your “photo” is still on paper, Notes can scan it directly and save it as a PDF. This is perfect for receipts,
handwritten pages, ID copies, and signed forms.
When to choose Notes over Files
- You need to annotate, highlight, or sign content quickly.
- You want note context attached to the image before export.
- You frequently share to Messages or Mail straight from note workflows.
Which Method Should You Use?
| Method | Speed | Best For | Learning Curve |
|---|---|---|---|
| Photos + Print Gesture | Very fast | Single photo, quick send | Low |
| Files + Create PDF | Fast | Multiple photos, folder organization | Low to Medium |
| Notes Workflow | Medium | Markup, note context, scan + export | Medium |
Troubleshooting: If Your iPhone Won’t Convert to PDF
1) “Create PDF” is missing in Files
Make sure you’re long-pressing an image file in Files, not previewing inside another app. Save the image to Files first, then try again.
2) PDF is blurry
- Start with a higher-resolution photo.
- Use better lighting for document shots.
- Crop tightly to reduce compression artifacts.
3) File size is too large
- Reduce image dimensions before conversion.
- Avoid unnecessary duplicate pages.
- If available in your iOS workflow, use compression options after export.
4) Pages are out of order
Rename files with numeric prefixes before batch conversion. Alphabetical sorting can scramble pages if names are inconsistent.
Privacy and Security Tips
- Store sensitive PDFs in private folders, not random shared albums.
- Double-check metadata when sharing official documents.
- Use trusted cloud storage and avoid unknown “free converter” sites for personal IDs.
SEO-Friendly FAQs
Can I convert multiple photos to one PDF on iPhone for free?
Yes. The Files app method is ideal for combining multiple images into one PDF.
What is the easiest way to save a photo as PDF on iPhone?
The Photos + Print gesture is usually the fastest for one image.
Does iPhone have a built-in photo to PDF converter?
Yes. You can use built-in iOS tools in Photos, Files, and Notes to create PDFs.
Where do converted PDFs go on iPhone?
Most methods let you save into the Files app, in iCloud Drive or On My iPhone.
Can I scan a document and save it as PDF directly on iPhone?
Yes. Notes and Files both support document scanning and PDF saving.
Conclusion
If you only remember one thing from this guide, remember this: your iPhone already has everything you need.
No paid tools, no complicated setup, no drama.
Choose Photos + Print for speed, Files + Create PDF for batch jobs, and
Notes when you need markup and context. Once you try these a couple of times, converting a photo
to PDF on iPhone becomes a 20-second habit instead of a 20-minute internet rabbit hole.
Experience Section: Real-World Scenarios and Practical Lessons (Approx. )
In real everyday use, people don’t convert photos to PDFs because it’s “fun.” They do it because life keeps throwing
tiny admin quests at them: upload your ID, submit your assignment, send your signed page, file your expenses, prove
your reservation, attach your receipt, and so on. The most useful lesson from repeated iPhone-to-PDF workflows is
that context matters more than the method.
For example, students often need to submit handwritten homework as one file. They usually start by taking four or five
photos, then panic when the school portal only accepts PDF. In that situation, the Files method is ideal because they
can keep every page in order and export a single document. The first time this happens, there’s usually a page-order
mistakepage 10 appears before page 2 because filenames are inconsistent. After that one painful upload, they learn
the “rename before convert” rule and never forget it.
Office users have a different problem: speed and professionalism. When someone asks, “Can you send this signed page in
PDF right now?” the Photos + Print workflow is the quickest win. You can capture, convert, and send in under a minute.
The catch is that fast workflows can produce sloppy files if lighting is poor. A photo taken under yellow desk light
with shadows may be technically a PDF, but not a readable one. Experienced users solve this by taking five extra seconds
to flatten the paper, improve lighting, and crop tightly before conversion. That small habit dramatically improves results.
Parents, freelancers, and small business owners often love the Notes workflow because they need context around the file.
A plain image is easy to lose, but a note with a short description, date, and attachment creates better digital memory.
You can keep “Tax Receipts 2026,” “Medical Docs,” or “Project Invoices” as organized note sets. Converting from Notes
to PDF then feels less like random file handling and more like lightweight document management.
Travelers run into another common case: unstable internet and urgent uploads. Airports, hotel Wi-Fi, and mobile data
can be unpredictable. In those moments, the smartest move is saving PDFs locally first, then uploading later. This avoids
failed uploads and duplicate submissions. People who do this regularly also keep a folder like “Travel PDFs” in Files so
tickets, visa pages, and confirmations are easy to find offline.
There’s also a confidence curve. First-time users assume converting to PDF is a “technical task.” After two or three
attempts, it becomes muscle memory. They stop searching “free iPhone PDF converter” and start using built-in tools with
intention. The practical takeaway is simple: don’t chase dozens of apps first. Master one fast method for urgent tasks,
one organized method for multi-page files, and one method that supports markup and context. That three-method toolkit
covers almost every real-world need.
Final real-world tip: build a repeatable mini workflow. Capture clearly, crop, name files, convert, verify readability,
and then share. It sounds basic, but this tiny checklist saves time, prevents rejection on upload portals, and reduces
the stress of last-minute document requests. Once that system is in place, your iPhone becomes a pocket document desk
minus the noisy scanner and the paper jam nobody misses.


