Table of Contents >> Show >> Hide
- Before You Start: Plan, Measure, and Choose Materials
- Step-by-Step: Build a Sturdy Wooden Gate in 13 Steps
- Step 1: Lay out your cut list and tools
- Step 2: Confirm your gate posts are solid
- Step 3: Cut the frame pieces to size
- Step 4: Dry-fit and square up the frame
- Step 5: Add the diagonal brace in the right direction
- Step 6: Screw the frame together
- Step 7: Add a middle rail (optional but recommended)
- Step 8: Attach the boards or pickets
- Step 9: Sand rough edges and pre-finish if desired
- Step 10: Attach the hinges to the gate
- Step 11: Hang the gate on the posts
- Step 12: Install the latch and handle
- Step 13: Seal, paint, and set up a maintenance routine
- Common Mistakes When Building a Wooden Gate (and How to Avoid Them)
- Safety Tips While Building a Wooden Gate
- Real-Life Experiences: Lessons You Only Learn After Building a Few Gates
- Conclusion
If you’re tired of squeezing through a wobbly section of fence like a suburban ninja, it’s time to build a proper wooden gate. The good news: a sturdy, good-looking gate is totally doable for a confident DIYer with basic tools. The better news: once you understand a few key principleslike how to brace the frame so it doesn’t sagyou’ll wonder why you didn’t build one sooner.
This guide walks you through how to build a wooden gate step by step, from planning and materials to hanging the gate and fine-tuning the latch. We’ll also talk about common mistakes, safety tips, and real-world lessons people only learn after building a few gates the hard way.
Before You Start: Plan, Measure, and Choose Materials
Check your fence, posts, and local rules
Before you even touch a saw, take a good look at where this gate will live. Are the fence posts solid and set in concrete? Are they leaning or loose? A perfect gate hung on wobbly posts will still act like a funhouse door.
Also check for:
- Local building codes or HOA rules: Some neighborhoods limit gate height, style, or swing direction.
- Obstacles: Sprinkler heads, tree roots, AC units, or sloped concrete can affect how your gate swings.
Measure the opening (and then measure again)
Use a tape measure to measure the distance between your two gate posts at three points: top, middle, and bottom. Posts are rarely perfectly parallel, so don’t skip this.
Use the narrowest measurement as your reference and subtract about 1/2 inch (12 mm) to allow clearance so the gate can swing freely without scraping. That number is your target gate width.
Pick the right wood and hardware
Your gate is outside 24/7, so choose materials that can handle sun, rain, and seasonal mood swings.
- Lumber: Common choices include cedar, redwood, or pressure-treated pine. Cedar and redwood resist rot and insects and look great stained. Pressure-treated pine is budget-friendly but benefits from a good sealer or paint.
- Frame size: Most DIY gates use 2×4 lumber for the frame and 1×6 or fence pickets for the infill boards.
- Fasteners: Use exterior-rated or stainless steel screws that won’t rust and streak down your boards.
- Hinges and latch: Heavy-duty strap or T-hinges are ideal for fence gates. Match the hardware finish to your home’s styleblack, galvanized, or bronze.
- Optional helpers: Anti-sag kits, gate wheels, or extra diagonal bracing for wide or heavy gates.
Step-by-Step: Build a Sturdy Wooden Gate in 13 Steps
Ready? Let’s build. The steps below assume a standard single wooden gate in a typical backyard fence, but you can adjust dimensions to fit your opening.
Step 1: Lay out your cut list and tools
Sketch a quick plan with your gate width and height. For many backyard fences, a gate height of 6 feet (to match the fence) works well, but you can go shorter for a garden gate.
Typical cut list for one gate might include:
- 2 vertical frame pieces (stiles)
- 2–3 horizontal rails (top, bottom, and optional middle)
- 1 diagonal brace
- Fence boards or pickets for the face
Gather tools: circular saw or miter saw, drill/driver, exterior screws, speed square, level, clamps, and safety gear.
Step 2: Confirm your gate posts are solid
If your existing posts wiggle when you lean on them, fix that before hanging a gate. Most pros recommend setting posts in concrete at least one-third of the fence height and below the frost line in cold climates. A typical 6-foot fence often needs posts set around 2 feet deepdeeper where frost is an issue.
If the posts are already in place but slightly out of plumb, you can sometimes cheat a bit with hinge shims, but if they are badly leaning, consider resetting them. A sagging post will drag even the best-built gate down with it over time.
Step 3: Cut the frame pieces to size
Use your measurements to cut the vertical stiles and horizontal rails from 2x4s.
- Stiles: Cut two boards to your desired gate height.
- Rails: Cut a top and bottom rail to your gate width (the number you calculated after subtracting clearance).
Step 4: Dry-fit and square up the frame
Lay the stiles and rails on a flat surface in a rectangle. Check for square by measuring diagonally from corner to corner. If the two diagonal measurements match, the frame is square. If not, nudge the corners until they do.
Use clamps or temporary screws to hold everything in place. Taking a few minutes here to get the frame square will save you from a gate that drags or binds later.
Step 5: Add the diagonal brace in the right direction
This is the part that separates sturdy gates from sad, sagging ones. Your diagonal brace should run from the bottom hinge side up to the top latch side. That way, the gate’s weight compresses the brace rather than trying to pull it apart.
Lay a 2×4 diagonally across the frame, mark where it intersects the rails and stiles, and cut it to fit snugly. The ends should land tight in the corners.
Step 6: Screw the frame together
With the brace cut and test-fitted, start assembling for real:
- Pre-drill screw holes to prevent splitting, especially near board ends.
- Attach the top and bottom rails to the stiles with two or three exterior screws at each joint.
- Install the diagonal brace, driving screws through the rails and into the brace at the ends and along its length.
Re-check the diagonals when you’re done. If the frame pulled out of square, gently clamp or push it back while snugging the screws.
Step 7: Add a middle rail (optional but recommended)
A center rail adds stiffness and gives you more places to fasten pickets or boards. Cut a 2×4 to match the top and bottom rails and place it roughly in the middle of the gate or aligned with the latch height.
Attach it with screws through the stiles. This extra rail is especially helpful for tall or wide gates or when you want a specific latch height.
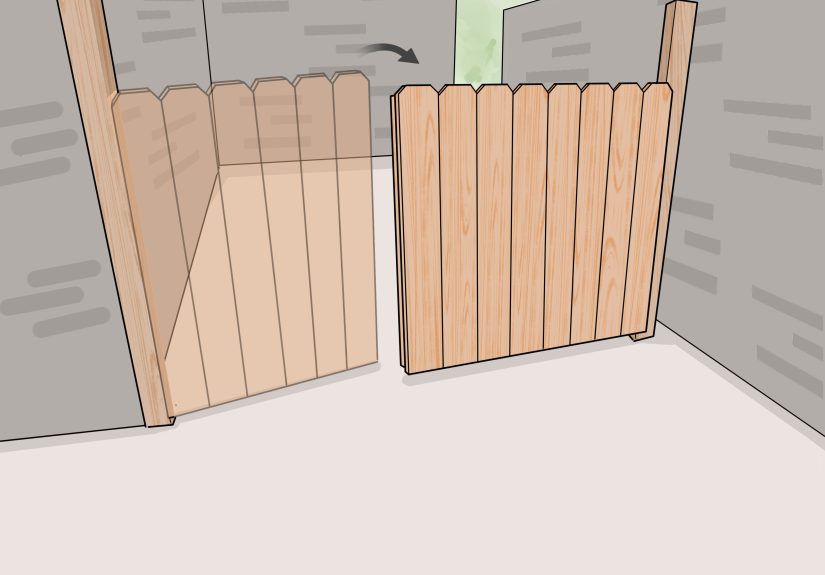
Step 8: Attach the boards or pickets
Now the frame becomes a gate. Lay your fence boards or pickets across the frame, making sure the tops line up with your desired finished height.
- Leave a small gap (about 1/8–1/4 inch) between boards for drainage and wood movement.
- Start with the two outer boards, then fill in the center so spacing stays even.
- Use two screws per rail per board for a solid connection.
Step 9: Sand rough edges and pre-finish if desired
Quickly sand sharp corners or splinters, especially around the handle area where people’s hands will be. If you plan to stain or seal the wood, many DIYers like to apply the first coat before hanging the gateit’s easier to reach all the surfaces when the gate is flat.
Step 10: Attach the hinges to the gate
Lay the gate face down and position your strap or T-hinges along the hinge stile. Typically, one hinge goes near the top rail and one near the bottom rail; a third in the middle is a good idea for heavier gates.
Pre-drill and install the supplied lag screws or structural screws. Make sure the hinges are perfectly aligned so the gate swings smoothly.
Step 11: Hang the gate on the posts
This step is easier with a helper, but you can cheat with scrap blocks. Place wood shims or bricks under the gate to hold it at the height you wantusually with about 1–2 inches of clearance at the bottom.
- Hold (or support) the gate in the opening with your chosen bottom gap.
- Level the top of the gate.
- Mark hinge locations on the post and attach the hinge plates to the post with structural screws or lag bolts.
Open and close the gate a few times. Adjust shims or hinge positions until it swings freely without dragging or binding on the posts.
Step 12: Install the latch and handle
Follow the instructions for your specific latch stylering latch, thumb latch, gravity latch, or locking handle. Mount the latch on the gate at a comfortable height (usually around 36–42 inches) and install the catch on the post.
Test it several times. Adjust the catch plate so the gate closes easily but doesn’t rattle in the wind. If you have kids or pets, consider a self-closing hinge or spring and a latch that can’t be popped open by a determined dog nose.
Step 13: Seal, paint, and set up a maintenance routine
Finish your gate with an exterior stain, sealer, or paint. This helps protect against moisture, UV rays, and warping. Pay attention to the top edges of boards and any exposed end grainthose areas soak up water like a sponge.
Once or twice a year, check for:
- Loose screws or hinge bolts
- Early signs of rot near the bottom
- Gate sagging or rubbing on the ground
A five-minute tune-up can add years to your gate’s life.
Common Mistakes When Building a Wooden Gate (and How to Avoid Them)
1. Putting the diagonal brace the wrong way
If your gate brace runs from top hinge side down to the bottom latch side, it’s in tension instead of compression. That design tends to let the gate sag over time. Remember: bottom hinge to top latch is the winning orientation.
2. Skimping on post depth and concrete
Shallow posts are one of the main reasons gates lean. If you’re installing new posts, set them deep enough and below the frost line in colder climates, using a proper concrete footing. It’s not glamorous, but solid posts are the foundation of a long-lasting gate.
3. Using interior screws or random nails
Drywall screws or interior fasteners will corrode outside. Once they rust, they lose strength and stain the wood. Use coated deck screws or stainless hardware designed for exterior use.
4. Ignoring wood movement and clearance
Wood swells when it gets wet and shrinks when it dries. If you build your gate with zero gaps or no top/side clearance, it may look perfect on day one but bind solid after the first rain. Always leave a little room for the wood to breathe.
Safety Tips While Building a Wooden Gate
- Wear eye protection when cutting, drilling, or hammering.
- Use hearing protection with loud power tools.
- Support long boards properly while cutting so they don’t pinch the blade.
- Be cautious around pressure-treated lumber dustcut outdoors or use a mask and clean up sawdust promptly.
- Lift the gate with your legs, not your back. A fully boarded gate can be heavier than it looks.
Real-Life Experiences: Lessons You Only Learn After Building a Few Gates
On paper, building a wooden gate is straightforward: make a rectangle, add a brace, hang it on hinges, done. In real backyards, though, you’re dealing with sloped ground, slightly crooked posts, and the occasional dog who thinks you built this just for them to test.
Pre-staining and labeling parts saves a ton of time
Many experienced DIYers eventually learn to pre-finish their lumber before assembly. Rolling or brushing stain on flat boards goes much faster than trying to hit every nook and cranny once the gate is hung. A quick trick is to label each piece on the end grain“left stile,” “top rail,” “brace”so you don’t have to play puzzle games later.
Expect the ground to be less level than you think
Driveways and walkways often have a slope for drainage. If you assume everything is level, you may hang a gate that clears the ground near the post but scrapes halfway through its swing. A smart move is to “mock swing” the gate outline before you build: hold a board in the opening at the planned bottom clearance and swing it to see where it might hit.
Wide gates need extra support
Once you get beyond about 3–4 feet in width, the game changes. The weight increases, leverage gets nasty, and sag shows up faster. People who build wide driveway or double gates often add:
- Gate wheels to roll part of the weight on the ground
- Stronger diagonal bracing or even metal frames hidden behind wood
- Anti-sag cable kits that let you fine-tune tension over time
If your gate will be wide and heavily usedsay for parking a trailerplan on those reinforcements from the start instead of trying to retrofit them after it droops.
Think about who will use the gate every day
It’s easy to build a gate for yourself and forget about short humans (kids) or four-legged escape artists. If you have children, placing the latch higher or using a child-resistant mechanism can prevent accidental escapes. Dog owners often find they need a snug fit at the bottom or an extra board to block adventurous noses from digging under.
Maintenance is easier than replacement
One small habit many experienced homeowners develop is a quick yearly “gate checkup.” It’s as simple as stepping outside with a screwdriver and a cup of coffee:
- Tighten any loose hinge bolts or latch screws.
- Add a dab of exterior caulk to cracks where water loves to sit.
- Brush on a fresh coat of sealer every few years.
These tiny tune-ups often mean your gate lasts a decade or more instead of needing a rebuild in three or four years.
And finally, be patient with yourself. The first gate you build may not look like it came from a high-end custom shopand that’s okay. By the time you’ve finished, adjusted, and admired it swinging smoothly, you’ll not only have a solid wooden gate, but also a lot of hands-on knowledge for the next project.
Conclusion
Building a wooden gate isn’t just a weekend projectit’s a chance to upgrade your fence, your home’s curb appeal, and your DIY confidence all at once. By choosing the right materials, measuring carefully, bracing the frame correctly, and hanging the gate on solid posts, you can create a strong, attractive entry that opens smoothly every time you walk through it.
Follow these 13 steps, add the real-world tips you’ve picked up here, and you’ll end up with a wooden gate that resists sagging, stands up to weather, and makes your yard feel finished instead of fenced-in. Grab your tape measure, cue up your favorite playlist, and start building that gateyou’ll be enjoying that satisfying click of the latch before you know it.


