Table of Contents >> Show >> Hide
- Pick Your Metal Top Style (Because “Metal” Is a Whole Personality)
- Design Overview: The Reliable DIY Approach
- Tools and Materials
- Step 1: Choose Your Dimensions (Comfort Matters)
- Step 2: Build a Farmhouse Base That Won’t Wobble
- Step 3: Build the Tabletop Core (Plywood Done the Right Way)
- Step 4: Plan the Metal Wrap (Measure Like You Mean It)
- Step 5: Attach the Metal to the Core
- Step 6: Make Corners That Don’t Look Like They Lost a Fight
- Step 7: Add “Farmhouse” Character Without Making It Look Fake
- Step 8: Finish the Wood Base (Durable Beats Perfect)
- Step 9: Protect the Metal (So It Stays Pretty and Practical)
- Step 10: Attach the Top to the Base (Allow a Little Movement)
- Safety Notes (The Unsexy Part That Saves Your Weekend)
- Quick FAQ
- Real-World Experience: What Building a Metal Top Farm Table Taught Me (500-ish Words of Lessons)
- Conclusion
A farmhouse table is basically the Swiss Army knife of furniture: dinner table, homework station, puzzle battlefield, plant-potting bench (don’t tell your spouse), and the official meeting spot where everyone asks, “Where are my keys?” Adding a metal top takes that classic farm-table vibe and gives it an industrial edgeliterally and aesthetically.
This guide walks you through a sturdy metal top farm table DIY build that’s realistic for a home workshop: a rock-solid wooden base with a metal-skinned top that can handle real life. We’ll cover material choices (zinc vs. galvanized vs. steel), a reliable base design, how to wrap sheet metal cleanly, finishing options, and the little details that make your table look “custom” instead of “I fought the tin and the tin won.”
Pick Your Metal Top Style (Because “Metal” Is a Whole Personality)
Before you buy anything, decide which metal-top look you’re going for. The build steps stay similar, but finishing and handling can change based on the material.
Option A: Zinc Sheet (The Classic Farmhouse Counter Look)
Zinc is popular for farmhouse-style counters and tables because it develops a soft, lived-in patina over time. It’s usually easier to form than thick steel, and it can look old-school without trying too hard.
Option B: Galvanized Steel (Budget-Friendly, Rustic, Bright)
Galvanized steel has a zinc coating that helps resist corrosion. It’s widely available at big-box stores and metal suppliers and gives that “country-industrial” finish right away. It can be tricky to paint without proper prep, but it looks great with the right clear protection.
Option C: Bare Steel (Modern Industrial, Needs Rust Protection)
Plain steel can look incredible with a clear coat, but it’s basically a magnet for rust if left unsealed. If you like the idea of a darker, modern-industrial top, plan on sealing it well and maintaining it.
Option D: Aluminum or Stainless (Low Maintenance, More Modern)
Aluminum won’t rust and is lightweight, but it dents more easily. Stainless is tough and low-maintenance, but typically costs more. Both skew more modern than rustic.
Design Overview: The Reliable DIY Approach
The most practical method for most DIYers is a wood farmhouse base with a plywood core tabletop that gets skinned with metal. You get the sturdy, forgiving structure of woodwith the durability and look of metal where it counts.
Tools and Materials
Tools
- Miter saw or circular saw with a guide
- Drill/driver + bits
- Pocket hole jig (optional but helpful)
- Clamps (more than you think you need)
- Orbital sander + sandpaper (80/120/180 grit)
- Measuring tape, square, straightedge
- Caulk gun (for construction adhesive)
- Metal snips (for thin sheet) or arrange a supplier cut (recommended)
- Files or deburring tool (for sharp edges)
- Rubber mallet and scrap wood block (for gentle forming)
Materials (Example: 72″ x 36″ Table)
- Legs: 4×4 posts (or laminated 2x4s) cut to finished height
- Aprons: 2×4 lumber for the frame
- Stretchers: 2×4 or 2×6 for stability (optional but recommended)
- Top core: 3/4″ plywood (cabinet-grade is nicest)
- Edge build-up: 1×2 or 1×3 hardwood/pine strips (optional, for thickness)
- Metal sheet: zinc/galvanized/steel sized to your top + wrap allowance
- Fasteners: wood screws, pocket hole screws (if using), washers
- Adhesive: heavy-duty construction adhesive (or contact cement for full-coverage bonding)
- Finish: wood stain/paint + protective topcoat; metal wax or clear coat
Step 1: Choose Your Dimensions (Comfort Matters)
A common farmhouse dining size is 72″ long x 36″ wide, which seats about 6 comfortably (8 if your family doesn’t mind elbow negotiations). Standard table height is 29″–30″. If you’re tall or love chunky tops, aim for a finished height near 30″.
Pro tip: Metal adds a “cool” visual weight. If you want the table to feel substantial, build the top so it looks 1 1/2″–2″ thick. You can do this with an edge build-up under the plywood (we’ll cover it).
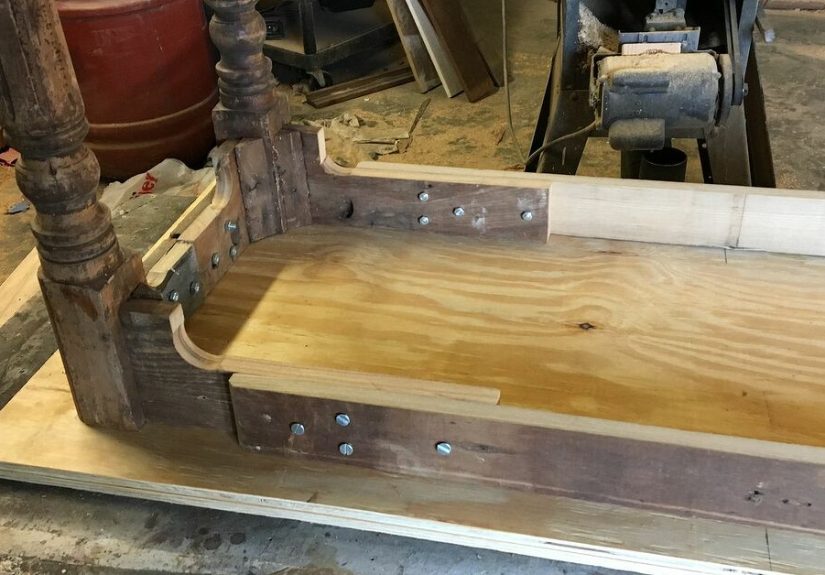
Step 2: Build a Farmhouse Base That Won’t Wobble
The base is where your table earns its keep. A metal top is unforgiving: if the base wobbles, the whole table feels cheap. Build the base like it’s going to survive a holiday dinner and a dramatic board game night.
Base Build (Straight-Leg Farmhouse Style)
- Cut legs to length. If your finished height is 30″ and your top is 1 1/2″ thick, your legs should be about 28 1/2″ (adjust for your exact top thickness).
- Cut aprons (long sides and short ends). The aprons connect the legs and support the top.
- Assemble the apron frame. Use pocket holes (fast, clean) or traditional joinery. Either way:
- Use wood glue in the joints.
- Clamp square before driving screws.
- Pre-drill if you’re close to board ends to prevent splitting.
- Add a center support (especially for long tables). A center stretcher keeps the tabletop from flexing and helps prevent long-term sagging.
- Optional but smart: add lower stretchers between legs. This boosts rigidity and gives that classic farm-table silhouette.
Stability upgrade: If your floors are even slightly uneven (so… most floors), consider adding adjustable furniture levelers to the bottom of the legs. Your table will stop doing the “tiny dance” every time someone leans on it.
Step 3: Build the Tabletop Core (Plywood Done the Right Way)
A metal skin needs a flat, stable core. Solid wood tops expand and contract across the grain with seasons; metal does not. A plywood core stays flatter and makes the metal application far easier.
Option 1: Simple Flat Core (Fastest)
- Cut 3/4″ plywood to your final tabletop size.
- Sand the top lightly to remove factory fuzz and ensure good adhesion.
Option 2: Thick-Look Top (Still Easy)
- Cut plywood to final size.
- Rip 1×2 or 1×3 strips and attach around the underside perimeter to “fake” thickness.
- Fill nail holes, sand edges flush, and break sharp corners with sandpaper.
This thick-look approach gives you that chunky farmhouse profile while keeping the stability of plywoodbasically the best of both worlds.
Step 4: Plan the Metal Wrap (Measure Like You Mean It)
If you’re wrapping the metal over the edges (the most “authentic farmhouse” look), you need extra material. A common wrap allowance is 1 1/2″–2″ per side, depending on your top thickness and how far you want the metal to fold under.
- Top size: 72″ x 36″
- Add wrap: + (2″ + 2″) length and + (2″ + 2″) width
- Metal cut size: 76″ x 40″ (example)
Best move: Ask a local sheet metal shop to cut the piece to size and (if possible) make clean bends. You’ll get straighter folds and fewer “why is this corner angry at me?” moments.
Step 5: Attach the Metal to the Core
Method A: Construction Adhesive + Mechanical Fastening (DIY-Friendly)
- Dry fit first. Place the metal on the core and verify overhang is even on all sides.
- Protect yourself. Wear glovessheet metal edges can be shockingly sharp. Deburr edges if needed.
- Apply adhesive. Run a consistent bead pattern across the plywood (zig-zag lines work well). Don’t leave big empty zones; you want full support to prevent drumming or hollow spots.
- Lay the metal carefully. Start at one end, lower it gradually, and press from the center outward to reduce trapped air.
- Clamp and weight. Use clamps around edges and place evenly distributed weight (books, sandbags, whatever you’ve got) across the top while it cures.
- Wrap edges. Once tacky/secure, fold the metal over the edges using a wood block and rubber mallet. Work slowly to avoid kinks.
- Screw from underneath. Drive short screws along the underside fold (every 6″–8″ is common) to hold the wrap tight and flat.
Method B: Contact Cement (Full-Surface Bond, Very Strong)
Contact cement can provide an extremely solid bond because it’s designed for full-surface adhesion. The trade-off: alignment must be perfect because you usually don’t get a second chance once it touches down.
- Apply contact cement to both surfaces (plywood top and underside of metal).
- Let it flash off per product directions until tacky.
- Use alignment spacers (thin dowels or strips) so you can position the metal before committing.
- Remove spacers gradually and press down firmly with a roller or a wrapped block.
If you’re nervous, pick Method A. It’s more forgiving and still very durable when done well.
Step 6: Make Corners That Don’t Look Like They Lost a Fight
Corners are where “DIY charm” can accidentally become “please don’t zoom in.” You’ve got a few solid approaches:
- Hospital corners: Like wrapping a bed sheetclean folds, minimal bulk. Best with thinner metal and careful measuring.
- Overlap corners: One side overlaps the other under the table. Easier, slightly more visible underneath.
- Corner patches (rustic style): Small fitted corner pieces can be soldered or fastened for a purposeful, old-world look.
Whatever you choose, make sure nothing sharp is exposed. If a corner can snag a sweater, it willprobably the nice one.
Step 7: Add “Farmhouse” Character Without Making It Look Fake
Metal tops look great when they have intentional detail. You can go subtle or lean into a riveted, industrial style.
Ideas That Work
- Faux rivets: Evenly spaced upholstery nails or small pan-head screws along a seam line.
- Intentional seams: Use two metal sheets with a center seam strip for a “vintage worktable” vibe.
- Soft patina: Let zinc naturally age and darken slightly where hands and dishes live.
The goal is “this belongs here,” not “I attacked it with a bag of bolts at midnight.”
Step 8: Finish the Wood Base (Durable Beats Perfect)
For a farmhouse look, you’ve got two common directions:
- Stained wood: Classic, warm, and forgiving. Seal with a durable topcoat.
- Painted base: White/black/greige bases look great under metal tops. Use a tough enamel or cabinet paint and seal if needed.
Sand well, remove dust, and don’t rush drying time. The finish you apply while impatient is the finish you’ll regret while staring at it during dinner.
Step 9: Protect the Metal (So It Stays Pretty and Practical)
Here’s the truth: a metal tabletop is a relationship. It’s low drama, but it does want a little attention.
Zinc or Galvanized Tops
- Wax finish: Easy, traditional, and repairable. Re-wax as needed. Great for patina lovers.
- Clear coat: Adds more protection, but adhesion depends on prep and product choice. Some systems need proper surface prep (cleaning and sometimes etching/priming) to avoid peeling.
- Painting: If you paint galvanized metal, use products formulated for galvanized surfaces and follow prep steps carefully so the coating bonds well.
Bare Steel Tops
- Clear coat (metal-rated): Helps prevent rust and locks in the look.
- Wax/oil: Adds a softer sheen and is easy to refresh, but needs maintenance.
Daily care tip: Wipe spills quickly, avoid harsh abrasives, and don’t let water sit under placemats or vases for days. Metal tops are tough, but “permanent puddle” is not a design style.
Step 10: Attach the Top to the Base (Allow a Little Movement)
Even though your top core is plywood (stable), your base is solid wood and will move slightly with seasons. Attach the top in a way that doesn’t fight the wood.
- Figure-8 fasteners or Z-clips work great.
- If using screws through aprons, use slotted holes (elongated) so the base can move without cracking or warping.
Safety Notes (The Unsexy Part That Saves Your Weekend)
- Wear gloves when handling sheet metal. Always.
- Deburr edges with a file to remove razor-like burrs.
- Eye protection when cutting, drilling, sanding, or working overhead.
- Avoid welding/cutting galvanized metal without proper controls. Heating zinc coatings can create hazardous fumes. If you need metal fabrication, a shop with the right ventilation and PPE is the safer route.
- Ventilation matters for adhesives and finishesopen doors, use fans, and follow product instructions.
Quick FAQ
Will the metal “drum” or sound hollow?
It can if there are gaps. Full support matters. Use enough adhesive coverage and clamp/weight evenly during cure to keep the metal tight to the core.
Can I use a metal top as a food-prep surface?
Many people do, but it depends on the finish and your comfort level. For dining tables, most folks use placemats/cutting boards as a habit anyway. If you want a true food-prep counter, consider stainless and a proven, food-safe finishing approach.
What’s the easiest way to get clean bends?
Have a sheet metal shop do it. Seriously. You’ll save time, reduce frustration, and end up with sharper, cleaner edges.
Real-World Experience: What Building a Metal Top Farm Table Taught Me (500-ish Words of Lessons)
The first time I tackled a metal top farm table DIY, I thought the hardest part would be the woodworking. Turns out, wood is polite. Metal is honest. Metal doesn’t care about your feelings, your timeline, or that you “basically measured it.” It cares about physics.
Lesson one: the metal sheet is never as “flat” as you want it to be. Even a brand-new sheet can have a subtle wave, and the moment you start moving it around, it will try to bend in ways that feel personal. That’s why the plywood core matters so much. The core isn’t just structureit’s your metal’s emotional support system. I learned to dry-fit the sheet, check corners twice, and mark alignment points like I was plotting a mission.
Lesson two: adhesive strategy is everything. On my first build, I got stingy with adhesive because I was thinking like a woodworkerspot glue here, a few screws there, call it a day. But metal telegraphs empty space. You’ll tap the top, hear a hollow thunk, and suddenly your table feels like a decorative drum. The fix was simple: better coverage and even clamping/weighting during cure. After that, the tabletop felt solid, quiet, and expensive.
Lesson three: corners are a full-time job. I assumed corners would be “fold, fold, done.” Nope. Corners are where you discover that sheet metal has a memory. If you crease it wrong, it will remember forever. The trick that saved me was working slowly with a wood block and rubber mallet, making small, controlled bends instead of trying to muscle it in one big fold. Also: deburring edges early kept me from donating blood to the project. I cannot stress this enoughgloves stay on.
Lesson four: the finish you choose affects how you live with the table. A waxed metal top has character and is easy to refresh, but it will show water rings if you ignore it. A clear-coated top is more “set it and forget it,” but surface prep becomes important so the coating doesn’t peel later. I ended up liking a middle path: a protective finish that fits our lifestyle, plus the acceptance that a farmhouse table is supposed to collect stories. Dents happen. Scuffs happen. That’s the point.
Final lesson: build the base sturdier than you think you need. The metal top draws attention, but the base is the quiet hero. Extra bracing, tight joints with glue, and careful squaring made the whole thing feel like a forever piece. And every time someone knocks on the top and says, “Wow, you made this?”it’s worth it. Even the corners. Especially the corners.
Conclusion
Building a metal top farmhouse table is one of those DIY projects that looks “high-end custom” when done rightand still feels achievable if you take it step by step. Start with a sturdy base, use a stable core, plan your wrap carefully, and choose a metal finish that matches how you actually live. Do that, and you’ll end up with a table that can handle everything from weekday chaos to holiday feasts… and maybe even a few dramatic board game rematches.