Table of Contents >> Show >> Hide
- Step 1: Plan the Deck You’ll Actually Use
- Step 2: Choose Materials That Fit Your Budget and Lifestyle
- Step 3: Lay Out and Dig the Footings
- Step 4: Build the Frame
- Step 5: Add Decking with Style (Young House Love–Inspired)
- Step 6: Build Safe Stairs and Railings
- Step 7: Finish, Inspect, and Maintain
- Real-Life Deck-Building Experiences & Lessons Learned
- Conclusion
If you’ve ever looked out at your backyard and thought, “This spot deserves
a gloriously overbuilt wooden stage for burgers, naps, and epic bubble-blowing,”
you’re in the right place. Building a deck is one of those DIY projects that looks
terrifying at first (all those beams! all those codes!), but once you break it into
steps, it becomes completely doable for a determined homeowner.
Inspired by the detailed deck chronicles on Young House Love,
plus guidance from professional deck-building resources and modern code recommendations,
this guide walks you through how to plan, design, and build a safe, sturdy,
and good-looking deck you’ll actually use. Think of it as a mash-up of
DIY blog honesty and contractor-grade best practices.
Step 1: Plan the Deck You’ll Actually Use
Decide how you’ll live on your deck
Before you touch a shovel, decide what this deck is really for. Is it a quiet
coffee spot for two, a party deck for twelve, or a launchpad for a future hot tub?
The way you’ll use it determines its size, shape, and structure.
- Small decks (8×10 or 10×12) are perfect for a bistro set or grill.
- Medium decks (12×16 or 14×18) fit a dining table plus a lounge area.
- Large decks may need additional beams and posts for heavier loads (grills, spas, outdoor kitchens).
Sketch your ideal layout with zones: grilling, eating, lounging, maybe a plant jungle
corner. Young House Love’s deck design used details like a “picture frame” border and
a decorative seam down the middle to make a big rectangle look intentional and finished,
not like a random plank parking lot.
Check permits, codes, and utilities
Once you have a basic design, hit pause and talk to your local building department.
In the United States, most jurisdictions use versions of the International Residential
Code (IRC) plus local amendments for decks. You’ll likely need:
- A building permit for any deck above a certain height or attached to the house
- Site or zoning approval if you’re close to property lines
- Inspections at key stages (footings, framing, final)
Call 811 (in the U.S.) before digging so utility companies can mark gas, electric,
and water lines. This is not an optional “nice to have”; it’s the “let’s not blow up
the neighborhood” step. Many deck failures happen because of poor footings, undersized
framing, or missing hardware, which is exactly what building codes are designed to prevent.
Step 2: Choose Materials That Fit Your Budget and Lifestyle
Framing lumber: the hidden hero
Nearly all residential decks are framed with pressure-treated lumber rated for ground
contact or above-ground use, depending on where it sits. This treated wood is designed
to resist rot and insects, making it ideal for posts, beams, and joists that you
never want to think about again.
Key framing materials include:
- Posts: Usually 4×4 or 6×6 pressure-treated lumber set in concrete footings.
- Beams: Built up from multiple 2x boards laminated together.
- Joists: 2×8, 2×10, or 2×12 boards spaced 12″, 16″, or 24″ on center depending on span and decking type.
Decking: wood vs. composite
For the visible surface, you have two main choices: traditional wood or composite.
- Pressure-treated wood: Cheapest upfront, easy to cut and install,
but needs regular sealing or staining to stay pretty and resist cracking. - Composite decking: More expensive up front, but lower maintenance,
consistent color, and no splinters for bare feet. Great if you hate refinishing projects
with the passion of a thousand suns.
Whatever you choose, follow the manufacturer’s span, spacing, and fastener recommendations.
Composite boards, for example, often require tighter joist spacing than wood.
Hardware and connectors
For any structural connections, use corrosion-resistant structural screws, bolts, and
approved joist hangers. Don’t rely on drywall screws or random fasteners from your
junk drawer. Guardrails, ledgers, and beams depend on strong metal hardware designed
to handle heavy loads and outdoor exposure.
Step 3: Lay Out and Dig the Footings
Square the layout
With your permit-approved plan in hand, mark the deck footprint on the ground using
stakes and string lines. Use the 3-4-5 rule (a simple Pythagorean triangle) to ensure
corners are square. Measure diagonals; when they match, your layout is truly rectangular.
Dig footings to code depth
Footings must extend below the frost line in your area, which your building department
can clarify. Use a post-hole digger or auger to dig holes, then:
- Pour concrete into forms or tubes to the required size and depth.
- Set post bases or anchor bolts into the wet concrete, aligned to your layout.
- Allow concrete to cure fully before loading it with the deck structure.
Properly sized and positioned footings help prevent sagging, heaving, and that subtle
“why does my drink slide off the table?” deck tilt later on.
Step 4: Build the Frame
Set posts and beams
Once the footings cure, attach pressure-treated posts to the post bases, making sure
they’re plumb. Cut them to height, then build beams by sandwiching two or more 2x
boards together with structural fasteners. Set beams on or against posts and secure
them according to your plans.
Many code guides recommend locating beam splices directly over posts for maximum
strength and limiting post height to avoid excessive wobble.
Attach the ledger to the house (if applicable)
If your deck is attached to the house, the ledger board is critical. Installed
improperly, it’s the #1 place decks fail. Follow modern IRC rules and manufacturer
guidance for:
- Removing siding and flashing properly, so the ledger contacts solid structural framing.
- Installing corrosion-resistant flashing above and behind the ledger to deflect water.
- Using structural bolts or lag screws at the specified spacing, never just nails.
Updated deck codes in the U.S. have become more detailed about ledger and flashing
requirements because water intrusion at this connection can rot house framing and
lead to catastrophic failures.
Install joists
With beams and the ledger in place, hang joists using approved joist hangers or
by resting them directly on beams. Space joists according to the deck board requirements
(often 16″ on center for wood and sometimes 12″ for composite).
Make sure the frame is square by measuring diagonals again; adjust before you
install decking. This is much easier to fix now than after hundreds of screws
have entered the chat.
Step 5: Add Decking with Style (Young House Love–Inspired)
Choose a layout pattern
You can lay deck boards straight across the joists, but if you’re going for that
Young House Love “we thought about this” look, consider:
- A picture-frame border, where boards run around the perimeter and
meet at crisp mitered corners. - A “zippered” seam, where boards from opposite directions interlock
in a diagonal pattern along a center line, breaking up long runs and hiding butt joints.
Lay boards loosely first to plan seams and minimize small slivers at edges. Then
fasten them with deck screws or hidden fasteners, maintaining consistent gaps for
drainage and expansion. Many builders now also use flashing or joist tape on top
of joists to reduce moisture and prolong the frame’s life.
Trim and clean up edges
One pro trick: install all boards with slight overhang past the frame, then snap a
chalk line and cut them all at once with a circular saw. This gives you a laser-straight
edge that looks far more professional than trying to cut every board to exact length
as you go. This is a technique Young House Love leaned on for their big deck build.
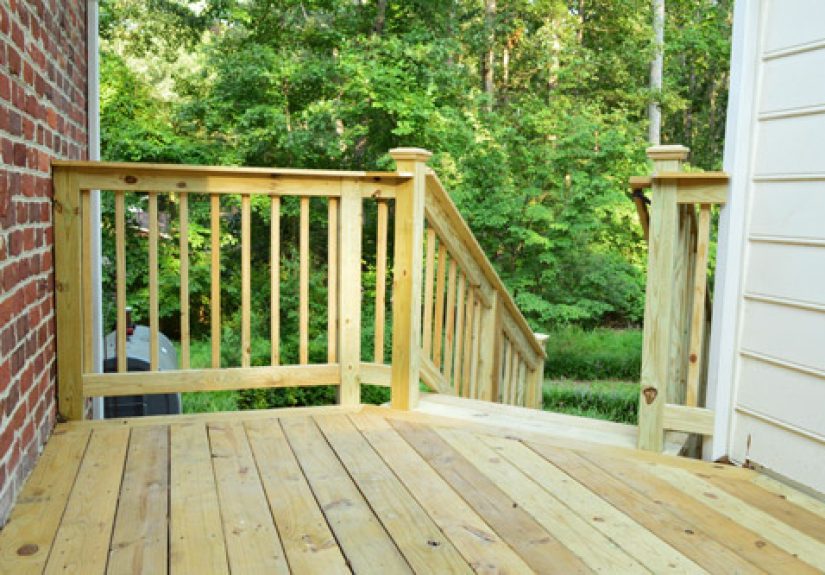
Step 6: Build Safe Stairs and Railings
Stairs that feel safe (and not terrifying)
Deck stairs are just a series of right triangles cut into stringers. Sounds simple
but codes for riser height, tread depth, handrails, and landings are strict for a reason.
Typical guidelines include:
- Maximum riser height around 7 ¾ inches, minimum about 4 inches.
- Consistent riser height and tread depth (difference no more than about ⅜ inch).
- Minimum stair width of 36 inches; many pros recommend 48 inches so they don’t feel cramped.
Carefully measure and cut stringers, attach them securely to the deck and landing,
then add treads and risers. Use structural fasteners and follow local codes for
guardrails and handrails.
Railings, guards, and posts
Anywhere your deck is a certain distance off the ground (often 30″ or more),
you’ll need guardrails installed to specific height and spacing requirements.
Common rules include:
- Rail height typically around 36–42 inches, depending on local code.
- Baluster spacing so a 4″ sphere cannot pass through (kid-head-proof).
- Guardrails strong enough to resist a concentrated load at the top rail.
Posts should be securely through-bolted to framing with approved hardware, not
just screwed into deck boards. Rot-resistant materials and proper flashing around
post bases help your railings stay strong for the long haul.
Step 7: Finish, Inspect, and Maintain
Final inspections and finishes
Once framing, stairs, and railings are done, your building department will likely
perform a final inspection. After the thumbs-up, it’s time for beauty treatments:
- Wood decking: Let it dry as recommended, then stain or seal to protect against UV and moisture.
- Composite decking: Just clean according to the manufacturer’s instructions.
Plan for ongoing deck maintenance: yearly cleaning, checking fasteners, and watching
for signs of rot or movement. A little attention each season can add years to your deck’s life.
The emotional finish line
DIYers often underestimate how long a full deck build takes. Young House Love’s
first big deck project stretched over weeks of evenings and weekends, with plenty
of sweat and “why did we start this again?” moments. But sinking that final screw
and standing back to see an actual outdoor room where there used to be patchy grass?
That feeling is unmatched.
Real-Life Deck-Building Experiences & Lessons Learned
Let’s talk about what it actually feels like to tackle a DIY deck build,
Young House Love–style. If you’re picturing a quick weekend project with perfect
weather, no trips to the lumber store, and zero math errors… I have some gentle,
sawdust-covered news for you.
1. The timeline is longer than you think (and that’s okay)
Many homeowners plan a deck like this: “We’ll demo the old steps Saturday, build
the frame Sunday, and be grilling by next weekend.” In reality, the timeline often
looks more like:
- Week 1: Permits, marking utilities, revising plans after talking to the inspector.
- Week 2: Digging footings, discovering one hole filled with solid rock.
- Week 3: Pouring concrete, waiting for it to cure, working around rain.
- Week 4+: Framing, decking, stairs, railings, and “oops, we need one more box of screws.”
Young House Love documented their own marathon timeline: squeezing work into evenings,
pausing for inspections, and managing life around a giant half-finished deck.
The big takeaway? Longer timelines aren’t failurethey’re just reality when you’re
learning as you go and doing things safely.
2. Inspectors can actually be your secret weapon
A lot of DIYers get nervous about inspectors, but many homeowners find them surprisingly
helpful. They might point out a missing hardware connection or suggest a better way
to flash the ledger before it’s buried behind trim and deck boards.
Treat your inspector like a free consultant whose main job is to keep your family
from crashing to the ground mid-cookout. Ask questions. Show them your plans. If they
ask for a change, write it down and view it as an upgrade in safety, not a personal
attack on your carpenter skills.
3. There will be a learning curveand some comedy
Expect at least one of these moments:
- Cutting your first stringer wrong because you measured from the wrong side of the line.
- Realizing you flipped a joist hanger upside down and wondering why the joist doesn’t sit right.
- Discovering how heavy a fully built beam really is when you and one friend try to muscle it into place.
The Young House Love style of DIY embraces this: laugh at the mistakes, learn from them,
and don’t be afraid to redo something that’s not right. It’s better to re-cut boards now
than stare at a crooked seam for the next 20 years every time you drink coffee.
4. Small design choices make a big impact
When you zoom out, a deck is just a rectangle with stairs. But the details you layer
on toplike that picture-frame border, a herringbone or “zippered” seam, black metal
balusters, or a built-in benchare what give it personality.
Homeowners who’ve followed a Young House Love–inspired approach often mention how those
little touches made the deck feel more like an intentional outdoor room than a slapped-on
platform. A few extra hours planning your board layout or railing style can completely
transform the finished vibe.
5. You’ll never regret overbuilding
Time and again, people who built decks say the same thing: “I’m glad we added that extra
beam / used better fasteners / upgraded the railings.” Almost nobody says, “I wish we’d
used smaller joists and fewer posts so it bounced more.”
Overbuilding within codeusing slightly beefier lumber where allowed, adding extra blocking,
and choosing higher-quality hardwarecan make your deck feel rock solid. That solidity
is something you and your guests feel every time you step outside. The deck doesn’t just
look good; it feels trustworthy.
6. The payoff is bigger than the price tag
Yes, there’s cost: lumber, hardware, tools, permits, and possibly therapy for your
post-stringer trauma. But the payoff is huge. A deck extends your living space, gives you
a place to gather, and often adds measurable resale value to your home.
More importantly, there’s the intangible joy of using something you built with your own
handswatching kids play on it, hosting your first dinner, or just sitting under the stars.
That’s the heart of the Young House Love approach: making a house feel like home through
projects that are both practical and personal.
If you’re on the fence (or deck rail) about starting, remember this: nobody feels “ready”
to build a deck. You get ready by planning carefully, respecting the codes, asking for help
when you need it, and taking the first stepliterally and figuratively. One board at a time,
you’ll get there.
Conclusion
Building a deck may be one of the bigger DIY projects you tackle, but it’s also one of the
most rewarding. With solid planning, code-compliant structure, thoughtful design, and a dash
of Young House Love creativity, you can turn a patch of lawn into a true outdoor living room.
Whether you choose pressure-treated wood or composite, simple lines or patterned borders,
the key is to build safely, take your time, and enjoy the process. The sawdust will settle,
the inspections will pass, and before long you’ll be kicking back on a sturdy new deck
wondering why you didn’t start sooner.
meta_title: How To Build a Deck (Young House Love–Inspired Guide)
meta_description:
Step-by-step guide to planning and building a safe, stylish DIY deck inspired by Young House Love.
sapo:
Want a deck that feels like an outdoor living room, not a random wood platform? This in-depth,
Young House Love–inspired guide walks you through every step of how to build a deckfrom planning,
permits, and framing to board patterns, stairs, railings, and real-life lessons learned. Learn what
materials to choose, how to meet modern deck building codes, and which design details make the biggest
impact so you end up with a safe, sturdy, and seriously good-looking deck you’ll love for years.
keywords:
how to build a deck, DIY deck building, Young House Love deck, deck framing and stairs, composite vs wood decking, deck building codes, deck railings and safety


