Table of Contents >> Show >> Hide
- What Exactly Is a Hand Crochet Bedspread?
- Planning the Size: Make It Fit Your Bed (Not Just Your Dreams)
- Choosing Yarn and Fiber: The Feel, the Look, and the Laundry Reality
- Pick a Construction Style (Because Not All Bedspreads Are Built the Same)
- Gauge and Swatching: The Unsexy Step That Saves You 40 Hours
- Yardage and Time: The Honest Math (With a Side of Pep Talk)
- How to Make a Hand Crochet Bedspread: Step-by-Step
- Step 1: Choose a Pattern That Matches Your Lifestyle
- Step 2: Decide the Finished Dimensions
- Step 3: Make and Block a Swatch (Yes, Really)
- Step 4: Build the Body (Motifs or Panels)
- Step 5: Join the Pieces
- Step 6: Add a Border or Edge Finish
- Step 7: Weave In Ends Like a Responsible Adult (Or at Least Like You’re Trying)
- Step 8: Block for Shape and Drape
- Joining and Finishing Tips That Make It Look Professional
- Blocking: Wet, Spray, or Steam?
- Care and Cleaning: Keep It Pretty Without Panic
- Common Problems (and How to Fix Them Without Dramatic Sighing)
- Heirloom Details That Make a Crochet Bedspread Feel Custom
- Conclusion
- Experiences From Makers: What It’s Really Like to Crochet a Bedspread (500+ Words)
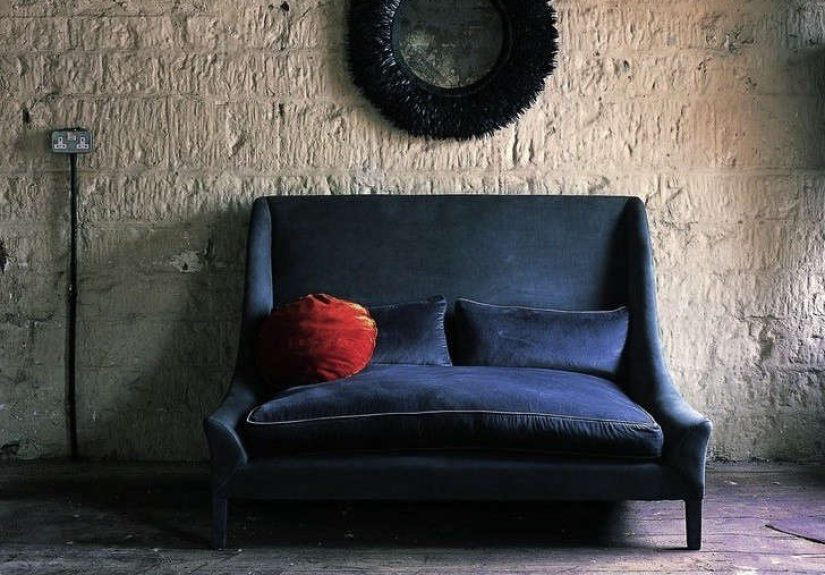
A hand crochet bedspread is the cozy overachiever of bedroom décor: part blanket, part statement piece, part “yes, I really did make this with my own two hands.”
It can be airy and lacy like a vintage heirloom, modern and graphic like a giant granny-square mosaic, or plush enough to make your bed look like it’s wearing a sweater.
And unlike store-bought bedding, a handmade crochet bedspread comes with a built-in storyplus the undeniable power to make guests say, “WAIT… you made that?!”
This guide walks you through the real-world decisions that make or break a bedspread project: sizing, yarn and fiber choices, stitch patterns that behave,
yardage planning (so you don’t end up playing Yarn Chicken at midnight), joining, blocking, care, and finishing details that make it look intentional instead of “I tried my best.”
What Exactly Is a Hand Crochet Bedspread?
A bedspread is typically designed to cover the bed more fullyoften reaching farther down the sides and sometimes covering pillowsso it reads as a complete “top layer.”
A coverlet is usually lighter and smaller, often stopping around the sides of the mattress instead of draping dramatically toward the floor.
Crochet can do either look; the difference is mostly in sizing, drape, and how much “drop” you build in.
Why Crochet Works So Well for Bedspreads
- Custom drape: You can make it sleek and tailored or romantic and puddly (like the bedspread is auditioning for a period drama).
- Texture on purpose: Crochet adds dimensionshells, ripples, lace, bobbleswithout needing extra trims.
- Heirloom vibes: Many classic bedspreads were crocheted in cotton thread with repeating motifs that hold up for decades when cared for properly.
- Practical warmth control: Openwork lace = breathable. Denser stitches = warmer. You choose the thermostat setting.
Planning the Size: Make It Fit Your Bed (Not Just Your Dreams)
Before you pick a stitch, decide what “bedspread” means for your bed. Do you want it to:
cover just the top (coverlet style), drape over the sides (classic blanket sizing), or drop close to the floor (traditional bedspread look)?
Quick Size Targets (Common Blanket-Style Dimensions)
These are common starting points. Brands vary, so treat them as guidesnot gospel.
| Bed Size | Typical “Bed Blanket” Size (inches) | What It Looks Like |
|---|---|---|
| Twin | ~66″ × 90″ | Drapes over sides, modest drop |
| Full/Queen | ~90″ × 90″ | Generous coverage, classic look |
| King | ~108″ × 90″ | Wide coverage, good side drape |
The Better Way: Measure Your Mattress + Decide Your “Drop”
If you want a bedspread that looks tailored, measure your mattress width, length, and height. Then choose your drop:
- Coverlet look: drop of ~8–12 inches (mostly decorative)
- Blanket look: drop of ~12–18 inches (practical and cozy)
- Bedspread look: drop of ~18–25+ inches (closer to the floor)
A simple sizing formula:
- Finished width = mattress width + (2 × desired drop)
- Finished length = mattress length + desired drop at foot (+ extra if you want pillow coverage)
Add a little cushion for real life: blocking, drape, and “oops I crocheted while watching plot twists” can change measurements.
Swatching and blocking your swatch helps you predict the final fabric behavior.
Choosing Yarn and Fiber: The Feel, the Look, and the Laundry Reality
Cotton (and Mercerized Cotton)
Cotton is a classic for crochet bedspreadsespecially vintage-style lace spreads. It’s breathable, crisp, and shows stitch definition beautifully.
Mercerized cotton has extra sheen and strength, which is perfect for intricate motifs. The trade-off: cotton can be heavy in a large bedspread, and it can stretch if your stitches are loose.
Acrylic
Acrylic is budget-friendly, widely available, and often machine washable. It can be softer than cotton and lighter than you’d expect for big projects.
Just be careful with heat: some acrylics don’t love high dryer temps or aggressive steaming.
Wool and Wool Blends
Wool can create a warm, breathable bed covering with gorgeous elasticity and drape. But care can be fussier (felting risk) unless you use superwash wool.
Wool blends can be a sweet spot: softness, resilience, and better stitch memory.
Thread vs Yarn: The “Vintage Bedspread” Decision
If you picture a traditional white lace bedspread with pineapple motifs and delicate texture, you’re likely in crochet thread territory (smaller hooks, more time, more detail).
If you want a modern statement piece with bold color and faster progress, you’re probably using yarn (DK, worsted, or bulky).
Pick a Construction Style (Because Not All Bedspreads Are Built the Same)
1) Motifs (Granny Squares, Lace Medallions, Popcorn Blocks)
Motif-based bedspreads are iconic: you crochet repeated shapes (squares, hexagons, medallions) and join them into a full-size spread.
Pros: portable, easy to customize size, and it’s simpler to replace a single motif if something goes wrong.
Cons: joining takes time, and weaving in ends can become a second full-time job if you change colors constantly.
2) Panels or Stripes
You crochet long sections (rows, chevrons, ripple stripes) and build width as you go.
Pros: fewer joins, faster flow, satisfying “blanket grows before your eyes” energy.
Cons: big pieces can be bulky to manage, and mistakes can travel far before you notice them.
3) Filet Crochet (Grid + Design)
Filet crochet uses open and filled squares to create pictures or geometric designsgreat for vintage-inspired bedspreads or monograms.
It looks fancy, but the technique is consistent once you lock in your rhythm.
4) Corner-to-Corner (C2C)
C2C builds the bedspread diagonally and works especially well for color blocks, gradients, or pixel-style patterns.
It can be very “Netflix-friendly” because the stitch repeat becomes muscle memory.
Gauge and Swatching: The Unsexy Step That Saves You 40 Hours
Gauge matters more on a bedspread than on, say, a hat, because small differences multiply across a huge surface.
A swatch tells you:
- How much your fabric stretches and drapes
- Whether the stitch pattern curls or ripples
- How the yarn looks after washing and drying
- How many motifs or rows you’ll need for your target size
Swatch Like You Mean It
- Swatch using the exact stitch pattern you’ll use in the bedspread.
- Make it big enough to measure accurately (not a tiny coaster pretending to be data).
- Wash or wet it the way you plan to care for the finished bedspread.
- Let it dry completely, then measure.
Yardage and Time: The Honest Math (With a Side of Pep Talk)
Bedspreads are big. Like, “maybe I should name it and start charging rent” big. Planning yardage early helps you:
avoid dye-lot mismatches, buy enough yarn once, and prevent the classic heartbreak of being 94% done with no matching yarn left on Earth.
Rough Yardage Expectations
Yarn needs vary wildly based on stitch pattern (lace vs dense), yarn weight, and finished size. As a general rule:
- Airy lace stitches: use less yarn, take longer due to fine thread and stitch complexity
- Dense stitches (single crochet, bobbles): use more yarn, feel heavier, work up slower per inch
- Worsted-weight “afghan-style” bedspread sizes: can easily land in the multiple-thousands-of-yards range
If you’re using thread for a traditional motif bedspread, you’ll often work from multiple balls of crochet cotton and count motifs rather than yards.
Either way, use your swatch to estimate: weigh your swatch (or measure yardage used), calculate the bedspread’s total area, and scale up.
Time Reality Check
A hand crochet bedspread is usually a marathon project. That’s not bad newsit just means you should pick a pattern you’ll still love after Week 6.
A helpful mindset: build it in chapters (motifs, panels, sections) and celebrate mini-finish lines.
How to Make a Hand Crochet Bedspread: Step-by-Step
Step 1: Choose a Pattern That Matches Your Lifestyle
Ask yourself:
- Do I want a lightweight decorative bedspread or a warm blanket-style cover?
- Do I enjoy repeating motifs… or does that make my soul leave my body?
- Do I want minimal ends to weave in (choose fewer color changes) or maximum color drama (choose chaos)?
Step 2: Decide the Finished Dimensions
Measure your bed and choose your drop. Write it down. Put it somewhere safe.
If your future self changes plans mid-project, at least let it be a thoughtful decision and not a “I forgot what I was doing” moment.
Step 3: Make and Block a Swatch (Yes, Really)
This is where you adjust hook size, confirm drape, and make sure the stitch pattern behaves.
If the fabric is stiff, try a larger hook or a different fiber. If it’s too floppy, size down or choose a denser stitch.
Step 4: Build the Body (Motifs or Panels)
- Motifs: make a small batch first, then lay them out to test spacing and color placement.
- Panels: track rows and stitch counts carefully; use stitch markers like they’re tiny crochet bodyguards.
Step 5: Join the Pieces
Joining can be subtle (invisible seams) or decorative (raised ridges that frame motifs).
Choose a join that matches the style: lacy bedspreads usually look best with flatter joins; bold modern spreads can handle more texture.
Step 6: Add a Border or Edge Finish
A border does three things: it cleans up edges, adds polish, and can help correct mild waviness.
Popular choices include simple single crochet rounds, shells, scallops, picots, and wider lace edgings.
Step 7: Weave In Ends Like a Responsible Adult (Or at Least Like You’re Trying)
Weave ends securely, changing direction so they don’t worm their way out after washing.
This step is where “handmade” becomes “heirloom.”
Step 8: Block for Shape and Drape
Blocking helps motifs lie flat, corners square up, and lace openwork show off. It’s basically a glow-up for yarn.
Joining and Finishing Tips That Make It Look Professional
Choose a Join That Matches Your Fabric
- Whip stitch (sewn): strong and simple; can be nearly invisible if done neatly.
- Slip stitch join (crocheted): tidy and slightly raised, good for durability.
- Mattress seam: excellent for invisibility, especially with solid-color motifs or panels.
- Join-as-you-go: saves time later, but requires focus (and maybe fewer plot-heavy TV shows).
Border Tricks for a Straighter Edge
- If edges flare out, use fewer stitches in the border round.
- If edges pull in, add stitches at corners or distribute increases evenly.
- Use a simple base round (single crochet) before any fancy lace edging for stability.
Blocking: Wet, Spray, or Steam?
Blocking method depends on fiber and your comfort level. Common approaches:
- Wet blocking: soak, gently press out water (no wringing), pin to measurements, dry completely.
- Spray blocking: mist until damp, shape and pin, dry.
- Steam blocking: pin first, then add steam carefully without smashing the stitches.
If you’re using acrylic, be cautious with high heat. Steam can “set” acrylic permanently if you get too close or too hot.
When in doubt, test on your swatch first.
Care and Cleaning: Keep It Pretty Without Panic
Always follow the yarn label if you know it. If you inherited or bought a handmade crochet bedspread and the fiber is unknown,
gentler is safer: hand wash in cool water and dry flat.
Machine Washing Tips (When Appropriate)
- Use a delicate cycle and cool water.
- Protect the bedspread in a large mesh laundry bag if possible.
- Avoid washers with a central agitator that can snag stitches.
- Dry flat when you can; if tumble drying is allowed, use low heat.
Stain Strategy
For most everyday stains, gentle spot treatment and patience work better than aggressive scrubbing.
Treat quickly, test detergents on an inconspicuous area, and remember: crochet is sturdy, but it doesn’t enjoy wrestling matches.
Common Problems (and How to Fix Them Without Dramatic Sighing)
Problem: The Bedspread Is Wavy or Rippling
- Cause: too many stitches, too many increases, or uneven tension.
- Fix: adjust border stitch count, block firmly, or size down hook for border rounds.
Problem: Motifs Don’t Match Size
- Cause: tension drift, hook changes, or inconsistent finishing rounds.
- Fix: block motifs to consistent measurements before joining; redo outliers.
Problem: The Bedspread Feels Too Heavy
- Cause: dense stitches + heavy fiber + large size.
- Fix: choose a lighter yarn, use more openwork, or aim for a coverlet-sized piece instead of a floor-length spread.
Problem: You’re Sick of It Halfway Through
- Cause: it’s a bedspread. It’s allowed to be a long project.
- Fix: rotate with smaller projects, set weekly mini-goals, or switch to a motif approach so you can “finish” pieces regularly.
Heirloom Details That Make a Crochet Bedspread Feel Custom
- Color planning: keep motifs consistent, or intentionally scatter colors for a modern patchwork look.
- Edging choice: scallops and picots read vintage; clean, wide borders read modern.
- Texture control: use raised stitches sparingly on a bedspread if you want it to lie smooth.
- Personal touch: add a small filet panel with initials or a subtle motif repeat that’s “your thing.”
Conclusion
A hand crochet bedspread is one of those projects that rewards you twice: once while you’re making it (because yarn therapy is real),
and again when it’s finished (because your bed suddenly looks like it belongs in a magazineor at least in the “I have my life together” section of your home).
The secret is planning: choose the right size and drop, pick a fiber that fits your comfort and care preferences, swatch and block early,
and select joining and edging methods that match your style. Do that, and you’ll end up with a bedspread that’s not just pretty, but practicaland proudly yours.
Experiences From Makers: What It’s Really Like to Crochet a Bedspread (500+ Words)
Ask a room full of crocheters about making a hand crochet bedspread and you’ll hear the same theme in a dozen different accents:
“It’s a commitment… but wow, it’s worth it.” The experience often starts with pure optimismfresh skeins stacked like colorful macarons,
a brand-new hook, and the kind of confidence that only exists before you’ve counted your 147th motif.
Many makers say the first big “aha” moment is realizing that bedspreads are less like a weekend craft and more like a long-running TV series.
Each motif or section becomes an episode. You learn to appreciate progress in smaller wins: finishing a row of squares, joining a strip,
or finally choosing a border after staring at five options for three days. Some crocheters keep a small basket of motifs-in-progress so they can grab one
whenever they have ten minutesbecause yes, bedspreads can be built in snack-size sessions.
Then there’s the emotional rollercoaster known as “joining.” People who love motifs often still admit that joining can feel like assembling furniture:
the pieces are all there, but suddenly you need patience, focus, and maybe a quiet room. The funny part is that joining also tends to be the stage where
the project suddenly looks real. A pile of squares becomes “oh… this is actually a bedspread.” That transformation is a huge morale boost.
Yarn choice becomes its own storyline. Cotton-thread bedspread makers often describe a mix of pride and disbeliefpride in the crisp stitch definition,
disbelief that something so delicate can take so long. Yarn-based bedspread makers talk about comfort and speed, but also the surprise weight of a large piece
once it’s big enough to cover your lap, your dog, and your questionable life choices. (Pets, by the way, show up in a lot of crochet stories. Cats sit on motifs.
Dogs “help” by stealing balls of yarn. Everybody contributes in their own emotionally unhelpful way.)
Another common experience is tension drift. Even skilled crocheters report that their stitches can change over weeks or months. That’s why so many makers become
true believers in blocking: it’s the moment when the bedspread looks polished and intentional, the lace opens up, and the edges finally behave. Several crocheters
say blocking feels like giving the project permission to be its best selflike it’s been trying hard the whole time, and now you’re letting it shine.
Finally, there’s the pride factor. Makers often describe the first time the bedspread goes on the bed as a “pause and stare” moment.
It’s not just a finished project; it’s proof of consistency and creativity. Some people pass them down, some gift them (to the very few who deserve that level of love),
and others keep them as a personal “I can do hard things” trophy. And honestly? A hand crochet bedspread is a pretty excellent trophy.