Table of Contents >> Show >> Hide
- Why a Faux Pumpkin Is Perfect for Stenciled Halloween Carving
- How to Choose the Best Halloween Stencil for a Faux Pumpkin
- Tools You Actually Need for Faux Pumpkin Carving
- Step-by-Step: How to Use Halloween Stencils to Carve a Faux Pumpkin
- Best Stencil Ideas for a Faux Pumpkin
- Common Faux Pumpkin Carving Mistakes to Avoid
- How to Make Your Finished Faux Pumpkin Look More Expensive
- Conclusion
- Real-World Experiences with Faux Pumpkin Stencils
There are two kinds of Halloween people. The first kind carves a real pumpkin, proudly displays it on the porch, and then spends the next week pretending the collapsing side wall is “rustic.” The second kind discovers the joy of a faux pumpkin and never looks back. If you are here for Halloween stencils to carve a faux pumpkin, congratulations: you have chosen the path of less mess, less panic, and far more replay value.
A faux pumpkin gives you the best part of pumpkin season without the soggy downside. You can carve it early, store it after Halloween, and bring it back next year like an orange celebrity returning for another season. Pair that with printable pumpkin stencils, and suddenly your front porch looks less “I attacked this with a butter knife at 10 p.m.” and more “Yes, the neighborhood committee may contact my agent.”
This guide covers how to choose the right pumpkin carving stencil, how to transfer the design cleanly, what tools actually help, and how to make a fake pumpkin jack-o’-lantern look polished instead of accidental. Whether you want a spooky haunted house, a classy moon-and-bat silhouette, or a cute ghost that looks mildly judgmental, the right stencil can take your faux pumpkin carving from basic to brilliant.
Why a Faux Pumpkin Is Perfect for Stenciled Halloween Carving
A real pumpkin has charm, sure. It also has seeds, stringy insides, a tendency to slump at the worst possible moment, and a suspicious timeline that seems designed to end exactly one day before your Halloween party. A faux pumpkin, by contrast, is the overachiever of fall decor. It lasts for years, can be displayed indoors or outdoors, and lets you carve at your own pace without racing a countdown clock powered by rot.
That makes faux pumpkins especially ideal for stencils. Intricate designs often take longer because they involve small cuts, etched details, repeated pattern sections, and careful lighting placement. With a real pumpkin, detailed work can feel like a time trial. With a craft pumpkin, you can tape on a template, step back, fix mistakes, and even pause the project overnight without waking up to a mushy disaster.
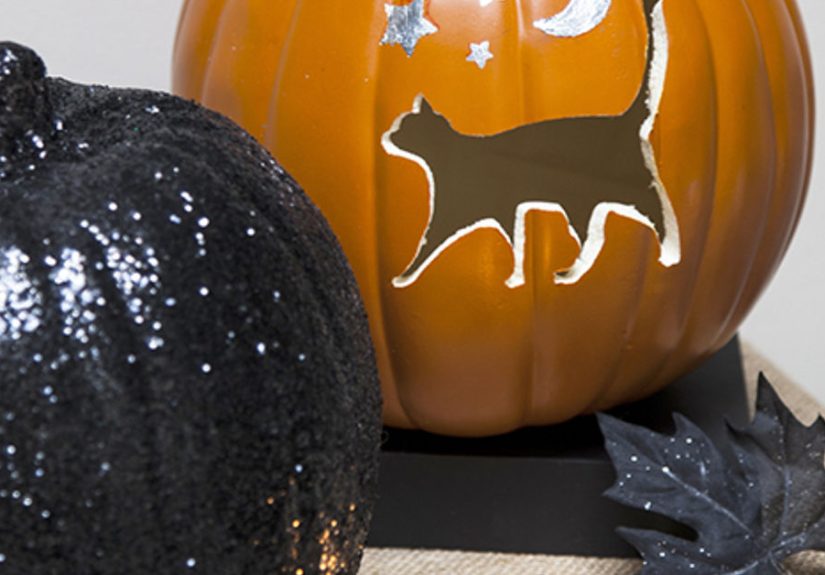
Faux pumpkins are also great for design experimentation. Want a dramatic black cat silhouette? Try it. Want a layered witch hat, a spiderweb, initials, stars, florals, or geometric cutouts? Go for it. Since the pumpkin is reusable, a stencil project feels less like a one-night gamble and more like a real Halloween decoration you can keep in your seasonal rotation. In other words, you are not just carving. You are building a tiny orange legacy.
How to Choose the Best Halloween Stencil for a Faux Pumpkin
The secret to a successful stencil is not bravado. It is matchmaking. The best Halloween pumpkin patterns fit your pumpkin’s size, shape, and your patience level. That heroic full-moon cemetery scene may be gorgeous, but if your pumpkin is small and your attention span is already wandering toward candy corn, choose something simpler.
Match the stencil to your skill level
Beginner-friendly designs usually have bold outlines, wide cut sections, and fewer tiny floating shapes. Think ghost faces, bats, crescent moons, classic jack-o’-lantern smiles, and block-letter words like “Boo.” Intermediate stencils often include interior details, sharper angles, or layered elements such as hats, branches, windows, or webbing. Advanced stencils usually rely on a mix of full cuts and etched areas to create shading, depth, and texture.
Match the stencil to the pumpkin shape
A tall faux pumpkin works well for vertical designs like a witch, haunted house, black cat, or stacked moon-and-stars pattern. Round pumpkins are ideal for centered faces, circular motifs, monograms, and spiderweb layouts. Flatter pumpkins can be great for wide scenes or decorative patterns that wrap slightly around the sides. Before you commit, hold the paper stencil against the pumpkin and make sure the design does not warp like it has entered a haunted mirror.
Pick a style that suits your decor
Not every Halloween pumpkin needs to look like it runs a haunted tax office. Stencils come in every style: spooky, whimsical, vintage, modern, kid-friendly, elegant, and even coastal or botanical. If your porch decor leans classic, try ravens, lanterns, or gothic lettering. If your style is playful, use smiling ghosts, candy motifs, or cartoon bats. If you want something upscale, etched florals, faux-bois textures, stars, or symmetrical geometric patterns look especially sharp on faux pumpkins.
Tools You Actually Need for Faux Pumpkin Carving
You do not need a garage full of power tools to carve a faux pumpkin well. You do need a few basics, plus the common sense to avoid carving while balancing a coffee in one hand and a mini candy bar in the other.
Start with these essentials:
- A faux or carvable craft pumpkin
- Printed stencil or printable pumpkin template
- Masking tape or painter’s tape
- A fine-tip marker or pencil
- A poking tool, awl, or pushpin
- A serrated carving tool, craft knife, or detail saw
- A scraping or linoleum-style tool for etching
- Battery-powered LED tea lights or fairy lights
For detailed work, a small carving saw or craft knife gives you control. For shading and texture, etching tools are the real stars. Etching means scraping away the surface layer instead of cutting all the way through, which creates contrast and helps more complicated stencil designs look polished. That is how you get fur, woodgrain, feathers, leaves, or moonlit glow effects instead of one big orange hole pretending to be art.
Step-by-Step: How to Use Halloween Stencils to Carve a Faux Pumpkin
1. Clean and prep the pumpkin
Wipe the faux pumpkin clean so tape and markings stick properly. If it has a glossy surface, make sure it is dry before attaching your stencil. Decide where the front of the pumpkin will be and test how it sits when displayed. A great design loses some of its charm if the pumpkin rolls and ends up staring at the siding.
2. Resize the stencil if needed
One of the best things about printable pumpkin stencils is flexibility. Enlarge or reduce the design so it fits your pumpkin’s front face. Leave a bit of breathing room around the edges, especially if the pumpkin has deep ridges. A stencil crammed from stem to base tends to look cramped, and nobody wants a bat wing disappearing into pumpkin geography.
3. Tape the stencil securely
Cut slits around the outer edge of the paper so it curves more easily around the pumpkin. Then tape it down smoothly. The paper does not have to lie perfectly flat, but it should stay steady while you trace or poke. If the stencil shifts halfway through, your elegant owl may come out looking like a haunted potato.
4. Transfer the design
You can transfer the pattern in two common ways. The first is tracing: use a marker or pencil to outline the major shapes directly onto the pumpkin. The second is pin-pricking: poke small holes along the stencil lines, then remove the paper and connect the dots. Pin-pricking works especially well for faux pumpkin carving because it preserves the design placement without leaving too much visible ink.
5. Decide where to cut and where to etch
This is where the stencil becomes art instead of paperwork. Large open areas, like eyes, windows, stars, or letters, can be fully cut through. Detailed areas, like fur texture, decorative swirls, or moon shading, often look better etched. Combining carved openings with etched surfaces gives the final pumpkin more dimension, especially when lit from inside.
6. Carve slowly and cleanly
Use small, controlled movements. Start with the tiniest sections first so the pumpkin surface stays stable while you work. Let the blade do the job rather than forcing it. If a section feels awkward, rotate the pumpkin instead of your wrist. Faux pumpkins reward patience. Rush the process and you may earn the crafting equivalent of a jump scare.
7. Add light for the full effect
Once the carving is done, place an LED tea light or a short strand of battery-powered fairy lights inside. This is when your stencil design comes to life. Etched areas glow softly, cut areas shine brightly, and your faux pumpkin suddenly looks like you know what you are doing. Which, to be fair, you now do.
Best Stencil Ideas for a Faux Pumpkin
If you need inspiration, these styles work especially well on faux pumpkins:
- Classic spooky: ghost faces, bats, ravens, tombstones, haunted houses, and crescent moons
- Kid-friendly: smiling pumpkins, candy corn, goofy monsters, stars, and cartoon cats
- Elegant: botanical vines, lace patterns, monograms, florals, and symmetrical filigree
- Modern: geometric cutouts, repeating polka dots, striped etching, or clean word stencils like “Boo” or “Eek”
- Statement pieces: layered woodland scenes, sugar-skull-inspired details, faux-bois etching, and stacked pumpkin displays
For an especially strong porch display, carve multiple faux pumpkins with coordinated stencils instead of making one pumpkin do all the heavy lifting. Three pumpkins with related patterns often look better than one giant design trying to tell an entire horror franchise in a single gourd.
Common Faux Pumpkin Carving Mistakes to Avoid
The biggest mistake is choosing a stencil that is too detailed for the pumpkin size. Tiny lines may look amazing on paper, but they can disappear or crumble when scaled down. Second place goes to over-cutting. If every part of the design is fully carved, the result can look flat. Mix full cuts with etched areas for a richer effect.
Another mistake is forgetting the lighting plan. Some stencil designs only shine when backlit, so test your LED placement before you call the project finished. And finally, do not ignore the pumpkin’s ridges. If a face or pattern lands awkwardly across deep grooves, it can distort the design. Shift the stencil slightly until the key features sit where they can actually be seen.
How to Make Your Finished Faux Pumpkin Look More Expensive
If you want your carved faux pumpkin to look less “craft table at 4 p.m.” and more “boutique fall display,” the trick is layering. Paint the pumpkin before carving for extra contrast. Black, ivory, sage, cream, and muted metallics all work beautifully. You can also lightly dry-brush the surface after carving to highlight etched details.
Display matters, too. Stack pumpkins by size, group them with lanterns, add a doormat, tuck in mums, or use mixed heights to create a fuller entryway scene. A single stenciled faux pumpkin can look charming. Three well-placed ones look intentional. Five says you either have excellent taste or a healthy seasonal obsession. Possibly both.
Conclusion
Halloween stencils to carve a faux pumpkin are the sweet spot between creativity and practicality. You get the drama of a carved jack-o’-lantern, the precision of a printable design, and the long-term value of decor you can reuse year after year. The right stencil helps you skip the guesswork, while faux pumpkin carving gives you the freedom to slow down, refine details, and build a display that lasts beyond one chilly October night.
Whether you choose a beginner ghost face, a dramatic moonlit cat, or an etched floral pattern that makes your pumpkin look suspiciously fancy, the formula is simple: pick the right template, use the right tools, mix carving with etching, and finish with safe LED lighting. Then stand back and admire your work like the Halloween mastermind you absolutely are.
Real-World Experiences with Faux Pumpkin Stencils
One of the most common experiences people have with faux pumpkin carving is pure relief. Not inspiration. Not artistic enlightenment. Relief. Relief that there are no slippery seeds on the counter, no frantic cleanup, and no weird moment where a real pumpkin starts leaking onto the porch like it is auditioning for a low-budget monster movie. That alone is enough to convert a lot of casual decorators into loyal faux-pumpkin fans.
Another frequent experience is realizing that stencils make you look far more talented than you felt ten minutes earlier. Many people start a Halloween carving project with mild confidence and a strong snack strategy. The stencil changes everything. Instead of guessing where the eyes should go or trying to freehand a bat that ends up resembling a startled bow tie, you have a plan. The shape is mapped out, the spacing is cleaner, and the final result looks deliberate. That is a deeply satisfying moment.
Families also tend to love faux pumpkin projects because the pressure is lower. A real pumpkin can make the whole activity feel like a one-shot event. If the design goes wrong, that is the pumpkin. Game over. A faux pumpkin feels more forgiving. You can repaint some styles, store the pumpkin for next year, and plan a whole lineup of coordinated designs over time. For households that decorate together, that means fewer “Who ruined it?” moments and more “Wait, this actually looks great” reactions.
People who enjoy detailed crafts often discover that faux pumpkins are better for more ambitious stencil work. Intricate windows, floral etching, layered moon scenes, and ornate lettering all benefit from a surface that does not soften or collapse. Crafters also learn quickly that combining etched and carved sections creates a more professional finish. The first time an etched leaf pattern glows softly next to a sharply carved star cutout, it becomes very hard to go back to a plain triangle-eyed pumpkin.
There is also the decorating payoff. A carved faux pumpkin tends to become part of a bigger seasonal look rather than a one-night prop. People place them on stair steps, beside lanterns, near mums, or in indoor entryways where real pumpkins might not last as long. Some build collections: one witch, one moon, one cat, one classic grin. Over a few seasons, the display starts to feel personal. It reflects your style, your humor, and your level of commitment to spooky porch excellence.
And then there is the little emotional surprise that comes with repeat use. Pulling out a favorite faux pumpkin from last year has the same cozy energy as unpacking treasured holiday ornaments. You remember making it, where you displayed it, and how good it looked lit up at night. That turns a simple stencil craft into a small annual tradition. Not bad for a fake pumpkin, really. It may not be real, but the Halloween joy absolutely is.


