Table of Contents >> Show >> Hide
- Before You Start: Know Your Pandora Bracelet Type
- What You’ll Need
- Easy Ways to Put Charms on a Pandora Bracelet: 10 Steps
- 1. Check charm and bracelet compatibility first
- 2. Plan your layout before opening the bracelet
- 3. Open the clasp gently and on a stable surface
- 4. Remove any existing safety chain or clips if necessary
- 5. Slide regular charms onto the bracelet from the open end
- 6. Add threaded or securing pieces where they belong
- 7. Snap clips onto the designated sections
- 8. Add spacers and dangles for shape and movement
- 9. Attach a safety chain before closing the bracelet
- 10. Close the clasp and check comfort, spacing, and balance
- Common Mistakes to Avoid
- Simple Styling Ideas for Beginners
- How Many Charms Should You Put on a Pandora Bracelet?
- Care Tips After Adding Charms
- What Real People Often Experience When Putting Charms on a Pandora Bracelet
- Final Thoughts
- SEO Tags
If you just got your first Pandora bracelet and you’re staring at the charms like they came with an unspoken engineering degree, relax. You are not the first person to wonder whether the charm slides on, twists on, snaps on, or needs a tiny prayer and a magnifying glass. The good news is that learning how to put charms on a Pandora bracelet is much easier than it looks once you understand the bracelet style, how the clasp opens, and where clips or safety chains belong.
This guide breaks it all down in plain English, with real-world tips for beginners who want the bracelet to look polished instead of “I poured a jewelry box onto my wrist and hoped for the best.” Whether you are building a sentimental keepsake, styling a gift, or simply trying to get a new charm on without launching it across the room, these easy steps will help you do it confidently.
Before You Start: Know Your Pandora Bracelet Type
Before you add a single charm, check which bracelet collection you have. This matters more than most people realize. Pandora has different bracelet families, and not every charm works with every bracelet. A classic Pandora Moments snake chain bracelet is the one most people picture when they think of a charm bracelet. It is designed to hold a mix of charms, clips, spacers, and safety chains. Pandora ME bracelets work differently and use styling links and connectors. Some bangles and slider bracelets also have specific charm limits and placement rules.
In other words, this is not the time for jewelry freestyle. The easiest way to avoid frustration is to confirm compatibility first, then style from there.
What You’ll Need
- Your Pandora bracelet
- Compatible Pandora charms
- Optional clips or spacers
- Optional safety chain
- A soft cloth or clean towel
- Good lighting and a little patience
A clean surface helps more than you’d think. Charms are small, polished, and mysteriously gifted with the ability to roll away at Olympic speed.
Easy Ways to Put Charms on a Pandora Bracelet: 10 Steps
1. Check charm and bracelet compatibility first
Start by making sure your charms actually fit your bracelet. Pandora Moments charms are designed for Pandora Moments bracelets. Pandora ME pieces are built differently and often use openable connectors or links rather than the classic charm-sliding setup. If you skip this step, you can end up forcing a piece that was never meant to fit, which is a fast route to annoyance and possibly damage.
If you bought the charm from a department store or jewelry retailer, the product description usually tells you which collection it fits. Look for phrases like “fits Pandora Moments bracelets” or “compatible with Pandora ME.” That little line saves a lot of drama.
2. Plan your layout before opening the bracelet
Yes, you can just start sliding charms on one at a time and hope for magic. But your future self will thank you for pausing first. Lay the charms out on a soft cloth and decide on the order. Do you want symmetry, like two matching charms near the center? Do you want a story flow, such as travel charms on one side and family charms on the other? Or do you want a delightfully chaotic “every charm I love is invited” look?
Planning ahead also helps you avoid overcrowding. Pandora bracelets usually look best when the charms have room to move. A bracelet stuffed to the edges can feel stiff, heavy, and visually busy.
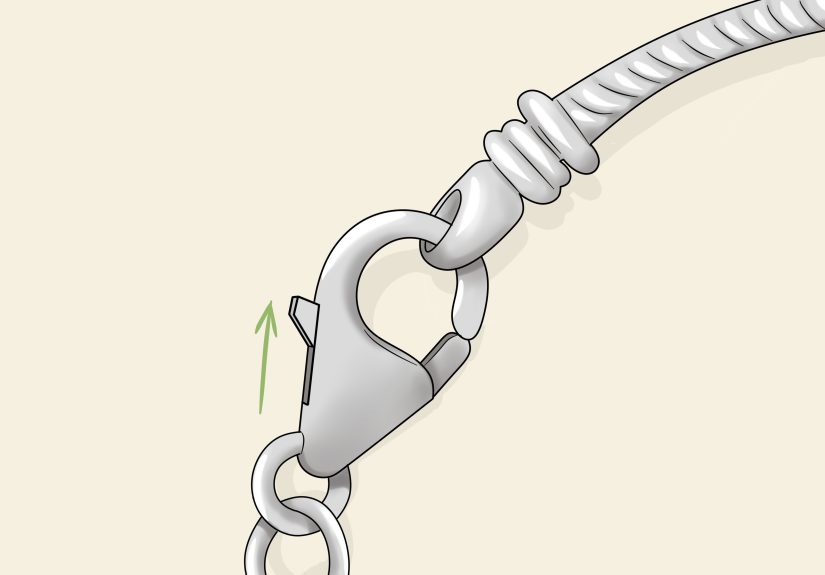
3. Open the clasp gently and on a stable surface
Place the bracelet on a table, desk, or folded towel. Then open the clasp carefully. Some Pandora clasps can feel snug, especially when the bracelet is new. That is normal. New bracelets often feel a little stiff at first, and many owners mistake “firm” for “broken.” It usually just means the clasp has not been opened a hundred times yet.
Use your fingernail or an opener tool if needed, but do not force it. If the bracelet is resisting like it has a grudge against you, slow down and check the clasp design before applying pressure. Jewelry should never require wrestling moves.
4. Remove any existing safety chain or clips if necessary
If your bracelet already has a safety chain, unfasten it first so you have clear access to the bracelet end. If clips are already in place, decide whether you want to keep the current sections or change them. Clips are useful because they separate charms into sections and help distribute weight more evenly. That makes the bracelet feel balanced and can help reduce stretching over time.
If you are only adding one or two new charms, you may not need to remove everything. But if you are restyling the bracelet, starting with a clean slate is often easier.
5. Slide regular charms onto the bracelet from the open end
Now for the satisfying part. Take your first charm and slide it onto the bracelet from the open end. Most standard Pandora Moments charms simply thread over the end of the bracelet and move along the chain. Some pieces glide on easily. Others may need a gentle twist as you move them over the bracelet’s threaded areas.
Do not jam the charm or rush. Slow, steady movement is the move here. If the charm catches slightly at a threaded station, rotate it gently instead of pushing straight through like you are trying to board a crowded subway train.
6. Add threaded or securing pieces where they belong
Many Pandora bracelets feature threaded sections that help keep pieces secure. Some charms or safety-chain ends are designed to work with these sections. If your piece has an inner thread, you may need to twist it into place rather than simply slide it on. The bracelet will usually tell you what it wants pretty quickly. If it spins into place smoothly, great. If it slides, even better.
This is one of those moments where gentle handling matters. If it feels wrong, stop and recheck compatibility. A proper fit should feel snug but not aggressive.
7. Snap clips onto the designated sections
Clips are more than decorative little overachievers. They help divide the bracelet into sections, keep the design balanced, and reduce the way charms all clump together in one sad metallic traffic jam. On many Pandora Moments bracelets, clips work best on the raised or threaded stations. Some clip styles snap onto specific sections, while others may sit between charms as accent pieces.
A simple styling trick is to place one clip on each side of the center section. That gives the bracelet structure and helps your layout stay intentional instead of accidental.
8. Add spacers and dangles for shape and movement
Once your main charms are on, fill in the design with smaller spacers or dangle charms if you like. Spacers can break up larger beads and keep the bracelet from looking bulky. Dangles add movement and personality, which is lovely until you put twelve of them in one spot and your bracelet begins sounding like festive wind chimes.
Try alternating bigger statement charms with smaller accents. This usually creates the most comfortable and visually pleasing result. Think of it like decorating a shelf: a little contrast makes everything look better.
9. Attach a safety chain before closing the bracelet
If you use a safety chain, now is the time to attach it. A safety chain helps keep the bracelet secure if the clasp accidentally opens. That means if life happens and your clasp pops open while you are getting coffee, hugging someone, or digging through a tote bag the size of a carry-on suitcase, your charms are less likely to scatter into the wild.
Attach the ends where your bracelet design allows, then make sure the chain hangs naturally without twisting. It should feel like a backup plan, not a puzzle.
10. Close the clasp and check comfort, spacing, and balance
Once all your charms are in place, close the bracelet and put it on. Check how it sits on your wrist. The bracelet should feel secure but not tight, and the charms should have enough room to move without squeezing your wrist. If the bracelet feels crowded with more than a handful of charms, you may need a slightly larger size or a simpler layout.
Look at the overall design too. Are all the heavy charms on one side? Are your favorite pieces hidden near the clasp? Tiny changes can make a big difference. Shift, edit, rebalance, and repeat until it feels right. A well-styled Pandora bracelet should feel personal, not packed like a suitcase before a budget airline check-in.
Common Mistakes to Avoid
Forcing incompatible charms
Not every Pandora piece belongs on every bracelet. If the fit is wrong, forcing it can damage the charm, bracelet, or both.
Overloading the bracelet too early
A full bracelet can be beautiful, but a new bracelet often looks better with a thoughtfully chosen mix rather than instant maximalism. Give the design room to breathe.
Skipping clips or a safety chain
You can absolutely wear a bracelet without them, but they do serve a purpose. Clips help with balance. Safety chains help protect your investment.
Ignoring comfort
A bracelet can be gorgeous and still annoying to wear if all the bulk sits in one section. Style matters. So does not wanting your wrist to feel like it is carrying a tiny silver kettlebell.
Simple Styling Ideas for Beginners
The balanced classic
Place one focal charm in the center, two matching or complementary charms on either side, and finish with clips near the center stations. This creates a polished, easy-to-wear look.
The story bracelet
Use charms that represent milestones: a graduation, a trip, a birthday, a pet, or a family member. Arrange them in chronological order for a bracelet that feels like a tiny wearable scrapbook.
The minimalist start
Begin with three to five charms and leave space for future additions. This is perfect if you want the bracelet to grow over time rather than arrive fully built on day one.
How Many Charms Should You Put on a Pandora Bracelet?
The answer depends on the bracelet style, size, and how you want it to feel. Many Pandora bracelet designs have recommended charm ranges, and more charms usually mean you may want a little more room. Practically speaking, a bracelet with a moderate number of charms often feels more comfortable and looks more balanced than one that is packed edge to edge.
A good beginner rule is this: start with a few meaningful pieces, wear the bracelet for a while, and build slowly. Pandora bracelets are personal by design. There is no trophy for filling every inch in one weekend.
Care Tips After Adding Charms
Once your bracelet is styled, basic care helps it stay beautiful. Wipe it gently with a soft cloth after wear. Keep it away from harsh chemicals, lotions, perfumes, and chlorinated water when possible. If it needs a deeper clean, mild soap, lukewarm water, and a soft brush are common go-to methods for jewelry like this.
Also, store the bracelet separately or in a soft pouch so the charms do not scratch against other jewelry. Your bracelet should tell your story, not look like it went twelve rounds in a tangled drawer.
What Real People Often Experience When Putting Charms on a Pandora Bracelet
The first time someone puts charms on a Pandora bracelet, there is usually a tiny moment of panic. The clasp feels stiffer than expected, the bracelet does not instantly drape like a silk ribbon, and the charms somehow seem both bigger and smaller than they did in the box. Bigger when you are trying to arrange them aesthetically, smaller when one slips from your fingers and disappears into the exact shadowy corner of the table you did not know existed.
That experience is incredibly common, especially for new owners. A brand-new bracelet often feels a little structured at first. People sometimes expect it to behave like an old favorite chain bracelet right away, but Pandora bracelets tend to soften and feel more natural with wear. That means the early styling experience can feel slightly awkward even when you are doing everything correctly. It is a little like breaking in new shoes, except shinier and with fewer blisters.
Another common experience is realizing that charm placement matters a lot more than expected. You may love all your charms individually, but once they are on the bracelet, one large piece can dominate the whole look. Two dangles side by side might tangle. A charm you thought should sit in the center may actually look better off to one side. This is why so many people end up rearranging the bracelet several times during the first week. It is not indecision. It is design evolution with a dash of “why does this one charm suddenly look bossy?”
Gift-givers also have their own version of this experience. A Pandora bracelet is often emotional. It may mark a graduation, anniversary, new baby, milestone birthday, or a trip someone never wants to forget. Because of that, people sometimes feel pressure to make the bracelet look perfect immediately. But the charm of a charm bracelet is that it does not have to be finished. In fact, it often feels more meaningful when it grows slowly. One charm from a sister, another from a best friend, one you bought for yourself after a promotion, one from a city you loved visiting. The bracelet becomes less about styling and more about memory collecting.
There is also the “aha” moment with clips and safety chains. A lot of first-time owners assume these are optional extras created by jewelry people who simply enjoy giving us more decisions. Then they wear the bracelet for a few days and realize clips help keep everything from sliding into one clump, while a safety chain can prevent a terrible “my bracelet opened in public and now I am crawling under a restaurant chair looking for a tiny silver heart” situation. Suddenly, those practical pieces feel less like accessories and more like the quiet heroes of bracelet styling.
Over time, people usually develop a personal system. Some keep the bracelet symmetrical and polished. Others rotate charms by season, mood, or occasion. Some treat it like a wearable diary. Others prefer one or two statement charms and keep the rest simple. That flexibility is part of the appeal. There is no single correct way to style a Pandora bracelet, only the way that feels most like you.
So if your first attempt feels slightly clumsy, welcome to the club. Nearly everyone starts there. The trick is to go slowly, handle each charm gently, and remember that a Pandora bracelet is supposed to be personal, not stressful. Once you get the hang of it, adding charms becomes less of a task and more of a ritual. And honestly, that is half the fun.
Final Thoughts
Learning how to put charms on a Pandora bracelet is mostly about understanding the system, handling the pieces gently, and giving yourself permission to style, restyle, and style again. Once you know how the clasp works, where clips go, and which charms fit your bracelet, the process becomes simple. Better yet, it becomes enjoyable.
Start with compatible pieces, keep the layout balanced, use clips and a safety chain if you want extra structure, and avoid overcrowding. From there, your bracelet can grow into something that feels stylish, meaningful, and unmistakably yours. Tiny charms, big personality, minimal chaos. That is the dream.


