Table of Contents >> Show >> Hide
- Why Cleaning Your PopSocket Matters
- Before You Start: What You’ll Need
- Easy Ways to Clean a PopSocket: 9 Steps
- Step 1: Wash Your Hands and Power Down Your Phone
- Step 2: Remove the PopSocket Carefully (If Your Model Allows)
- Step 3: Dry-Clean the Dust and Lint First
- Step 4: Wipe the PopSocket Top and Accordion with a Damp Cloth
- Step 5: Clean the Phone Case Area Under and Around It
- Step 6: Clean the Sticky Gel the Right Way (This Is the Big One)
- Step 7: Disinfect the Outer Surfaces Safely (Optional but Smart)
- Step 8: Reattach the PopSocket to a Clean, Dry, Smooth Surface
- Step 9: Set a Simple Cleaning Routine So It Never Gets Gross Again
- Common Mistakes That Ruin a PopSocket
- Quick FAQ
- Real-World Experiences: What Happens When People Actually Clean Their PopSocket (and What They Learn)
- Conclusion
- SEO Tags
Your PopSocket goes everywhere your phone goes: the kitchen, the gym, the car cup holder, the couch cushions, and somehow (mysteriously) the floor. So yes, it gets gross. Dust, lint, lotion, snack crumbs, and mystery pocket fuzz all love hanging out in that little collapsible grip.
The good news? Cleaning a PopSocket is easy if you do it the right way. The bad news? Cleaning it the wrong way can ruin the sticky gel, leave streaks on your phone case, or turn your phone grip into a slippery little hockey puck. This guide walks you through a safe, simple, and genuinely effective method in 9 easy stepswith tips for the grip, the adhesive base, and the phone case underneath.
This article is written for real life: busy people, messy pockets, and anyone who has ever looked at their PopSocket and thought, “Wow… I should not be touching that.”
Why Cleaning Your PopSocket Matters
A PopSocket is a high-touch phone accessory. You tap it, grip it, collapse it, expand it, and hand your phone to other people. Over time, oils from your hands and everyday grime build up on the top and around the accordion folds. If you ignore it too long, the grip can feel slippery, look dingy, and collect lint like it’s training for a pocket-fuzz championship.
Cleaning also helps with performance. A dirty surface around the base can affect how well the PopSocket sits on your case. And if the adhesive gel picks up dust, it may lose some of its stickiness. The key is to clean the right parts in the right orderwithout soaking the adhesive or using harsh chemicals where they don’t belong.
Before You Start: What You’ll Need
- A clean microfiber cloth (best choice for phone accessories)
- Cotton swabs (for edges and creases)
- A small bowl of cool water
- Mild dish soap (just a drop or two)
- A dry towel or paper towel (for drying surfaces, not the phone screen)
- Optional: 70% isopropyl alcohol wipes (for compatible hard, non-porous outer surfaces only)
- Optional: soft toothbrush (for scrubbing a case, not the sticky gel)
Important: Do not use bleach, harsh sprays, or abrasive cleaners. Also, don’t spray liquid directly onto your phone, PopSocket, or case. Put cleaner on a cloth first, and keep moisture away from ports and openings.
Easy Ways to Clean a PopSocket: 9 Steps
Step 1: Wash Your Hands and Power Down Your Phone
Start with clean hands. If you clean your PopSocket with oily hands, you’re basically re-seasoning it while you work. A quick hand wash makes a noticeable difference.
Next, turn off and unplug your phone. This is a small step that helps you clean more safely and avoid accidental taps, swipes, or moisture issues. If you’re cleaning both the PopSocket and the phone case, this step is non-negotiable.
Step 2: Remove the PopSocket Carefully (If Your Model Allows)
If you have a swappable PopSocket, you can often remove the top by collapsing it, pressing down, and twisting. This makes the cleaning job much easier because you can clean the top and base separately.
If you need to remove the base from the case, go gently. Use a slow lift and avoid yanking. For stubborn adhesive, a thin card or dental floss can help lift the edge without tearing the gel. No superhero moves heresteady beats strong.
If your PopSocket isn’t swappable, don’t worry. You can still clean it well while it stays attached.
Step 3: Dry-Clean the Dust and Lint First
Before water or wipes touch anything, do a dry pass. Use a clean microfiber cloth to wipe the PopSocket top, accordion folds, and the area around the base. This removes loose dust, pocket lint, and crumbs.
Why this matters: if you go straight to a damp cloth, dust turns into grime paste. And nobody needs a DIY mud mask for their phone grip.
Use a cotton swab for tight spots around the edge of the base. If you see lint packed into the creases, gently roll the swab instead of pushing hard. The goal is to lift debris, not jam it deeper.
Step 4: Wipe the PopSocket Top and Accordion with a Damp Cloth
Mix a tiny drop of mild dish soap into cool water. Lightly dampen one corner of your microfiber cloth (not dripping) and wipe the PopSocket’s outer surfaces. Focus on:
- The top disc (where fingerprints and makeup transfer show up)
- The accordion folds (where grime collects)
- The outer edge near the base
Use gentle pressure. A microfiber cloth is enough for most buildup. If needed, a cotton swab can help clean the creases. If your PopSocket has a printed design, avoid scrubbing aggressively so you don’t wear the finish.
After wiping, go over it again with a clean damp section (water only) to remove soap residue. Then dry with a soft cloth.
Step 5: Clean the Phone Case Area Under and Around It
PopSockets get blamed for grime they didn’t create. A lot of the dirt actually lives on the phone case surface around the base. Clean that area before reattaching anything.
How you clean the case depends on the material:
- Silicone or hard plastic cases: A damp microfiber cloth with mild soap usually works well.
- Clear cases: Use gentle soap and water first. If they’re yellowing, cleaning may help a little, but some discoloration is permanent.
- Leather or specialty finishes: Follow the case maker’s instructions and avoid random wipes “just because they’re nearby.”
Make sure the case is fully dry before the PopSocket goes back on. Adhesive and moisture are not friends.
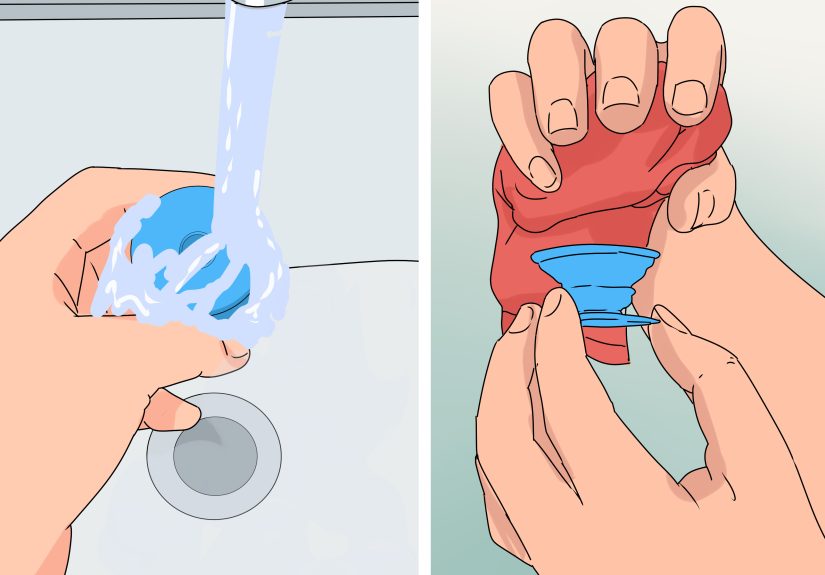
Step 6: Clean the Sticky Gel the Right Way (This Is the Big One)
If the PopSocket adhesive gel looks dusty or isn’t sticking well, clean it separately. This is the step most people get wrong.
- Rinse the sticky gel quickly with cool water.
- Let it air dry for about 10 minutes.
- Do not leave it exposed too long, or the gel can dry out too much.
That’s it. No soap. No alcohol. No scrubbing. No paper towel rubbing. Just a quick rinse and a short air dry.
If you’re thinking, “Should I sanitize the sticky part too?”skip it. The adhesive is not the place for disinfecting products. Clean and disinfect the outer surfaces instead.
Step 7: Disinfect the Outer Surfaces Safely (Optional but Smart)
If you want a deeper clean, you can disinfect the outside of your phone and case. Many major device manufacturers allow gentle use of compatible disinfecting wipes or 70% isopropyl alcohol-based wipes on hard exterior surfaces. The key rules are simple:
- Use wipes or a cloth lightly dampened with cleaner
- Never spray cleaner directly on the phone or grip
- Avoid ports, speakers, microphones, and openings
- Do not use bleach or harsh household cleaners
- Do not soak the PopSocket or case
For the PopSocket itself, focus on the outer top and sides, not the adhesive gel. If your case material is delicate (like leather), use manufacturer-approved methods only.
Step 8: Reattach the PopSocket to a Clean, Dry, Smooth Surface
Now for the satisfying part. Once everything is clean and fully dry, reattach the PopSocket base to your phone or case.
For the best hold, place it on a smooth, flat, hard surface. PopSockets generally stick best to hard plastic, glass, or smooth cases. They may not stick well to silicone, waterproof, highly textured, or soft cases.
When you place it, press firmly and evenly. Then leave it alone for a bit. Resist the urge to pop it open 14 times immediately just to “test it.” Giving the adhesive time to settle improves the hold.
Step 9: Set a Simple Cleaning Routine So It Never Gets Gross Again
The easiest PopSocket cleaning method is consistency. A quick wipe once or twice a week prevents buildup and makes deep cleaning much easier later. If you use your phone while eating, working out, or commuting, clean it more often.
A good routine looks like this:
- Weekly: Dry wipe with microfiber cloth
- Every 1–2 weeks: Damp wipe of PopSocket top and case
- As needed: Quick rinse of sticky gel if grip loses stickiness
- During cold/flu season or after travel: Careful disinfecting of outer surfaces
Your phone grip doesn’t need a spa day. It just needs 2 minutes and a microfiber cloth.
Common Mistakes That Ruin a PopSocket
- Using bleach or harsh cleaners: These can damage finishes and are not recommended for phones and accessories.
- Soaking the whole PopSocket: Great for pasta, bad for adhesive.
- Scrubbing the sticky gel: This can reduce stickiness fast.
- Using paper towels on screens: They can be too rough and leave lint.
- Reattaching to a wet or dusty case: The adhesive won’t bond well.
- Sticking it to silicone or textured cases: It may not hold properly, even if it looks fine at first.
Quick FAQ
Can I use alcohol to clean a PopSocket?
Yes, but only on the outer hard surfaces (and only lightly). Avoid alcohol on the sticky gel adhesive. For the gel, use a quick water rinse and air dry.
Why is my PopSocket not sticking anymore?
Usually because the gel picked up dust or the case surface is dirty, textured, or silicone-based. Clean the gel, clean the case, and reattach to a smooth, dry surface.
Can I clean it while it’s still on the phone?
Yes. A microfiber cloth and a lightly damp swab work great for routine cleaning. Just be careful around openings and don’t let moisture pool around the base.
Real-World Experiences: What Happens When People Actually Clean Their PopSocket (and What They Learn)
Here’s the part nobody talks about in short cleaning tips: most people don’t clean a PopSocket until it becomes visibly weird. Not “a little dusty.” We mean full-on fuzzy, sticky, and somehow both greasy and dry at the same time. In real use, the PopSocket collects whatever your day throws at ithand lotion, makeup, pocket lint, flour from cooking, and even dog hair if you live with a furry coworker. That’s why the best cleaning advice is the kind that works in normal homes, not spotless laboratories.
A common experience is the “it stopped sticking overnight” panic. Usually, the issue is not that the product is permanently damagedit’s that the adhesive gel picked up dust or the user moved it to a different case material. People often switch from a hard case to a soft silicone case and assume the PopSocket is failing, when the real issue is compatibility. Once they clean the gel and move it back to a smooth, hard surface, the grip works much better. It feels like magic, but it’s really just adhesive chemistry doing its job.
Another frequent scenario: someone uses a very wet wipe or sprays cleaner directly on the phone. The PopSocket may survive, but the result is usually streaks, trapped moisture, or a base that starts lifting at the edges. After that, people tend to overcorrect and scrub harder, which makes the finish look worn. The better approach is always the samelight moisture, soft cloth, gentle passes, and patience. PopSockets and phones respond well to calm cleaning, not aggressive cleaning.
There’s also the “I cleaned the top, but it still looks dirty” problem. That usually happens when grime is stuck in the accordion folds or around the base rim. A quick wipe makes the top shiny, but the edges still look dull. In these cases, cotton swabs and a microfiber cloth do the heavy lifting. Some users also find that cleaning the phone case itself makes the biggest difference visually. Once the case is cleaned, the PopSocket suddenly looks newer because the dirt contrast is gone.
Families and shared devices bring a different kind of experience. If multiple people grab the same phoneespecially at homePopSockets get dirty fast. Parents often notice that their grip feels sticky after kids use the phone during meals or car rides. A simple weekly wipe routine solves most of this. People who add PopSocket cleaning to another habit (like wiping keys, glasses, or a desk) tend to stick with it. People who wait for the grip to look terrible usually end up doing a longer, more annoying deep-clean later.
Travel is another big one. PopSockets take a beating in airports, taxis, backpacks, and hotel nightstands. Travelers often notice the grip feels grimy by the end of a trip, especially if they use it constantly for maps, photos, and boarding passes. The easiest fix is a quick microfiber wipe every evening and a deeper clean when they get home. That routine keeps the PopSocket comfortable to use and helps the adhesive last longer because dust doesn’t get pressed into the gel.
One final pattern is the “I thought it was broken, but it just needed cleaning” moment. This happens a lot. The PopSocket may feel loose, look faded, or seem less secure, but a proper cleaning and reattachment restores most of its function. Not every PopSocket lasts forever, of course, but regular cleaning makes a surprising difference in both appearance and grip. In other words: sometimes your phone accessory doesn’t need replacingit just needs a tiny bit of attention and a less chaotic relationship with your pockets.
Conclusion
Cleaning a PopSocket is simple once you know the rules: be gentle, keep the adhesive gel treatment minimal, avoid harsh chemicals, and always reattach to a clean, dry, smooth surface. The 9-step method above helps you clean the grip, protect your phone case, and restore stickiness without damaging the parts that matter.
Think of it as basic maintenance for one of the most-used accessories on your phone. A quick clean keeps it looking better, feeling better, and working betterand that’s a win for something you probably touch hundreds of times a day.


