Table of Contents >> Show >> Hide
- Why DIY a Poster Frame Instead of Buying One?
- Choose Your “Easy” Level: Two DIY Poster Frame Styles
- Materials and Tools (Pick Based on Your Option)
- Option A Tutorial: Easy DIY Poster Hanger Rails (Fast, Minimal, Stylish)
- Option B Tutorial: Simple Wood Poster Frame with Acrylic (Classic “Real Frame” Look)
- Step 1: Measure like a grown-up (but keep it friendly)
- Step 2: Choose your backing and how “archival” you want to be
- Step 3: Cut your frame pieces
- Step 4: Assemble the frame
- Step 5: Create a “ledge” for acrylic and backing (two easy ways)
- Step 6: Build the frame sandwich
- Step 7: Add hanging hardware and hang it straight
- Make It Look High-End: Finishing and Design Tricks
- Hanging Tips: Keep Your Wall Art Up (and Your Drywall Intact)
- Common Mistakes (and How to Fix Them)
- FAQ: Easy DIY Poster Frame Questions
- Experience-Based Tips: What DIYers Learn After Making a Few Poster Frames (Extra )
- SEO Tags
Posters are the snack food of wall art: inexpensive, fun, and somehow always arriving rolled up like a burrito that refuses to behave.
The problem is that a naked poster can look a little “college-dorm-core,” while a store-bought frame in an oddball size can cost more than the poster itself.
The good news: you can build an easy DIY poster frame that looks polished, fits your exact size, and lets you choose the vibemodern, rustic, minimalist, or “I swear this was expensive.”
In the spirit of community DIY (think: clever shortcuts, budget wins, and projects that don’t require a workshop the size of an aircraft hangar),
this guide walks you through two beginner-friendly options:
a wood poster hanger (rail frame) that’s fast and forgiving, and a more traditional simple frame with an acrylic front
that gives your poster that real “gallery wall” energy.
Why DIY a Poster Frame Instead of Buying One?
If you’ve ever tried to buy a frame for a 24×36 poster, you already know the plot twist: the “cheap” frame is often thin, flimsy, and ready to warp
the moment humidity shows up like an uninvited guest. DIY framing isn’t just about saving money (though yes, your wallet will clap politely).
It’s about controlover size, style, finish, and even how protected your poster is.
DIY frames shine when you want:
- Custom sizing: Works for standard posters (18×24, 24×36) and weird sizes you found at a concert merch table at 11:47 p.m.
- A higher-end look: Wood rails, clean lines, and intentional finishes read “designed,” not “last-minute.”
- Safer glazing options: Acrylic is lighter and less likely to shatter than glass, which matters in busy rooms, kids’ spaces, or rentals.
- Easy updates: Swap posters seasonally without feeling like you’re defusing a bomb behind the frame.
Choose Your “Easy” Level: Two DIY Poster Frame Styles
Option A: Wood Poster Hanger (Rails)
This is the quick-win method: two wood rails clamp the top (and usually the bottom) of your poster.
It’s lightweight, modern, and doesn’t require acrylic or glass. It’s also perfect if your poster is on thicker paper and you like a relaxed, scroll-style look.
Option B: Simple Wood Frame + Acrylic Front
If you want a classic framed lookedges protected, poster held flat, ready for a gallery wallthis is your pick.
You’ll build a basic wood frame, add an acrylic sheet, and secure the poster with a clean backing.
Still beginner-friendly, just a few more steps.
Materials and Tools (Pick Based on Your Option)
Common supplies (both options)
- Tape measure (or ruler) and pencil
- Sandpaper or sanding sponge (medium + fine grit)
- Wood stain or paint (optional)
- Drop cloth or cardboard (for mess control)
Option A supplies (wood poster hanger rails)
- Two to four wood strips (1×2, lattice trim, or thin molding), cut to poster width
- Strong magnets or a clamping method (binder clips, small screws, or a routed groove if you’re fancy)
- Wood glue (optional, depending on design)
- String/cord/leather strip for hanging + a small screw eye on each side
Option B supplies (traditional frame + acrylic)
- Picture frame molding (or 1×2 boards for a chunkier, modern look)
- Acrylic sheet cut to your poster size (hardware stores can often cut it)
- Foam board or acid-free backing board (recommended for longevity)
- Wood glue + brad nails (or corner braces)
- Hanging hardware (D-rings + wire, or sawtooth hanger for small frames)
Tool level options
- No power tools: miter box + hand saw, sandpaper, clamps, glue.
- Some power tools: miter saw speeds up cuts; brad nailer makes assembly faster.
- Extra credit: router for a rabbet (a recessed ledge) so acrylic and backing sit neatly.
Option A Tutorial: Easy DIY Poster Hanger Rails (Fast, Minimal, Stylish)
This is the “I want it done today” solution. It’s also the method that makes people say,
“Wait… you made that?” in a tone that implies you might secretly have a woodworking side hustle.
Step 1: Measure and cut your rails
- Measure the width of your poster.
- Cut two rails to match that width (top and bottom). For a stronger grip, you can make four rails (two for top, two for bottom) that sandwich the paper.
- Lightly sand edges so nothing snags or splinters your poster (or your pride).
Step 2: Decide how the rails will “hold” the poster
You’ve got a few legit approaches here, depending on the look you want and the tools you have:
- Magnet method (cleanest look): embed small magnets so the rails snap together around the poster.
If you don’t want to carve recesses, you can attach magnets to the back with epoxy and keep them aligned. - Clamp method (zero fuss): use small binder clips hidden behind the top rail, or tiny screws that pinch the poster gently.
This is great for renters or anyone who wants to avoid permanent adhesives. - Groove method (extra tidy): cut a shallow groove along the inside edge of the rail (router or table saw) so the poster slides in.
Step 3: Finish the wood (optional but recommended)
- Wipe rails clean of dust.
- Stain for warmth, paint for a modern pop, or go natural for a Scandinavian vibe.
- Let everything dry fully before introducing your poster to it (wet stain + paper = regret).
Step 4: Add the hanger
- Screw a small eye hook into each end of the top rail (pre-drill to avoid splitting).
- Tie on a cord, leather strip, or simple string.
- Adjust the length so the poster hangs level. This is the part where your level gets to feel important.
Step 5: Insert your poster and hang
Slide or clamp the poster into the top rail, then add the bottom rail for weight and a finished look.
Hang on a small nail, picture hook, or wall anchor depending on weight and wall type.
Style tip: Rails look especially sharp in sets. Frame three related posters the same way and suddenly your wall looks curated,
not accidental.
Option B Tutorial: Simple Wood Poster Frame with Acrylic (Classic “Real Frame” Look)
Want your poster to look like art you insured? This method gives you that crisp outline, protects the print,
and helps flatten the “rolled poster memory” so it stops trying to become a tube again.
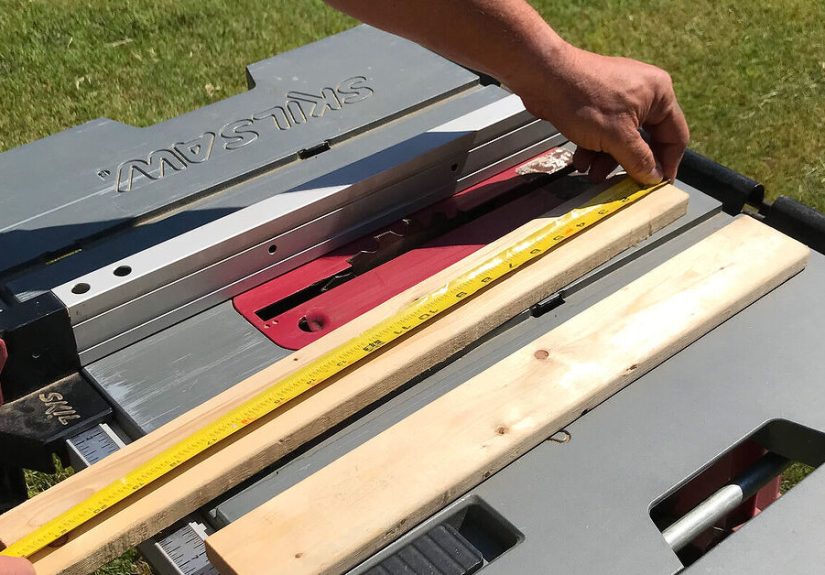
Step 1: Measure like a grown-up (but keep it friendly)
- Measure your poster’s exact width and height.
- Add a little breathing room (about 1/8″ total) if you want an easier fit and less edge buckling.
- Decide on your “reveal”: do you want the poster edge visible, or will a mat/faux mat cover it slightly?
Step 2: Choose your backing and how “archival” you want to be
If your poster is replaceable, you can use standard foam board as backing. If it’s sentimental (concert memory!)
or collectible, consider acid-free backing and gentle mounting methods. The goal is to keep paper from yellowing
or sticking over time.
Step 3: Cut your frame pieces
- Use picture frame molding or 1×2 boards.
- Cut 45-degree miters (miter box + hand saw works fine). Focus on clean angles more than speed.
- Dry-fit the pieces around your poster measurements before gluing. This is where you catch mistakes while they’re still fixable.
Step 4: Assemble the frame
- Apply wood glue to the mitered corners.
- Clamp until dry. If you have brad nails, add a couple per corner for strength.
- Fill gaps with wood filler if needed, then sand smooth once dry.
Step 5: Create a “ledge” for acrylic and backing (two easy ways)
- Easier method: Attach thin trim strips (or stop molding) on the inside back edge of the frame.
This creates a lip that acrylic and backing can sit against. - Cleaner method: Cut a rabbet with a router (a recessed channel) so the stack sits flush.
This looks professional but isn’t required.
Step 6: Build the frame sandwich
- Place acrylic into the frame first (clean it before you lock it indust loves permanence).
- Center the poster on the backing board. If you’re mounting, use minimal, reversible techniques (corners or gentle hinges) rather than heavy adhesives.
- Place backing behind the poster and press into the frame.
- Secure the backing with small nails, frame points, or turn buttons.
Step 7: Add hanging hardware and hang it straight
Add D-rings and wire for larger frames, or a sawtooth hanger for smaller ones. For a classic “gallery” look,
many decorators hang art so the center sits around eye level (often cited around 57 inches from the floor).
Adjust for your room and furniture heightrules are helpful, not bossy.
Make It Look High-End: Finishing and Design Tricks
Upgrade the wood finish without drama
- Stain + matte topcoat: Warm, classic, forgiving on pine.
- Painted black or white: Instantly modern. Satin finish hides small flaws.
- Natural with clear coat: Lets wood grain do the talking.
Prevent blotchy stain on soft wood
Pine can stain unevenly. A pre-stain conditioner (or a light sanding + wiping technique) can help you avoid the “leopard spotting” effect.
If you do get blotches, lean into it with a slightly darker stain or a painted finish. Design is also the art of pretending you meant it.
Fake a mat (cheaply) for a gallery feel
Custom mats are lovely, but you can get a similar look with thick white cardstock or acid-free board.
Cut a window slightly smaller than your poster so it “frames” the print inside the frame.
It adds depth, hides imperfect edges, and makes even a budget poster look intentional.
Flatten a stubborn rolled poster
- Unroll and place under clean books for a day (use a sheet of clean paper between poster and books).
- Reverse-roll it gently in the opposite direction for a short time to relax the curl.
- Frame it with backing and acrylic to encourage it to stay flat over time.
Hanging Tips: Keep Your Wall Art Up (and Your Drywall Intact)
A gorgeous DIY poster frame deserves a secure hang. The best hardware depends on weight and wall type.
For heavier frames, a stud or anchor is your friend. For lighter rail hangers, a simple nail or picture hook often works.
Quick hanging checklist
- Use a level: especially with sets or gallery walls.
- Know your wall: drywall, plaster, brickeach behaves differently.
- Be cautious with adhesive strips: great for some lightweight frames, risky for heavy or fragile pieces.
Bonus hack energy: If you’re trying to mark where hardware will land, some DIYers use simple transfer tricks to avoid extra holes.
Regardless of method, measure twice, make holes once. Your future self will thank you.
Common Mistakes (and How to Fix Them)
“My rails keep slipping.”
Upgrade your grip: stronger magnets, a slightly thicker rail, or a hidden clamp method.
If your poster paper is very smooth, a tiny strip of felt on the inside of the rail can add friction without damage.
“My frame is slightly crooked.”
Tiny gaps happen. Wood filler + sanding + paint can hide a lot.
If the frame is out of square, loosen hardware, re-clamp on a flat surface, and re-secure once aligned.
“There’s dust under the acrylic and I can’t unsee it.”
Congratulations: you have excellent eyes. Take it apart, clean acrylic with a soft cloth, and reassemble in a low-dust zone.
Pro move: wipe down backing board, toodust is an equal-opportunity annoyance.
“My poster has ripples.”
Ripples can come from humidity or tension. Use a firm backing, avoid stretching the paper,
and consider a mat/faux mat so the acrylic doesn’t press directly on the print.
FAQ: Easy DIY Poster Frame Questions
Is acrylic really better than glass for posters?
“Better” depends on your priorities. Acrylic is lighter and more impact-resistant, making it a smart choice for high-traffic spaces or larger frames.
Glass is more scratch-resistant and often cheaper in small sizes. For posters, acrylic is a popular balance of safety and convenience.
Do I need UV protection?
If your poster gets direct sunlight, UV protection can help reduce fading over time.
If it’s in a darker hallway or away from windows, you may not need the upgrade.
Can I do this in a rental?
Yesrails are especially rental-friendly because they’re lightweight. If you use adhesive hanging solutions,
stay within weight limits and avoid using them for anything heavy or fragile.
Experience-Based Tips: What DIYers Learn After Making a Few Poster Frames (Extra )
The first time you make a DIY poster frame, it feels like a magic trick: a rolled-up print becomes wall-worthy decor in a single afternoon.
Then you make a second one and discover the hidden storyline of framinglittle details that don’t show up in the “after” photos but absolutely
determine whether your project looks handmade in a charming way or handmade in a “did a raccoon help?” way.
One of the most common “aha” moments is how much paper behavior affects everything. Posters that have lived in a tube for months
can cling to that curl with impressive stubbornness. DIYers often learn to flatten first, frame second. A night under books helps, but the real
secret is patience: let the poster relax on a clean surface, then assemble your rails or frame without rushing. Rushing is how you end up with a
poster that’s slightly skewed forever, like it’s trying to escape frame prison.
Another frequent lesson: magnets are not all created equal. Plenty of people start with magnets that feel strong in your hand,
then the rails slowly slide the minute gravity has a say. When that happens, you don’t need to abandon the projectyou just need to upgrade your
grip. DIY communities often suggest stronger magnets, better alignment, or adding a subtle friction layer inside the rails. Once your rails hold,
the whole project suddenly feels “real,” like something you’d buy, not something you made between errands.
Finish work also teaches humility. Stain can look gorgeous… unless you apply it to soft wood without prep and end up with blotches that look like
the frame is developing a complex skin condition. The good news is that DIYers also learn the quickest fix: sand lightly, adjust stain tone,
or pivot to paint. A painted rail frame in matte black or warm white can look shockingly high-end, especially when paired with a simple cord.
It’s the design equivalent of putting on sunglasses: everything instantly looks more confident.
Then there’s the “invisible stuff” that becomes visible the moment you add acrylic. Dust. Specks. The tiny fiber that appears under the glazing
like it paid rent. Most DIYers learn to clean the acrylic right before final assembly, not at the beginning, because time plus air equals
dust. Wiping down the backing board helps, too. And if you trap a speck anyway? You’ll probably only notice it at 2 a.m., and that’s okay.
The fix is simply reopening and reassemblingannoying, but doable.
Finally, hanging the frame teaches a practical design lesson: a frame can be perfect, but if it’s hung too high or slightly crooked,
your brain will register “off” before it registers “pretty.” DIYers often adopt a simple rule of thumb: aim for eye-level placement
(and adjust for furniture), use a level, and don’t rely on adhesive solutions for anything that would make you sad if it fell.
Once you dial in placement, your DIY poster frame stops feeling like a project and starts feeling like a finished room.