Table of Contents >> Show >> Hide
- Why Build a DIY Crate Cabinet?
- Tools and Materials You’ll Need
- Step-by-Step: How to Build a DIY Crate Cabinet With Sliding Drawers
- Smart Ways to Use a Crate Cabinet With Sliding Drawers
- Pro Tips for Smooth Sliding Drawers
- Safety Considerations
- My DIY Crate Cabinet Experience: Lessons, Wins, and “Do-Overs”
If your home is overflowing with craft supplies, toys, tools, or “I’ll organize this later” clutter, a DIY crate cabinet with sliding drawers might be your new best friend. Inspired by the popular Hometalk project that uses off-the-shelf wooden crates and basic hardware, this storage piece combines rustic charm with serious function.
Instead of spending big money on a store-bought cabinet, you can build your own crate cabinet using inexpensive wooden crates, simple drawer slides, and a few boards from the home center. The result? A tall, narrow storage tower that works everywherefrom a craft room or classroom to an entryway, laundry room, or garage.
In this guide, we’ll walk through how to build a crate cabinet with sliding drawers, which materials to choose, how to install drawer slides so they glide smoothly, and how to customize the finish to match your style. We’ll also cover real-life tips and lessons learned so your project turns out sturdy, smooth, and squeak-free.
Why Build a DIY Crate Cabinet?
Wooden crates have become a DIY favorite in the U.S. for good reason: they’re affordable, lightweight, and easy to repurpose into shelves, nightstands, closets, and storage towers. When you turn crates into sliding drawers, the functionality jumps to another level.
Big storage in a small footprint
The classic crate cabinet design is tall and slimoften about 4 feet high with four stacked crates. It takes up little floor space but offers deep storage for bulky items like fabric, toys, pantry goods, or workshop supplies. This makes it perfect for small homes, apartments, or that awkward corner you’ve never known what to do with.
Budget-friendly and beginner-friendly
Most versions use ready-made crates from home centers, full-extension drawer slides, and basic boards such as poplar or pine. Compared with building traditional drawer boxes from scratch, mounting crates on slides is simpler and more forgiving. If you can measure, drill, and use a miter or circular saw safely, you can handle this project.
Customizable style
Crates and simple boxes are like blank canvases. You can leave them rustic, stain them a rich walnut, or paint them bright colors for a kids’ room. Many DIYers paint or stain the cabinet frame and crates separately so the piece looks intentionally designed, not just thrown together.
Tools and Materials You’ll Need
Your exact shopping list will depend on the size of your cabinet, but here’s a commonly used setup based on popular crate cabinet tutorials:
Core materials
- 4 pre-made wooden crates (often sourced from big-box stores)
- 4 pieces of 1×4 or similar boards for vertical sides (about 4 feet long)
- Additional 1×2 or 1×3 boards for horizontal supports and back braces
- 1 sheet (or partial sheet) of plywood or oak veneer for the top
- Edgebanding (optional) to finish plywood edges
- 4 pairs of 16″ full-extension drawer slides
- Wood screws in various lengths (1 1/4″, 1 1/2″, 2″)
- Wood glue
- Sandpaper (120–220 grit) or a power sander
- Paint, stain, or clear finish and brushes/rollers
Tools
- Miter saw or circular saw (for cutting boards)
- Drill/driver and drill bits
- Pocket hole jig (optional, but helpful for strong joints)
- Clamps and a square for keeping everything straight
- Measuring tape, pencil, and level
- Safety gear: eye protection, ear protection, and dust mask
If you’re an absolute beginner, don’t panic. Many U.S. DIY tutorials on drawers and pull-out storage emphasize that basic drawer construction is more about consistent measuring than fancy joinery.
Step-by-Step: How to Build a DIY Crate Cabinet With Sliding Drawers
Step 1: Plan your size and layout
Start by measuring your crates. Note both their width and height. Add a bit of “breathing room” (usually 1/2″ to 1″) between the top of each crate and the board above it so the drawers can glide without rubbing.
Decide how tall you want the cabinet to be. Many builders choose a 4-foot tall cabinet with four crates. Taller cabinets can work, but if you go much higher, consider anchoring the unit to the wall for safety.
Step 2: Build the frame
- Cut four vertical side pieces from your 1×4 boards. These will form the legs of the cabinet.
- Cut horizontal pieces to act as supports between the legsthree or four sets, depending on the number of drawers, plus a pair for the base.
- Lay out two “ladder” shapes on the floor: two vertical legs with horizontal supports spaced where each crate will sit. Make sure the spacing matches your crate height plus clearance.
- Attach the supports using screws and wood glue. Pocket holes on the underside or inner faces help hide fasteners.
- Connect the two ladders with supports at the back and bottom to create a rigid rectangular frame.
Use a square diligently hereif the frame is out of square, your slides will fight you later, and your drawers may bind or rack.
Step 3: Reinforce the crates
Pre-made crates are great, but they’re not always designed to handle the stress of sliding in and out on hardware. Many tutorials recommend reinforcing the crate sides or bottoms with additional boards or by gluing and re-nailing the slats.
- Add a strip of solid wood inside each side where the slides will attach, so the screws have more to bite into.
- Check for loose slats and secure them with glue and brad nails if needed.
- Lightly sand any rough edges to prevent splinters and snagged fabrics.
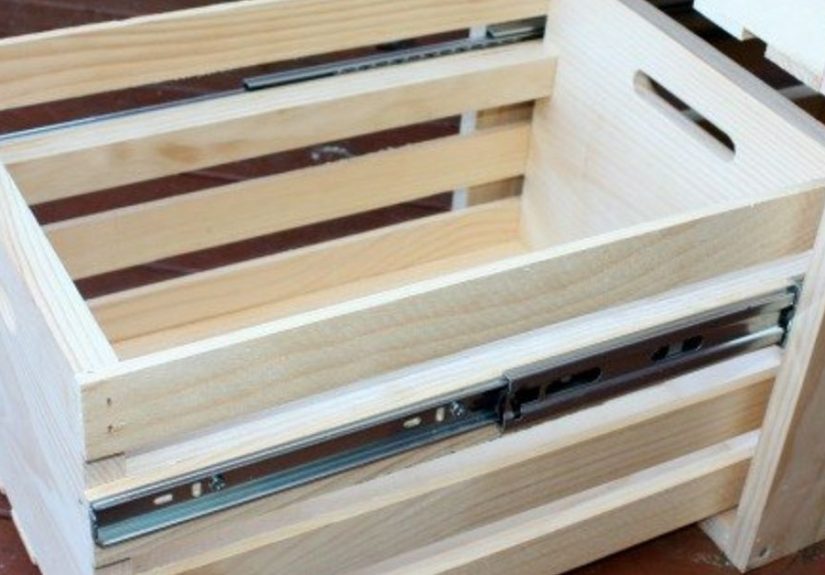
Step 4: Install the drawer slides in the frame
Drawer slides are where precision matters most, but the concept is straightforward: the two sides of each slide must be level, parallel, and aligned with each other.
- Mark the slide positions on the inside of the cabinet legs. Many DIYers use a scrap of wood as a spacer block so all slides on one side are at the same height.
- Install the cabinet (stationary) portions of the slides on each side of the frame, checking with a level.
- Double-check that corresponding slides (left/right) are exactly opposite each other and the same distance from the front of the cabinet.
Take your time here. If something feels off, it probably is. Adjust before you ever attach the slides to the crates.
Step 5: Attach slides to the crates
- Separate the sliding portion from each slide, as directed by the manufacturer.
- Using the same spacer method, mark and attach the sliding portions to the reinforced sections of each crate.
- Ensure each pair is level and aligned so the crate will travel straight in and out.
- Carefully slide each crate into its rails and test the movement.
You want the crates to glide smoothly and stop just shy of tipping out. Full-extension slides give you maximum access to the crate contents, which is one of the big perks of this design.
Step 6: Add the top and back supports
Once your crates slide nicely, cut a plywood or oak-veneer top to fit the cabinet. You can either overhang it slightly or make it flush, depending on the look you want. Apply edgebanding to cover exposed plywood edges if you prefer a more finished, furniture-grade appearance.
Some builders also add a simple back panel or horizontal braces. This helps keep the cabinet square and prevents racking when the drawers are fully extended.
Step 7: Sand, finish, and style
Now the fun part: making it pretty.
- Sand all surfaces, starting with medium grit and finishing with a finer grit.
- Wipe dust away, then apply your chosen stain or paint. You can stain the frame and paint the crates for contrast, or go all-white, black, or colorful.
- Finish with a protective clear coat if the cabinet will live in a high-traffic area.
- Add hardwaremetal label pulls, cup pulls, or rope handles can reinforce the rustic, farmhouse, or industrial vibe you’re aiming for.
Smart Ways to Use a Crate Cabinet With Sliding Drawers
One of the best things about this project is its flexibility. DIYers across the U.S. have adapted crate cabinets and similar crate storage towers for all kinds of spaces.
In the craft room or home office
Use each crate for a specific category: paper, paints, yarn, fabrics, or office supplies. Because the crates pull all the way out, you don’t end up digging blindly for that one roll of washi tape you swear you bought last month.
In a kids’ room or playroom
Label each crate with a simple word or picture“Blocks,” “Cars,” “Dolls.” Sliding drawers make cleanup feel like a game, and the rustic crates can withstand the occasional slam better than flimsy plastic bins.
In the entryway or mudroom
Use the top surface for a tray, plant, and basket for keys. Dedicate crates to scarves, hats, gloves, or pet supplies. It keeps the daily chaos contained instead of piled on the floor.
In the workshop or garage
Crate cabinets make great small-parts storagesandpaper, spray paint, extension cords, or hand tools. Combine them with pegboard or wall-mounted racks for a compact, organized workstation.
Pro Tips for Smooth Sliding Drawers
If you’ve never installed drawer slides before, here are some battle-tested tips drawn from multiple drawer and pull-out shelf tutorials:
- Work from the bottom up. Install the lowest set of slides first, test the crate, then move up. That way you aren’t fighting gravity and awkward angles the whole time.
- Use consistent spacers. Cut a few scrap boards to use as spacers for slide placement. This keeps your heights consistent without constant measuring.
- Double-check clearance. Make sure you have enough space on each side of the crate for the slides plus a hair of wiggle roomtoo tight and the drawers will bind.
- Test, adjust, then lock it in. Temporarily install slides with just a couple of screws. Once everything glides smoothly, add the remaining screws.
- Consider soft-close slides. For a more premium feel and fewer slammed crates, soft-close hardware is worth the extra cost.
Safety Considerations
Because a crate cabinet is tall and the drawers pull out, safety matters:
- Anchor it to the wall. Especially in homes with kids or pets, securing the cabinet to a stud with simple brackets or straps helps prevent tipping when drawers are fully extended.
- Distribute weight wisely. Store heavier items in the lower crates and lighter items up top. This keeps the center of gravity low.
- Use proper fasteners. Make sure your screws are long enough to hold, but not so long that they poke through crate walls or the cabinet sides.
My DIY Crate Cabinet Experience: Lessons, Wins, and “Do-Overs”
On paper, a DIY crate cabinet with sliding drawers looks like an easy weekend projectand it can be. But like most DIYs, the real story is a mix of small victories, tiny mistakes, and “oh, that’s why pros do it that way” moments.
Measure twice, then measure the crate again
One of the biggest learning moments many builders report is discovering that pre-made crates are not always perfectly square or identical. You might have a stack of four crates where one is slightly taller, one is a hair wider, and one has a warped board. If you design your cabinet assuming every crate is textbook-perfect, you’ll probably end up trimming, sanding, and muttering under your breath later.
The smarter approach is to measure each crate individually and design the cabinet around the largest dimensions. Then you know the others will fit without binding. If a crate is particularly warped, you can reinforce it early with glue, clamps, and a few extra brad nails to tame the twist.
The “drawer slide reality check”
Most people underestimate drawer slides the first time. In theory they’re simple: screw one part to the cabinet, one to the crate, and boomdrawer. In reality, the slides reveal every tiny error in your measurements. If your cabinet isn’t square, or your spacing is off by even 1/16″, the crate may drag, lean, or refuse to close smoothly.
What works well is treating slide installation like a mini project of its own. Cut a dedicated spacer block for each slide position, pre-mark your lines, and use a level even if the manufacturer swears their templates make it “foolproof.” Builders who slow down at this stage usually end up with buttery-smooth drawers instead of “it works if you yank it just right.”
Finishing: rustic vs. refined
A crate cabinet naturally leans rustic, but you can steer the look in different directions with finish choices. A light stain and matte topcoat gives you that modern farmhouse vibe. Dark stain and black hardware push it toward industrial. Bright paint on the crates with a neutral frame turns it into a playful accent for a kids’ space.
One smart trick is finishing the frame and crates separately before assembly. That way you can reach all the nooks and crannies without worrying about drips getting on hardware. Just remember to lightly sand the slide areas so they’re free of finish build-up, which can interfere with movement.
Where the cabinet really shines
Once it’s in use, a crate cabinet with sliding drawers earns its keep fast. In a craft room, it becomes the “where everything actually goes” station: paper in one crate, adhesives in another, fabric scraps in a third. In an entryway, it quietly swallows gloves, hats, and umbrellas that used to live on the floor. In a garage, it corals spray paint, extension cords, and sandpaper so you’re not hunting through random boxes every time you start a project.
But the best part might be psychological: sliding out a crate feels more intentional than rummaging through an open bin. You see what you have, put it back, and close the drawer. It nudges you toward actually staying organized.
What I’d do differently next time
If you’re planning your first crate cabinet, here are a few “second-time-around” insights to borrow:
- Buy one extra crate. That way, if one is badly warped or damaged, you have a backup instead of redesigning mid-build.
- Invest in decent slides. Cheap slides can feel gritty or sag over time. Full-extension, ball-bearing slides make the cabinet feel more like real furniture and less like a temporary solution.
- Anchor from day one. It’s easy to say, “I’ll secure it later,” but once the cabinet is full of stuff, you may forget. Attach simple L-brackets or straps as soon as you place it.
- Label the crates. Even a simple label holder on each drawer saves you from the “open every drawer until you find the thing” routine.
In the end, a DIY crate cabinet with sliding drawers is more than a trendy Pinterest projectit’s a practical, customizable storage solution that you can actually build with basic tools and a free weekend. And every time you slide out a crate and see everything neatly organized instead of avalanching onto the floor, you’ll be glad you did.


