Table of Contents >> Show >> Hide
- Why Concrete Works Surprisingly Well for Picture Frames
- Safety First (Because Wet Cement Doesn’t Care That You’re Crafting)
- Materials and Tools
- Pick the Right Mix (A Little Choosing Now Saves a Lot of Crumbling Later)
- Design Your Frame (With a Real Example You Can Copy)
- Build the Mold (The “Cereal Box Engineering” Phase)
- Mix and Pour (Where the Magic and the Mess Meet)
- Embed Hardware Now (Because Drilling Concrete Later Is… A Whole Thing)
- Cure Like You Mean It (This Is Where Strong Frames Are Made)
- Demold and Finish (From “Block” to “Boutique”)
- Seal the Frame (So It Doesn’t Dust, Stain, or Shed Grime)
- Assemble Your Concrete Picture Frame
- Design Variations (Because One Frame Is Never “Just One Frame”)
- Troubleshooting (Quick Fixes for Common Problems)
- Time and Cost (Realistic Expectations)
- FAQ
- Real-World Experience Notes (What People Learn After the First Frame)
- Conclusion
You’ve seen wood frames. You’ve seen metal frames. You’ve seen “barnwood” frames that look like they survived three hurricanes and a divorce.
But a concrete picture frame? That’s the kind of modern-industrial flex that says, “Yes, I have taste… and possibly a tiny architecture
studio in my spare room.”
The best part: this project is absolutely doable with beginner tools, a simple mold, and the patience to let concrete do its slow, magical thing.
In this guide, you’ll learn how to make a sleek DIY concrete picture frame that looks gallery-worthy, plus how to avoid the classic
first-timer mistakes (like “Why does my frame look like Swiss cheese?”).
Why Concrete Works Surprisingly Well for Picture Frames
Concrete has an unfair reputation for being all sidewalks and parking garages. In small-scale projects, it’s more like clay’s cooler, moodier cousin.
A thin cast frame can look clean and modern, with just enough texture to feel handmade. And because it’s non-precious (translation: you’re allowed to
mess up), you can experiment with pigments, terrazzo chips, and embedded details without sweating every tiny scratch.
- Style: modern, minimalist, industrial, Scandinavian-adjacent.
- Texture: naturally matte, with optional polishing for a smoother finish.
- Customization: pigment, marbling, terrazzo, stamped letters, inlays, and more.
- Gift potential: looks expensive; costs less than a fancy coffee run.
Safety First (Because Wet Cement Doesn’t Care That You’re Crafting)
Concrete projects are fun, but cement-based materials can irritate skin and eyes, and dust isn’t something you want to inhale. The good news: basic
PPE (personal protective equipment) covers most of the risk.
- Wear waterproof gloves (nitrile-coated or rubber) and eye protection.
- Use a dust mask/respirator while handling dry mix or sanding cured concrete.
- Work in a well-ventilated area and keep a towel + water nearby for quick cleanup.
- If wet mix gets on your skin, wash it off promptlydon’t “wait until you’re done.”
Materials and Tools
You can make a concrete frame with a very simple setup. The mold is the star of the show; everything else is supporting cast.
Concrete + Finishing Supplies
- Concrete mix for small projects (fine-grain is easiest). Options below.
- Water (clean, room temp).
- Optional: concrete pigment (liquid or powder) for color.
- Sandpaper: 120 grit + 220 grit (add 400 grit if you want extra smooth).
- Optional: small container of cement “slurry” (cement + water) for filling pinholes.
- Concrete sealer (water-based acrylic or a penetrating sealer is beginner-friendly).
Mold + Assembly Supplies
- Cardboard/cereal boxes or foam board (for a disposable mold).
- Painter’s tape + packing tape (the stronger the tape, the happier the mold).
- Hot glue or strong craft glue (optional but helpful).
- Release agent: a tiny amount of cooking oil or petroleum jelly (applied very thin).
- Picture frame hardware: small D-rings or a sawtooth hanger, plus tiny screws.
- Glass/acrylic sheet for the front (reclaimed from an old frame works great).
- Photo backing board (acid-free is ideal).
- Optional: adhesive felt pads (to protect your wall and stop wobble).
Tools
- Utility knife/scissors + ruler + pencil.
- Mixing tub/bucket + stirring stick or trowel.
- Measuring cup for water.
- Small putty knife or old credit card (for leveling).
- Optional: an old toothbrush or small brush (for “painting” a first coat into corners).
Pick the Right Mix (A Little Choosing Now Saves a Lot of Crumbling Later)
Not all mixes behave the same. For a picture frame, you want something that casts smoothly and doesn’t have boulders hiding inside it.
- Best for beginners: sand topping mix, mortar mix, or a “repair” mix (fine texture, fewer big rocks).
- Using standard concrete mix: if it contains larger aggregate, you can sift out the biggest pieces for a thin frame
(your mold will thank you for not trying to swallow gravel). - Quick-setting options: fast-curing mixes work, but they reduce your working timegreat if you’re confident, stressful if
you’re still negotiating with your tape.
Whatever mix you choose, respect the water guidance on the bag. Too much water makes concrete easier to pour but weaker and more prone to
shrinking, cracking, and edge chipping. You’re aiming for thick, workable “oatmeal” or “peanut butter” consistencymixable, not soupy.
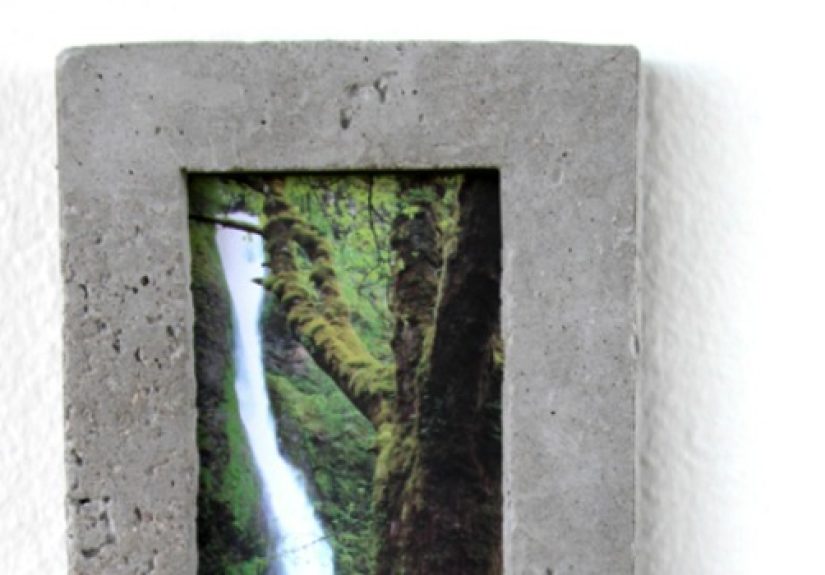
Design Your Frame (With a Real Example You Can Copy)
Start small. A 5" x 7" frame is the perfect “learn the moves” size. Here’s a reliable layout:
- Outer size: 7" x 9" (gives you a bold border)
- Photo opening: about 4" x 6" (so the photo hides behind the frame edge)
- Thickness: ~1/2"
- Recess (for glass/backing): ~1/8" deep ledge on the back side
That recessed ledge is what makes the frame function like a real frame instead of a concrete donut. You’ll create it in the mold with thin strips
of cardboard (simple, effective, oddly satisfying).
Build the Mold (The “Cereal Box Engineering” Phase)
You’re building a two-part mold: an outer box and an inner “void” that forms the photo opening. If you do this neatly, everything else gets easier.
Step 1: Make the Outer Box
- Draw the outside rectangle (example: 7" x 9") on sturdy cardboard or foam board.
- Create side walls by cutting strips the height of your frame thickness (example: 1/2").
- Tape or glue the strips around the perimeter to form a shallow tray.
- Add extra support strips on the outside to prevent bulgingconcrete has opinions about weak walls.
Step 2: Make the Inner “Void” (Photo Opening)
- Draw and cut a second rectangle matching the opening size (example: 4" x 6").
- Build up its walls to the same height as the outer mold (again, about 1/2").
- Center it inside the outer mold so the border looks even on all sides.
- Tape it down firmly so it can’t float or shift when you pour.
Step 3: Create the Back Recess for Glass
On the back of the frame, you want a ledge that glass and backing can sit on. The simplest way is to add thin cardboard strips around the opening area.
- Cut strips about 1/2" wide and roughly 1/8" thick (single-layer cardboard often lands near this range).
- Tape these strips around the inner opening, positioned so they form a shallow ledge when the concrete cures.
- Press everything down tightlygaps here become “accidental modern art.”
Pro tip: Seal the inside of the mold with packing tape for smoother surfaces and easier release. Then apply a tiny amount of release
agent (very thinno one wants oily concrete).
Mix and Pour (Where the Magic and the Mess Meet)
Mixing Tips That Actually Matter
- Start with about 2/3 of your water and add more slowly until workable.
- Mix thoroughly. Dry pockets become weak spots and ugly craters.
- If using pigment, mix it into the water first for more even color.
- Keep your batch small. You can always mix a second round.
Pouring the Frame
- “Paint” a thin first layer into corners with a brush or gloved fingers to reduce trapped air.
- Fill the mold halfway, then gently tap the sides to release bubbles.
- Add the rest of the mix, slightly overfilling.
- Level the surface with a putty knife or an old card using a sawing motion.
How to Reduce Air Bubbles (Without Buying Fancy Equipment)
Air bubbles are the #1 thing that makes beginners think they “did it wrong.” You didn’t. Concrete just likes to trap air like it’s hoarding it
for winter.
- Tap the mold firmly on the table for 30–60 seconds.
- Run a toothpick around corners and edges to pop trapped pockets.
- If you have a palm sander (no sandpaper), press it against the mold to vibrate bubbles out.
- A slightly smoother mix (not watery, just workable) often reduces voids.
Embed Hardware Now (Because Drilling Concrete Later Is… A Whole Thing)
You have two common strategies: embed hanging points while wet, or attach hardware after curing. Embedding can be cleaner if you plan ahead.
- Sawtooth hanger: embed small screws or nails partially so you can attach it later.
- D-rings: embed small anchor points (or plan to screw them into the back ledge after curing).
- Backing support: embed tiny wood tabs (or small blocks) where turn-buttons can later screw in.
If you’re unsure, skip embedding and attach hardware after curing using short screws in a glued-on wood strip (the “I prefer control” method).
Cure Like You Mean It (This Is Where Strong Frames Are Made)
Concrete doesn’t just “dry.” It hydrates and gains strength over time. For thin pieces like a frame, the biggest risk is rushing the demold and ending
up with chipped corners. A gentle, moist cure helps reduce cracking and improves strength.
- Cover the mold with plastic (a bag or wrap works) to hold moisture.
- Let it sit flat and undisturbed.
- If possible, lightly mist inside the plastic once a day for the first couple of days.
- For best durability, let the frame cure for at least 72 hours before demolding.
After demolding, the concrete will continue getting stronger over the next days and weeks. Treat it gently at firstthis is not the moment to test
its “drop resistance.”
Demold and Finish (From “Block” to “Boutique”)
Demolding
If you used cardboard, peel it away slowly. If something feels stuck, don’t yanksoften tape edges and work gradually. Concrete is tough, but thin
edges can still chip if you go full raccoon-in-a-snack-bag.
Sanding and Smoothing
- Start with 120 grit to knock down sharp edges and bumps.
- Move to 220 grit to smooth and refine.
- For a softer, more “stone-like” feel, finish with 400 grit.
Filling Pinholes (Optional, but Very Satisfying)
Mix a spoonful of cement with a little water into a thin paste. Rub it into pinholes with a gloved finger, let it set, then sand lightly.
This step can transform “homemade” into “high-end.”
Seal the Frame (So It Doesn’t Dust, Stain, or Shed Grime)
Sealing is especially helpful for decor pieces you’ll handle often. A good sealer reduces chalky dust, improves stain resistance, and can subtly
deepen color. For indoor frames, a water-based acrylic sealer is a common choice. Penetrating sealers can keep a more natural look.
- Make sure the frame is dry and dust-free after sanding.
- Apply a thin coat with a foam brush or soft cloth (follow the product directions).
- Let it dry, then apply a second thin coat if needed.
- Allow full cure time before placing photos against it (so you don’t “seal” your picture into history).
Assemble Your Concrete Picture Frame
- Insert glass/acrylic into the back recess.
- Place your photo and backing board behind it.
- Secure with turn-buttons (attached to small wood tabs) or flexible clips.
- Add felt pads to the back corners to protect the wall and help it sit level.
- Attach your hanger hardware and choose a wall anchor appropriate for the frame’s weight.
Design Variations (Because One Frame Is Never “Just One Frame”)
- Terrazzo style: sprinkle small stone chips or colored glass into the mold, then sand after curing to reveal speckles.
- Two-tone pour: pour a base color, let it firm slightly, then add a second color for subtle layers.
- Embedded brass look: place thin metallic strips in the mold edges for a clean inlay effect.
- Soft edges: run a bead of caulk in mold corners to create a rounded profile.
- Letterpress vibes: press rubber stamps into a partially set surface for minimal typography.
Troubleshooting (Quick Fixes for Common Problems)
“My frame chipped when I demolded it.”
Most often: demolded too early, mix was too wet, or the edges were ultra-thin. Next time, cure longer (aim for 72 hours), keep the cure humid,
and avoid overwatering the mix.
“I have lots of air bubbles.”
Tap longer, vibrate the mold, and “paint” a thin layer into corners first. Also check your mix consistency: very stiff mixes trap air more easily.
“The mold bulged and my frame looks… curvy.”
Add bracing strips outside the mold walls and use stronger tape. Cardboard molds are great, but they need backup.
“The surface looks dusty or chalky.”
That’s common on unsealed concrete crafts. Brush off dust, let the piece dry fully, then seal with thin coats.
Time and Cost (Realistic Expectations)
- Active work time: 60–120 minutes (mold + mixing + pour + cleanup)
- Cure time before demold: about 72 hours for best durability
- Full “ready to handle confidently” time: several more days
- Approx cost: usually lowespecially if you reuse glass/hardware from old frames
FAQ
Is a concrete picture frame super heavy?
Not necessarily. A thin cast (around 1/2") can feel pleasantly solid without being outrageous. It will be heavier than wood, so use appropriate
wall anchors and avoid hanging it from anything you don’t trust (like a single sad thumbtack).
Can I make this without glass?
Yes. You can skip glass and use a matte board or backing only, but your photo will be less protected. If you go glass-free, sealing the concrete helps
reduce dust transfer.
Should I paint it instead of sealing?
You can. Painted frames can look amazing, but paint adds a “coating” that can chip. Sealing keeps the raw concrete vibe and is often easier for
beginners.
Can I make it smoother like a countertop?
Yesuse a fine mix, reduce bubbles, sand progressively (up to 400 grit or higher), fill pinholes, and seal. The mold lining matters too: smoother
mold surfaces produce smoother concrete surfaces.
Real-World Experience Notes (What People Learn After the First Frame)
The first concrete picture frame most makers create has a personality. Sometimes that personality is “sleek gallery minimalism.” Sometimes it’s
“crumbly moon rock.” Both are normal. Here are the most common experience-based lessons that show up after you’ve mixed, poured, waited, peeked,
waited again, and finally peeled off the cardboard like you’re unwrapping a very stubborn present.
1) The mold is the project. People often think the pour is the main event, but the mold decides your corners, edges, and overall
crispness. A mold that’s square, braced, and well-taped makes the frame look professional before you even touch sandpaper. The “I’ll just tape it
quickly” approach tends to produce a frame that looks like it melted slightly in the sun. Bracing the outer walls with extra cardboard strips (and
using packing tape on the inside) is one of those tiny steps that feels optional… until it isn’t.
2) Patience is a tool. Many first-time frames chip because the concrete was strong enough to feel hard, but not strong enough to
handle demolding drama. Makers who wait longerespecially keeping the piece covered to hold moistureusually get cleaner edges and fewer cracks.
It’s not exciting advice, but it’s the kind that saves you from whispering “Noooo” at a corner that breaks off in slow motion.
3) “Too wet” is a sneaky problem. A common beginner instinct is to add extra water to make the mix pour like pancake batter. It
does pour easier, but it can also weaken the finished frame and increase shrinkage or surface dusting. Experienced makers aim for a workable,
thick consistency, and they use tapping/vibration to help the mix settle instead of watering it down. The frame ends up stronger, and sanding feels
less like you’re filing a stale cookie.
4) Bubbles aren’t failurethey’re feedback. Pinholes and voids happen. People learn fast that corners and tight areas are bubble
magnets. The “paint a thin first coat into corners” trick is a game changer, as is tapping the mold longer than you think you need. Another
surprisingly effective habit: pause after the first half-pour, tap/vibrate, then top off and tap again. It’s like sending air bubbles a polite
invitation to leave.
5) Finishing is where your style shows up. Some makers fall in love with the raw, matte look. Others discover that sanding to a
softer finish makes the frame feel like stoneware. Many people try at least one “extra” detailpigment, terrazzo chips, rounded corners with caulk,
or a sealed satin sheenbecause concrete rewards experimentation. The best experience-based tip here is to test finishes on the back or on a small
leftover sample. That way, if you hate a glossy sealer, you’re not locked into “permanent wet look” for eternity.
6) The frame gets attentionso plan the display. Concrete frames look modern and bold, which means they often become a focal point.
People learn that smaller sizes look especially chic on shelves, desks, or picture ledges, while larger sizes need more thoughtful hanging hardware.
Felt pads on the back are a tiny upgrade that makes a big difference: less wall scuffing, less rocking, and a more intentional “finished” feel.
In short: the experience of making a concrete frame is part craft, part science experiment, and part lesson in letting materials do what they do best.
Once you’ve made one, you’ll look at every empty wall space and think, “This could use a little… cement.”
Conclusion
A DIY concrete picture frame is one of those projects that feels delightfully unexpected: simple materials, big design payoff.
Build a sturdy mold, mix carefully (not watery), cure with patience, and finish with sanding + sealing to match your style. Whether you keep it raw
and minimalist or go full terrazzo masterpiece, you’ll end up with a frame that looks custom, modern, and just a little bit brave.