Table of Contents >> Show >> Hide
- Table of Contents
- What Are Chocolate Revel Bars?
- The Ingredient Lineup (and Why It Works)
- How to Make Chocolate Revel Bars (Foolproof Method)
- Pro Tips, Texture Fixes, and Common Mistakes
- Fun Variations (Because You’re Allowed Joy)
- Serving Ideas That Feel Fancy
- Storage, Make-Ahead, and Freezing
- FAQ
- of Real-Life Revel Bar Moments
Some desserts whisper. Chocolate revel bars show up wearing a crumbly oat-cookie jacket, carrying a fudgy chocolate center, and announcing,
“Hi, yes, I’m here to make your willpower do that thing where it pretends it never existed.”
If you’ve ever wondered why these bars vanish first at bake sales, potlucks, and “I brought something small” gatherings (lieseveryone knows it’s a 9×13),
this is your complete guide: what they are, how to nail the texture, the easiest ways to remix them, and how to store (or “hide”) them so you actually get one.
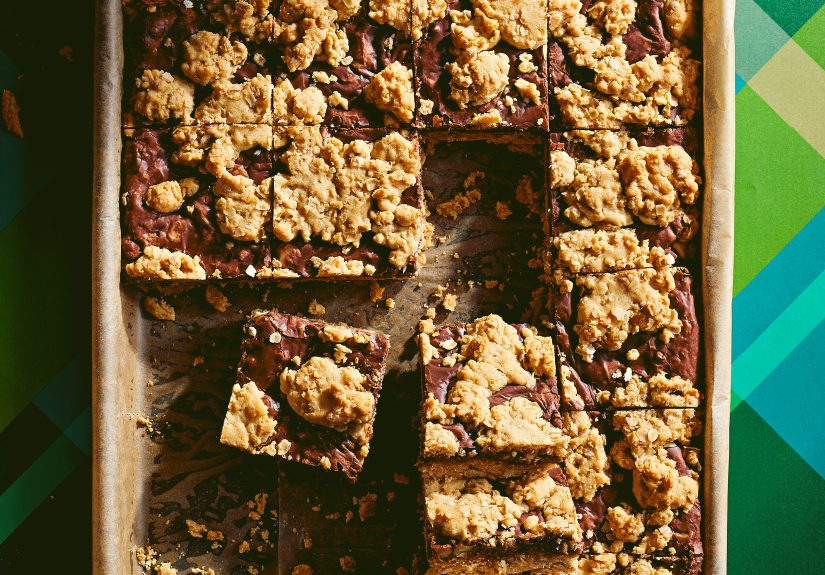
What Are Chocolate Revel Bars?
Think of revel bars as the love child of an oatmeal cookie and a brownieexcept the “brownie” part is usually a quick, stove-top chocolate
filling that sets up like soft fudge. The classic structure is simple (and brilliant):
- Bottom layer: chewy oatmeal cookie dough pressed into a pan
- Middle layer: a rich, glossy chocolate filling (often built around sweetened condensed milk)
- Top layer: more oatmeal dough dropped in crumbles, sometimes swirled so the chocolate peeks through on purpose
The magic is contrast: buttery oats and brown sugar give you caramel warmth and chew, while the chocolate center brings that dense “fudge shop” satisfaction.
They’re sturdy enough to travel, sweet enough to feel like a treat, and forgiving enough to make even if your measuring cups are “somewhere in a drawer
that is more of a concept than a place.”
Why the oats matter
Oats are the backbone of the bar. Quick-cooking oats tend to blend into the dough more, creating a tighter, chewier bite. Old-fashioned rolled oats
keep more texturethink rustic, hearty, and just a little more “cookie-ish.” Either works; the best choice depends on your vibe:
- Want classic chewy bars? Lean toward quick oats or a half-and-half mix.
- Want more texture and a “homemade” look? Go with rolled oats.
The Ingredient Lineup (and Why It Works)
Most chocolate revel bars recipes share the same core players. Understanding what each does makes it easier to troubleshoot and customize.
For the oatmeal cookie layers
- Butter: flavor, tenderness, and that “baked-good perfume” that makes people wander into the kitchen
- Brown sugar: moisture + a deeper caramel note (helps chewiness)
- Eggs: structure and a softer crumb (so it’s a bar, not a crumble pile)
- Vanilla + salt: not optional if you like flavor
- Flour + baking soda: the framework; keeps the bar from becoming oat fudge soup
- Oats: chew, texture, and the signature “revel” personality
For the fudgy chocolate center
The classic filling is fast and dramatic in the best way: a saucepan, low heat, and a few ingredients that melt into glossy fudge.
Most versions rely on:
- Chocolate chips: semi-sweet is traditional, but dark chocolate works if you like a deeper bite
- Sweetened condensed milk: thick, sweet, and built to make chocolate creamy and sliceable
- Butter: smooths the texture, adds richness, and helps the filling set without turning gritty
- Salt + vanilla: makes the chocolate taste like chocolate (instead of just “sweet”)
- Optional nuts (often walnuts): crunch + a toasty counterpoint to the fudge
Important: sweetened condensed milk is not evaporated milk
This mix-up has broken more hearts than a bad season finale. Sweetened condensed milk is thick and sweet; evaporated milk is unsweetened.
Swapping them changes both texture and sweetness dramatically. If the recipe calls for sweetened condensed milk, use ityour filling will thank you.
How to Make Chocolate Revel Bars (Foolproof Method)
You can find dozens of versions out there, but the workflow is remarkably consistent. Here’s a clear, low-drama method that delivers the classic
chewy oatmeal bars with a fudgy chocolate filling.
Step 1: Set up for success
- Heat oven to 350°F.
- Line a 9×13 pan with parchment (leave overhang so you can lift the bars out).
- Lightly grease the parchment so the corners don’t cling like they pay rent.
Step 2: Make the oatmeal dough
Cream butter and brown sugar until fluffy, then beat in eggs and vanilla. Mix dry ingredients (flour, baking soda, salt, oats) separately, then combine.
You want a thick, slightly sticky doughpressable, not pourable.
Key move: Reserve about one-third of the dough for the topping. Press the rest firmly into the pan to create an even base.
If it sticks to your hands, lightly dampen your fingertips or use a piece of parchment to press it down.
Step 3: Make the chocolate filling
In a saucepan over low heat, melt chocolate chips with sweetened condensed milk and a little butter, stirring until smooth and glossy.
Take it off the heat, then add vanilla and a pinch of salt. If using nuts, stir them in now.
Step 4: Layer, crumble, and “revel”
- Pour the warm chocolate filling over the base and spread into an even layer.
- Drop small spoonfuls of reserved dough over the top.
- Gently swirl a little if you want that classic look where chocolate peeks through.
Step 5: Bake + cool (the hardest step emotionally)
Bake until the top is lightly browned and setusually 25–35 minutes, depending on your pan and oven.
Cool completely before cutting. If you slice too early, the filling may smear instead of slicing cleanly (still delicious, but less photogenic).
Pro Tips, Texture Fixes, and Common Mistakes
1) Don’t overbake if you want chew
The top should look set and lightly golden, not dry and deeply browned. Overbaking turns the oat layers from chewy to “why is my jaw working overtime?”
Remember: bars continue to firm up as they cool.
2) Make clean cuts like a bakery (without acting like one)
- Cool completely, then chill 30–60 minutes for the neatest slices.
- Use a long knife and wipe it between cuts.
- For extra clean edges, lightly warm the blade under hot water and dry it first.
3) If your filling seems runny, it’s usually one of these
- Too hot to judge: Warm filling always looks looser; it sets as it cools.
- Wrong milk: Evaporated milk won’t set the same way as sweetened condensed milk.
- Underbaked base: If the base didn’t get enough heat, the layers can stay soft and messy.
4) Salt is your secret weapon
A pinch in the filling and a proper amount in the dough keeps these from tasting like pure sugar. Chocolate + salt is not a trend; it’s a fact of life.
5) Want thicker bars?
Use a smaller pan (like a 9×9) for a taller, denser barjust bake a bit longer and watch the edges. Or keep the 9×13 and cut smaller squares.
These are rich; nobody needs a brick unless it’s been a week.
Fun Variations (Because You’re Allowed Joy)
Once you understand the structureoat cookie + fudge + oat cookieyou can remix these without losing what makes them special.
Nutty classic
Add chopped walnuts or pecans to the filling for crunch. Toast them first for deeper flavor.
Caramel chocolate revel bars
Stir caramel bits into the filling or sprinkle them over the chocolate layer before topping with dough. The result is gooey, dramatic, and extremely popular
with anyone who says, “I’m not really a dessert person” (also lies).
Espresso-chocolate upgrade
Add a small amount of espresso powder to the filling to deepen chocolate flavor without making it taste like coffee. It’s the grown-up version of “extra.”
Peanut butter swirl
Warm peanut butter slightly and drizzle it over the chocolate layer. Swirl gently with a knife before adding the topping dough. If you want a “Reese’s-adjacent”
vibe, this is the move.
Dark chocolate + flaky salt
Use dark chocolate chips and finish with a tiny pinch of flaky salt after baking. The contrast is loud in the best way.
Gluten-free friendly
Use a quality 1:1 gluten-free flour blend and certified gluten-free oats. Expect the texture to be slightly more tender and a little less chewy, but still very good.
Dairy-free experiment
Some bakers swap in coconut-based sweetened condensed milk alternatives and dairy-free chocolate. Results vary by brand, but the structure can still work.
Consider it a fun science project you get to eat.
Serving Ideas That Feel Fancy
Chocolate revel bars are already a complete dessert, but you can dress them up (or down) depending on the moment.
- Potluck-ready: cut small squares; they’re rich, and smaller pieces travel better
- Ice cream bar mode: warm a square for 10 seconds and top with vanilla ice cream
- Holiday plate: pair with something bright (like citrus cookies) so the chocolate feels even deeper
- Snack attack: a small piece with coffee tastes like “I have my life together”
Storage, Make-Ahead, and Freezing
These bars are famously make-ahead friendly. The flavors settle, the filling firms, and the whole pan becomes easier to cut neatly after a rest.
Best quality storage
- Room temperature: store airtight for a few days for the best chew.
- Refrigerator: keeps them firm and tidy; let sit 10–15 minutes before serving for softer texture.
- Freezer: wrap well and freeze for longer storage; thaw at room temp.
Food-safety common sense
Most baked bars are relatively stable thanks to low moisture and lots of sugar, but use your judgment. If your kitchen is hot, humid, or the bars include extra
perishable toppings, refrigerate. And as a general safety rule, don’t leave perishable foods out for extended periods at room temperatureespecially in warm conditions.
FAQ
Are revel bars the same as oatmeal fudge bars?
Pretty much. Names vary by cookbook and region, but the concept is the same: an oatmeal cookie base and topping with a fudgy chocolate layer in the middle.
Can I use old-fashioned oats instead of quick oats?
Yes. Old-fashioned oats give more texture. Quick oats tend to produce a tighter, chewier bar. If you’re unsure, use a 50/50 mix.
Why is my top layer patchy?
Patchy is normal and honestly part of the charmmany traditional methods intentionally leave chocolate peeking through.
If you want more coverage, use smaller dollops of dough and distribute them more evenly.
How do I keep the bars from crumbling?
Press the base firmly, don’t skimp on eggs or butter, and cool completely before slicing. Chilling before cutting helps a lot.
Can I double the recipe?
Yestwo 9×13 pans are usually easier than one mega-pan unless you own a baking sheet the size of a coffee table.
of Real-Life Revel Bar Moments
Chocolate revel bars have a special talent: they feel nostalgic even if you didn’t grow up with them. Maybe it’s the oats and brown sugarthose warm,
toasty flavors that smell like “something good is happening”or maybe it’s the way the chocolate layer sets into that soft-fudge bite that makes you pause
mid-chew like, “Okay, wow, this is why people fight over the last piece.”
If you’ve ever brought a pan to a gathering, you’ve probably watched the reveal (pun fully intended). First, someone cuts a cautious squarepolite, measured,
pretending they’re only trying it for “quality control.” Then they come back with a second piece that is noticeably less polite. By the time the conversation
shifts to weekend plans, the pan looks like it survived a small, delicious earthquake.
There’s also the home-kitchen experience: the moment you spread the chocolate filling and realize you should have used a slightly bigger spatula, because now
you’re doing that awkward “sweep-sweep-sweep” dance trying to make the layer even. Then you drop the reserved dough on top and it refuses to cooperate,
because oatmeal dough has never heard of “smooth and elegant.” It wants to be rustic. It wants to be chunky. It wants to make you accept that perfection is
overrated and crumbs are a lifestyle.
And cutting them? Cutting revel bars can be a whole emotional arc. Slice too soon and the chocolate smears like a crime scene (a tasty one, but still).
Wait until they’re fully cool and suddenly you’re a bakery-level genius with clean edges and tidy squares. Many people learn the same lesson here:
the refrigerator is not just for leftoversit’s for dessert strategy. A short chill turns “messy but yummy” into “stackable and giftable.”
These bars also have a reputation for saving the day when you need something dependable. School bake sale? They’re sturdy. Holiday cookie exchange? They stand out.
Random Tuesday when you want to feel like you did something with your life? One pan makes the whole kitchen smell like comfort. They’re the kind of dessert
you can wrap up, label with a sticky note (“Chocolate Revel Barsdo not leave unattended”), and hand to someone who has had a long week. The message is clear:
you deserve chocolate, oats, and a soft place to land.
The best part is how flexible they are in real life. Want to make them feel extra fancy? Add toasted nuts and a pinch of flaky salt. Want them kid-friendly?
Skip the nuts and use classic semi-sweet chips. Want to impress the coffee people? Add espresso powder and watch eyes widen. No matter which direction you go,
the experience stays the same: that first bite where the oat layers chew and the chocolate melts just slightly, like the bar is doing a small victory lap on
your taste buds. That’s the “revel” part. And yes, it counts as a life experience.


