Table of Contents >> Show >> Hide
- What Is a “Chip and Dip Flower” (and Why Are People Making Them)?
- Why the Chip-and-Dip Tray Is Weirdly Perfect for DIY Decor
- Choose Your Chip-and-Dip Flower Adventure
- Option A: The Front Door or Wall “Chip and Dip Flower”
- Option B: Concrete or Hypertufa “Chip and Dip Flower” Garden Art
- Option C: A Chip-and-Dip Outdoor Feature (Bird Bath or Small Fountain Vibe)
- Paint, Texture, and Weatherproofing Tips That Actually Matter
- Where to Use Chip-and-Dip Flowers
- Troubleshooting: Common Problems (and the Fixes)
- Time, Cost, and Effort (So You Can Plan Like a Human)
- Bonus: Real-World Chip-and-Dip Flower Experiences (and What They Teach You)
- Conclusion
Somewhere between “I’ll just run into Dollar Tree for batteries” and “Why am I holding seven seasonal wreaths and a bag of googly eyes?”
lives the chip and dip flower. If you’ve never heard of it, congratulationsyou’ve been doing errands like a normal person.
If you have heard of it, you already know the truth: that humble, flower-shaped chip-and-dip tray is basically a craft supply wearing a snack costume.
In this guide, we’re going to break down what “chip and dip flowers” are, why they’re so popular, and how to turn one inexpensive tray into
eye-catching decor for your front door, fence, garden bed, or patiowithout making it look like a science fair project that survived a hurricane.
Expect clear steps, practical tips, and a few gentle jokes, because glue guns are stressful and we all cope differently.
What Is a “Chip and Dip Flower” (and Why Are People Making Them)?
A chip and dip flower is a DIY decor piece made by repurposing a plastic (often flower-shaped) chip-and-dip traycommonly found at
dollar storesinto something floral and decorative. You can use the tray in three main ways:
- As the flower itself (paint it, embellish the center, hang it on a door or wall).
- As a mold for concrete or hypertufa garden art (stepping stones, flower “stones,” or yard accents).
- As a base for functional outdoor features (like a shallow bird bath or a small fountain-style attraction).
The reason this trend has legs (and petals) is simple: the tray already has a flower shape, it’s lightweight, and it’s cheap. That means you can
experiment without feeling like you’re gambling your retirement fund on a can of spray paint.
Why the Chip-and-Dip Tray Is Weirdly Perfect for DIY Decor
1) It’s already shaped like a flower
Crafting usually starts with “Step 1: create a shape.” A chip-and-dip tray says, “No worries, I did that for you.” The scalloped edges and petal-like
curves read as floral even before you paint a thing.
2) It has built-in dimension
The “dip well” in the middle becomes the flower center. The outer ring becomes petals. That natural depth makes it easy to add texture, beads, a raised
center, or even a faux “stamen” situation without complicated layering.
3) It’s beginner-friendly (but still looks intentional)
This is one of those rare DIY projects where a beginner can get a satisfying result quicklyyet experienced crafters can keep upgrading it with texture,
weatherproof finishes, and more elaborate mounting.
Choose Your Chip-and-Dip Flower Adventure
Let’s walk through three popular versions: a door/wall flower, a garden stepping-stone flower, and a bird-bath/fountain-inspired outdoor piece.
Pick oneor do all three and become the neighborhood’s unofficial Minister of Whimsy.
Option A: The Front Door or Wall “Chip and Dip Flower”
This version is the fastest and most beginner-friendly: paint the tray, dress up the center, add a hanger, and display it like a big cheerful bloom.
Materials
- 1 plastic chip-and-dip tray (flower-shaped is the classic)
- Spray paint suitable for plastic (or a plastic-bonding primer + paint)
- Hot glue gun + glue sticks
- Wood beads, flat gems, or small craft balls (for the center)
- Optional: craft texture paste or dimensional paint for a raised center
- Drill (or heated awl) + wire/twine for hanging
Step-by-step
- Clean the tray. Wash with warm soapy water, rinse, and dry. If it feels slick, lightly scuff with fine sandpaper so paint can grip.
- Paint in light coats. Spray several light coats rather than one heavy coat. Let each coat flash dry before the next to avoid drips.
- Add the “flower center.” Paint the center a contrasting color, apply texture paste, or glue beads/gems around the inner rim.
The goal: make the middle look intentionallike you planned it, not like you dropped a craft bin and called it art. - Create a hanger. Drill two small holes near the center and thread wire through to form a loop. Twist securely, then tuck sharp ends.
- Seal for durability. If it will live outdoors, use an outdoor-rated clear sealer. Let it cure fully before hanging.
Design ideas that look “boutique,” not “basement”
- Sunflower look: warm yellow petals + deep bronze/brown textured center + natural wood beads.
- Modern farmhouse: matte white petals + charcoal center + a few oversized black beads.
- Coastal: sea-glass green petals + sandy center + tiny shell accents (sealed well).
- Seasonal swap: keep the flower the same, change only the center (spring pastels, summer brights, fall copper, winter silver).
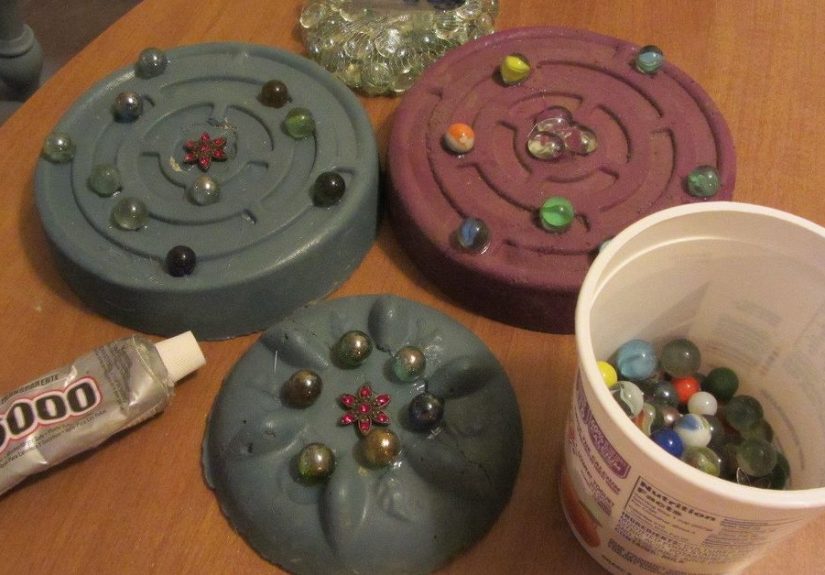
Option B: Concrete or Hypertufa “Chip and Dip Flower” Garden Art
This is where the chip-and-dip tray becomes a mold. You fill it with concrete (for heavy-duty stepping stones) or hypertufa (a lighter, rustic mix
often made with cement and peat moss). The result: a flower-shaped stone that looks right at home in a garden.
Materials
- Chip-and-dip trays (you may want multiples)
- Concrete mix or hypertufa ingredients
- Mold release: cooking spray or a light coat of oil
- Gloves, dust mask, and eye protection
- Optional reinforcement: chicken wire/hardware cloth
- Bucket, mixing tool, and water
Concrete stepping-stone method (simple and sturdy)
- Prep the mold. Spray the inside of the tray with cooking spray or lightly oil it. This helps release the stone later.
- Mix concrete to the package directions. Aim for a workable consistencythick enough to hold shape, but not so dry it crumbles.
- Fill the tray and settle the mix. Scoop concrete in until full. Gently tap or wiggle the tray to release air pockets and level it.
- Add reinforcement (optional but helpful). Lay chicken wire/hardware cloth in the middle of the stone, then cover with more concrete.
- Let it cure. Don’t rush. Let it harden fully before demolding. Flip onto a towel or soft surface and gently peel the tray away.
- Finish. Sand sharp edges, then leave natural or paint with exterior concrete paint.
Hypertufa method (lighter, rustic, and very “garden-y”)
Hypertufa is a cement-based mix typically combined with ingredients like sand and peat moss to create a porous, stone-like texture.
It’s popular for garden projects because it looks naturally weathered and is easier to move around than solid concrete.
- Mix your hypertufa. A common approach is blending sand, peat moss, and Portland cement, adding water slowly until the mix feels like
thick peanut buttermoldable but not soupy. - Prep the tray. Coat the inside with a release agent (oil/spray) so the hypertufa doesn’t bond to the plastic.
- Pack and pat. Press the mix into the tray, patting firmly so it fills details and reduces air pockets. Make it thick enough to avoid
cracking when demolding. - Let it set. Allow it to firm up (often overnight) before removing the tray. Then let it continue curing before sealing/painting.
How to make the “center” pop (without cracking)
- Keep the center thicker than the petal edges to prevent weak spots.
- Tap the mold to release trapped air bubbles that can cause fragile voids.
- Use mesh reinforcement if you plan to step on it or place it in a high-traffic area.
Option C: A Chip-and-Dip Outdoor Feature (Bird Bath or Small Fountain Vibe)
Sometimes the chip-and-dip tray isn’t just decorit becomes a functional garden feature. The shallow center can work well for a small bird bath,
and DIYers sometimes pair it with a simple pump setup for gentle water movement.
Bird bath basics (simple version)
- Use a concrete-cast flower bowl (from the mold method above) as the bath.
- Sand edges smooth, then seal the surface for easier cleaning.
- Place it on a stable base (an upside-down planter, a stump, or a pedestal).
Gentle fountain-style attraction (advanced version)
If you’re adding any pump/tubing, keep the design simple and safe: stable base, low splash, and easy cleaning. Many DIYers cut or melt a center hole
(carefully) to route tubing through and keep water recirculating.
- Plan water flow: you want water to return to the basin, not launch itself into your mulch like it’s training for the Olympics.
- Keep it shallow: aim for a safe, low-depth water area and refresh it regularly.
- Use outdoor-rated components: especially if anything plugs in (and keep cords protected).
Paint, Texture, and Weatherproofing Tips That Actually Matter
For plastic tray flowers
- Clean first: paint hates invisible grease.
- Light sanding helps: a quick scuff gives paint something to grab.
- Use thin coats: thick coats lead to drips and sticky regret.
- Seal outdoors: UV and rain are rude. A clear outdoor sealer helps.
For concrete/hypertufa flowers
- Don’t rush curing: early demolding is how you get “abstract art” instead of a flower.
- Avoid too much water: overly wet mixes can weaken cured concrete.
- Seal if you paint: sealing helps paint last longer and makes cleaning easier.
- Mind freeze/thaw climates: thicker stones and proper curing improve durability outdoors.
Where to Use Chip-and-Dip Flowers
The best part about this project is how flexible it is. One tray can become something that fits your home’s style, whether you’re going for
“cozy cottage garden” or “modern porch with one bold statement piece.”
- Front door: hang a painted plastic flower as a bright seasonal welcome.
- Fence or garden wall: mount several in different sizes for a playful floral cluster.
- Garden path: use concrete flowers as stepping stones or accents around beds.
- Planter styling: lean a concrete flower against a large pot for instant charm.
- Patio corners: add a bird bath version to bring movement and life to quiet spots.
Troubleshooting: Common Problems (and the Fixes)
“My paint peeled off the plastic.”
That’s usually a prep issue. Clean thoroughly, lightly scuff, use a primer designed for plastic, and apply multiple thin coats. Seal it if it lives outdoors.
“My concrete stuck to the tray.”
Use a mold release (spray/oil), and make sure you let it cure long enough. When demolding, flip it onto a towel and peel the tray gently rather than yanking.
“It cracked when I removed it.”
The stone was likely too thin or not cured enough. Make future ones thicker (especially around the center) and consider reinforcement mesh for stepping stones.
“It looks… flat.”
Add contrast: a darker center, texture paste, layered beads, or dry-brushed highlights on the petal edges. Dimension is what makes it read as “decor”
rather than “painted plate.”
Time, Cost, and Effort (So You Can Plan Like a Human)
- Plastic door/wall flower: about 30–60 minutes of hands-on time, plus drying/curing time for paint and sealer.
- Concrete stepping stone: 30–45 minutes hands-on, plus curing time (often a day or more depending on conditions).
- Hypertufa garden flower: 45–75 minutes hands-on, plus curing time (and it improves as it ages outdoors).
Cost is usually low: a tray, a little paint, and whatever embellishments you already have. Concrete/hypertufa projects cost more in materials,
but you’ll typically have leftovers for additional DIY garden decor.
Bonus: Real-World Chip-and-Dip Flower Experiences (and What They Teach You)
Let’s talk about what happens after you proudly finish your first chip-and-dip flower and place it outside like a decorating legend.
Because real life doesn’t always behave like a perfectly edited tutorial video.
First, there’s the “porch audit” moment. You hang your brand-new flower on the front door, step back, and realize it’s either (a) adorable,
(b) oddly tiny, or (c) so bright the neighbors can navigate home by it. This is when you learn the first big lesson:
scale matters. One flower can look charming, but two or threestaggered in height or grouped near a wreathcan look like a deliberate design choice.
Suddenly it’s “curated porch decor,” not “one mysterious plate.”
Then comes weather. If your plastic tray flower is unsealed, the sun may fade it faster than a cheap beach towel. If it’s sealed but hung where rain hits directly,
you might notice water beading, streaking, or dust clinging like it pays rent. The lesson: outdoor decor needs outdoor finishing.
A good clear sealer and a quick wipe-down every so often can keep it looking fresh, especially in humid or rainy seasons.
Concrete and hypertufa flowers have their own “welcome to reality” moments. The most common one is impatience:
you demold too early because you’re excited, and the petals chip like a tortilla in a toddler’s grip. Most DIYers learn quickly that curing isn’t optional.
It’s not “waiting,” it’s “letting physics finish the job.” A second lesson shows up when you place stones in the yard:
where you set them matters. A beautiful flower stepping stone placed on uneven soil can wobble, sink, or tilt after a heavy rain.
If you want them to last, you’ll level the spot, tamp the soil, and treat it like a mini installation.
One of the most surprisingly delightful experiences people report is how these projects become “social crafts.”
A chip-and-dip flower is approachable: kids can help paint petals, a friend can pick bead colors, and someone inevitably becomes the “official glue gun operator.”
In a world where hobbies can feel expensive and complicated, this one invites participation. You end up with decor that has a story:
“That blue one? My niece painted it and insisted the center needed sparkles because ‘flowers deserve jewelry.’”
Finally, there’s gifting. Chip-and-dip flowers make easy, low-cost gifts that don’t scream “last minute,” especially if you customize colors to someone’s home.
The best gift versions usually include one practical upgrade: a sturdy hanger, a sealed finish, and a center that won’t fall off in transit.
Add a simple note“Hang it where you need a little sunshine”and suddenly you’ve turned a $1 tray into something genuinely joyful.
And that’s the real secret: the project is fun, but the payoff is watching your yard or porch look happier than it did yesterday.
Conclusion
“Chip and dip flowers” prove that DIY doesn’t have to be complicated to be satisfying. With one tray, a little paint, and a few smart finishing choices,
you can create front-door decor, garden stepping stones, or outdoor accents that feel playful and personal. Start simple, focus on contrast and durability,
and let your style leadbecause the only real rule here is: if it makes you smile when you walk up to your house, it’s working.