Table of Contents >> Show >> Hide
- What Is a Built-In Closet Hack, Exactly?
- Plan Your Built-In Closet Like a Pro
- Step-by-Step: How to Create a Built-In Closet Hack
- Smart Storage Ideas to Steal from the Pros
- Finishing Touches: Style That Built-In Like a Mini Boutique
- Common Mistakes to Avoid with Built-In Closet Hacks
- Real-Life Experiences with Built-In Closet Hacks
- Conclusion: Your Built-In Closet Hack, Your Rules
If your bedroom closet currently looks like a fabric avalanche waiting to happen, you are not alone. Most of us are trying to cram a department store’s worth of clothes, shoes, and “I’ll-fit-into-that-again-one-day” jeans into a builder-grade box with a single sad hanging rod. A custom closet sounds dreamy, but the price tag? Not so much.
That’s where a smart built-in closet hack comes in. Inspired by the Remodelaholic style of transforming ordinary pieces into stunning built-ins, this approach turns basic furniture, stock cabinets, or IKEA units into a wall-to-wall, made-for-you closet system. You get the look of custom cabinetry, the storage of a small boutique, and the satisfaction of saying, “Yep, I built that.”
In this guide, you’ll learn how built-in closet hacks work, how to plan your space like a pro, step-by-step ideas for building it out, and real-world tips to keep everything organized. We’ll also share experience-based insights so you can skip the rookie mistakes and go straight to the “after” photos.
What Is a Built-In Closet Hack, Exactly?
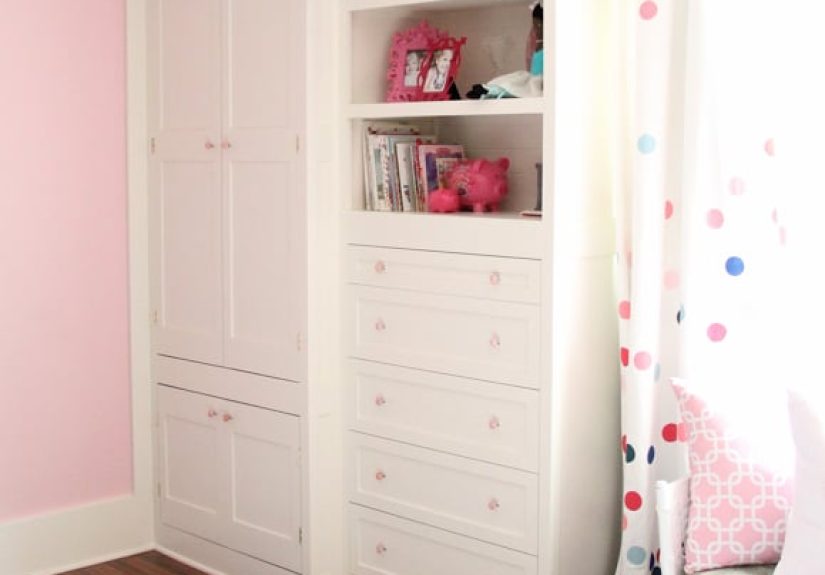
A built-in closet hack is basically a clever shortcut to a custom closet. Instead of hiring a cabinetmaker or ordering a pricey closet system, you start with pieces you can buy off the shelflike an old armoire, dressers, stock kitchen cabinets, or IKEA wardrobesand “hack” them into a seamless built-in.
The classic Remodelaholic-style project takes a few key pieces of furniture, anchors them to the wall, and then adds trim, filler panels, and paint so everything looks like one continuous unit. What started as mismatched pieces becomes a polished built-in with drawers, doors, shelves, and hanging space that feels like it came with the house.
Other DIYers use IKEA cabinets (like PAX wardrobes, Sektion kitchen cabinets, or other modular units) as the bones of the closet, then add custom doors, panels, or molding for a high-end look on a budget. The magic is in the transformation: you’re not just organizing; you’re upgrading the architecture of the room.
Plan Your Built-In Closet Like a Pro
Before you pick up a drill, planning is where your built-in closet hack succeeds or fails. The more time you spend on layout and measurements, the smoother the build will goand the less likely you’ll end up muttering at a crooked shelf at midnight.
1. Measure Your Space (Twice)
Grab a tape measure and note:
- Wall width, floor to ceiling height, and closet depth.
- Any obstacles: baseboards, vents, outlets, sloped ceilings, windows, or doors.
- The swing of closet or bedroom doors so they don’t crash into your new built-ins.
Sketch a simple front view and side view. It doesn’t need to be prettythis is a working drawing, not a gallery piece. But do mark the measurements clearly so you can match your furniture or cabinet sizes to the space.
2. Decide What You Need to Store
A great built-in isn’t just about “more storage”it’s about the right storage. Ask yourself:
- Do you mostly hang clothes, or fold them?
- Do you have a lot of shoes, bags, or accessories?
- Do you share the closet with someone else (or several someones)?
As a general rule:
- Double hanging rods (one above the other) are perfect for shirts, skirts, and pants folded over hangers.
- Single long-hang sections are for dresses, coats, and long cardigans.
- Drawers and shelves handle sweaters, T-shirts, jeans, and pajamas.
- Shallow shelves or cubbies are ideal for shoes, bags, and baskets.
3. Choose Your “Hacking” Pieces
Here are popular starting points for a built-in closet hack:
- Existing furniture: An old dresser, armoire, or bookshelf can be the centerpiece of your built-in. Drawers become clothing storage; bookshelves turn into open wardrobe shelving.
- IKEA systems: PAX wardrobes or kitchen-base cabinets are favorites because they come in multiple sizes and are easy to combine. Kitchen cabinets are especially useful for built-in dressers with deep drawers.
- Stock cabinets from a home center: Pre-assembled or RTA (ready-to-assemble) cabinets can line up along the wall to form the bottom row of your built-in, with hanging rods and shelves above.
When planning, try to leave a little space (even an inch or two) on the sides and top. You’ll later cover those gaps with filler strips and trim so the whole setup looks perfectly built-in.
Step-by-Step: How to Create a Built-In Closet Hack
Every closet and budget is different, but this general process will guide you from “random furniture” to “wow, is this custom?”.
Step 1: Clear the Space and Prep the Walls
Empty the closet or the wall where your built-ins will go. Remove old wire shelving or flimsy rods. Patch any big holes, then lightly sand and prime if needed. If you want to paint the wall behind the built-in a fresh color, now is the timeit’s much easier before everything is installed.
Step 2: Build or Assemble the Base Cabinets
If you’re using dressers or pre-made cabinets, slide them into place along the wall. Check:
- They are level from side to side and front to back (shim as needed).
- The fronts line up in a straight line so they look like a continuous unit.
- You leave room for doors to open fully if your pieces have them.
For a closet-height built-in, you may stack units or add open shelving on top, leaving a bit of space at the very top for crown molding if you like a more traditional look.
Step 3: Secure Everything to the Wall
Safety first. Built-in units must be anchored:
- Use a stud finder to locate studs behind the wall.
- Attach cabinets or wardrobes through the sturdy back edge into studs with appropriate screws or mounting brackets.
- If a stud doesn’t line up where you need it, use heavy-duty wall anchors rated for the load.
This keeps tall units from tipping, especially if kids like to climb or pull on drawers.
Step 4: Add Hanging Rods and Shelves
Above and between cabinets, add:
- Closet rods for hanging clothes, mounted into side gables or directly into studs.
- Adjustable shelves for shoes, baskets, and folded items.
- Vertical dividers if you want sections for each person or type of item.
To maximize space, consider double-hang sections on one side and a tall single-hang section on the other. If you’re hacking IKEA or stock systems, use their shelf pins, rails, and hardware to keep everything solid and adaptable.
Step 5: Create the “Built-In” Look with Trim
This is where the hack becomes magic. Use:
- Filler strips to close side and top gaps between the cabinets and walls or ceiling.
- Baseboard and crown molding to wrap around the base and top so the unit looks original to the house.
- Face frames (simple boards nailed along the front edges) for a unified, custom look.
Caulk all gaps where trim meets the wall, cabinets, and ceiling. Once caulked and painted, the seams disappear and your furniture mash-up suddenly looks like a single, intentional built-in.
Step 6: Patch, Sand, and Paint
Fill nail holes, screw heads, and any gaps in wood with a good-quality wood filler or patching compound. Let it dry, sand smooth, and spot-prime if necessary. Then paint everything in your chosen coloroften a crisp white or soft neutral so your clothes become the “color pop.”
Use a durable cabinet or trim paint in a satin or semi-gloss finish. It will handle scuffs better, and hangers or baskets will slide in and out more easily.
Step 7: Install Doors, Hardware, and Accessories
Reinstall doors or add new ones, making sure they align well and open smoothly. Then choose hardware that matches your room’s styleanything from classic knobs to modern bar pulls. This small detail can make a big difference in the overall vibe of the closet.
Finish with accessories:
- Baskets and bins for socks, scarves, and seasonal items.
- Drawer organizers for underwear, accessories, and jewelry.
- Hooks on interior sides or back wall for bags, belts, or hats.
- LED strip lights or puck lights under shelves for better visibility.
Smart Storage Ideas to Steal from the Pros
A built-in closet hack is more than pretty millwork; it’s about function. Here are layout ideas and tricks inspired by professional organizers and home-design resources:
- Drawers at mid-height: Placing drawers around waist level makes them easy to access and gives your closet a built-in dresser look.
- Open shelves above rods: Use them for labeled bins, folded sweaters, or spare linens (but don’t overload themheavy, rarely used items are better stored elsewhere).
- Double rods on one wall: This doubles hanging space in the same footprint and keeps everyday clothing visible and easy to reach.
- Shoe shelves near the floor: Adjustable shelves or short cubbies help keep shoes from turning into a pile at the bottom of the closet.
- Mirrored doors: Mirrored fronts can make a small closet feel bigger and eliminate the need for an extra full-length mirror in the room.
- Bins for everything small: Collapsible or fabric bins are perfect for accessories, off-season clothes, or workout gear and keep open shelving from looking cluttered.
Think of your built-in as a storage puzzle: if everything has a designated spot, your closet practically organizes itselfwell, almost.
Finishing Touches: Style That Built-In Like a Mini Boutique
Once the structure is done, styling takes your built-in closet hack from “functional” to “I want to live in here.”
- Unify your hangers: Using matching slim hangers instantly makes the closet look more polished and increases hanging capacity.
- Color-code by category: Group items (tops, pants, dresses) and then arrange them by color within each group. It’s easier on the eyes and speeds up getting dressed.
- Limit what lives here: Keep only clothes and items you use regularly in this built-in. Off-season or rarely used items can be stored under the bed, in another closet, or in bins elsewhere.
- Add personality: Wallpaper the back of open shelves, paint the inside a contrasting color, or add small art pieces on open sections for a boutique feel.
- Label discreetly: Use small labels on baskets or the inside edges of shelves so family members know where things go (and, theoretically, put them back).
Common Mistakes to Avoid with Built-In Closet Hacks
Even the smartest DIYers hit a few snags. Avoid these pitfalls:
- Skipping wall anchors: Tall wardrobes and stacked cabinets can tip if not secured. Always anchor to studs or use heavy-duty wall anchors.
- Overloading your shelves: Just because you can cram 40 sweaters onto one shelf doesn’t mean you should. It stresses the shelf and makes it impossible to keep tidy.
- Turning the closet into a storage dump: Try not to store bulky coats, equipment, or rarely used items in your bedroom closet if you have other storage options. Save this prime real estate for daily wardrobe and essentials.
- Ignoring ventilation and lighting: A packed, dark closet can feel stale and make it hard to see what you own. Add a light fixture or LED strips and leave a bit of breathing room.
- Not editing your wardrobe: No built-in hack can fix a closet stuffed with things you never wear. Declutter before you build so the system you create actually fits your life.
Real-Life Experiences with Built-In Closet Hacks
Built-in closet hacks look amazing online, but what is it really like to live with one? Here are a few experience-based insights that come up again and again from DIYers who’ve done it.
1. Upcycling Furniture Feels Extra Satisfying
One of the most rewarding experiences people share is turning older furniture into a built-in that suddenly looks like it belongs in a designer bedroom. An old dresser that once collected dust in the guest room becomes the central bank of drawers in the new closet wall. Painting it to match the trim and adding new hardware makes it almost unrecognizablein the best way.
The emotional payoff is big: you keep a piece you already love, but instead of feeling dated, it becomes a stylish, hardworking part of everyday life. It’s a mix of nostalgia and practicality that a brand-new system can’t quite replicate.
2. IKEA and Stock Cabinets Really Do Stretch the Budget
Many DIYers report that using IKEA frames or stock kitchen cabinets cuts the cost dramatically compared to ordering a full-blown custom closet. Yes, there’s some assembly (and sometimes a few choice words while you hunt for the right screw), but once everything’s installed and trimmed out, the savings are worth it.
One common experience: people are surprised how solid the setup feels once it’s anchored, trimmed, and painted. What started as “flat-pack furniture” starts to act and look like permanent cabinetry, especially when you add baseboards and crown molding around it.
3. The Planning Phase Is Where Regret (or Joy) Begins
Folks who are happiest with their built-in closet hacks usually spent extra time up front figuring out what they actually needed. They measured how many inches of hanging space their clothes required, counted pairs of shoes, and decided exactly how many drawers they wanted.
Those who rushed in sometimes realized after the fact that they forgot long-hang space for dresses, or didn’t include enough drawers and ended up with T-shirts stacked too high. The good news: most of these issues are fixable with a bit of rearranging, but it’s much easier to plan them out from the beginning.
4. Everyday Life Gets Easier (and a Little Calmer)
A thoughtfully hacked built-in closet does more than look pretty; it changes your daily routine. When everything has a logical placework clothes in one section, casual wear in another, gym gear in a labeled binyou spend less time hunting and more time actually getting ready.
Many people notice an unexpected benefit: the bedroom feels calmer. There’s something mentally soothing about opening a closet and seeing order instead of chaos. Even if the rest of the house is a little wild (hello kids’ rooms), the closet becomes a small zone of control.
5. Maintenance Is Real, but Manageable
Built-in closet hacks aren’t “set it and forget it.” Over time, you may need to:
- Tighten hardware or adjust a hinge that’s sagging.
- Re-caulk tiny gaps where wood has subtly shifted.
- Touch up paint where hangers, shoes, or baskets have scuffed the finish.
The upside is that because you built it yourself, these little tune-ups aren’t intimidating. With leftover paint, a bit of caulk, and a screwdriver, you can keep your built-in looking fresh for years.
6. The “Closet Reset” Habit Makes It Last
People who get the most mileage out of their built-in closet hack often adopt a simple habit: a periodic “closet reset.” Every few months, they:
- Donate items they haven’t worn in a long time.
- Shuffle seasonal pieces to higher or lower shelves.
- Re-label bins if their needs have changed.
That small, regular maintenance keeps clutter from creeping back in, and the built-in continues to feel like a smart upgrade instead of just another space to pile things.
Conclusion: Your Built-In Closet Hack, Your Rules
A built-in closet hack in the Remodelaholic spirit isn’t about perfectionit’s about creativity, function, and working with what you have. By combining furniture or modular cabinets, adding trim and paint, and customizing the interior for your wardrobe, you can get a high-end built-in look without a high-end invoice.
Whether you’re transforming a small reach-in closet or an entire bedroom wall, the same principles apply: measure carefully, plan intentionally, anchor securely, and finish with details that make you smile every time you slide a drawer or grab your favorite sweater.
In the end, the best part of a built-in closet hack isn’t just the extra storageit’s that little thrill of opening the doors, seeing everything where it belongs, and thinking, “I actually pulled this off.”