Table of Contents >> Show >> Hide
- What You’ll Make (And Why This Works)
- Ingredients
- Equipment You’ll Want
- Step-by-Step: Bread Machine Dough, Oven-Baked Crust
- Two Easy Ways to Get Steam (Pick One)
- Scoring + Baking
- How to Make It Even Crustier
- Troubleshooting: Common Bread Machine French Bread Problems
- Variations That Still Taste Like French Bread (But With Personality)
- Storage, Freezing, and Re-Crisping
- Conclusion
- Experiences From the Real World (The Part Recipes Don’t Always Tell You)
A bread machine is basically the world’s most patient kitchen assistant: it mixes, kneads, and proofs without asking for a lunch break.
The only thing it struggles with is the crust. Most bread machines bake in a humid little loaf sauna, which is great for soft sandwich bread…
and not so great when you want that crackly, bakery-style French crust.
The workaround is simple and very “have your croûte and eat it too”:
use the bread machine for the dough cycle, then move the shaped loaves to a hot oven with steam.
That steam keeps the crust flexible during the first part of baking, letting the loaf expand (hello, oven spring), then the dry heat finishes the job into
a bold, shattery crust. That’s the secret handshake of crusty French bread.
What You’ll Make (And Why This Works)
This bread machine crusty French bread recipe makes 2 baguette-style loaves (or 1 larger bâtard/oval loaf),
with a lean dough (flour + water + salt + yeast). Lean doughs bake up with a crisp crust and a chewy, open crumb when you treat them right:
strong flour for structure, enough water for nice bubbles, and steam early in the bake to keep the crust from “setting” too soon.
Ingredients
Measurements are listed in grams (recommended) and cups/spoons (backup).
If you’ve ever wondered why your “4 cups” sometimes makes dough and other times makes drywall compound, it’s because cups can vary wildly.
A scale makes this recipe boringly reliablein the best way.
Dough (2 baguettes or 1 large loaf)
- Warm water: 350 g (about 1 1/2 cups) aim for pleasantly warm, not hot
- Bread flour: 500 g (about 4 cups + 2 Tbsp, spooned & leveled)
- Salt: 10 g (about 1 3/4 tsp)
- Instant yeast: 5 g (about 1 1/2 tsp) or active dry yeast: 6 g (about 2 tsp)
- Sugar (optional): 8–10 g (about 2 tsp) not “traditional,” but helpful for browning in many home ovens
For the Pan + Crust
- Cornmeal (optional): 1–2 Tbsp for the pan/peel
- Boiling water or ice cubes: for steam (details below)
- Neutral oil or nonstick spray: for the pan (if not using parchment)
Equipment You’ll Want
- Bread machine (any branduse the Dough setting)
- Baking sheet or baking stone/steel (nice, but optional)
- Parchment paper (highly recommended for easy transfers)
- A sharp knife or razor for scoring
- A sturdy metal pan or cast-iron skillet for steam (if using steam-pan method)
- Optional: digital thermometer (best way to confirm doneness)
Step-by-Step: Bread Machine Dough, Oven-Baked Crust
1) Load the Bread Machine
Follow your machine’s manufacturer order first. If your manual is missing (or has mysteriously vanished like socks in a dryer),
a common approach is: liquids first, then flour, then salt, then yeast (keep yeast and salt separated until mixing begins).
- Pour in the warm water.
- Add the bread flour.
- Sprinkle salt over the flour.
- Make a small well in the flour and add the yeast there (so it doesn’t hit the salt directly).
- If using sugar, add it with the water or sprinkle it over the floureither works.
2) Choose the Right Setting
Select DOUGH (not “Bake,” not “French,” not “Rapid,” not “I’m in a hurry so I’ll regret this later”).
The dough cycle mixes, kneads, and proofsthen stops before the bread machine starts its steamy loaf-spa bake.
3) Check the Dough Texture (This Is the Make-or-Break Moment)
Open the lid after 5–10 minutes of mixing. You’re looking for dough that’s soft and slightly tacky, forming a smooth ball.
If it looks like dry rubble, add water 1 tablespoon at a time. If it looks like pancake batter having a crisis, add flour
1 tablespoon at a time. Humidity, flour brand, and how aggressively you scoop flour all change dough feel.
When the cycle finishes, the dough should be roughly doubled, airy, and stretchy. If it’s barely grown,
check that your yeast is fresh and your water wasn’t too hot.
4) Shape Like a Pro (Even if You Don’t Feel Like One)
- Lightly flour your counter. Turn out the dough and gently press into a rectangle.
- Divide into 2 equal pieces for baguettes (or keep whole for one large loaf).
- Pre-shape each piece into a rough log, cover, and rest 10 minutes. This relaxes the gluten so your dough stops fighting you.
- For baguettes: flatten gently into a rectangle, roll up tightly from the long side, and pinch the seam closed. Taper ends slightly.
- Place seam-side down on parchment on a baking sheet (or a floured peel). Leave space between loaves.
5) Proof Until Puffed, Not Until Collapsed
Cover loaves lightly (a clean towel or lightly greased plastic wrap) and let rise until noticeably puffy,
typically 30–60 minutes depending on room temperature.
A good rule: the dough should spring back slowly when gently poked, leaving a slight indentation.
6) Preheat the Oven (Hot Oven = Better Crust)
Preheat to 475°F. If using a baking stone/steel, preheat it for at least 30 minutes.
Heat is your friend here: it drives oven spring and sets up that crackling crust.
Two Easy Ways to Get Steam (Pick One)
Option A: Steam Pan (Simple, Effective, Classic)
- Place a sturdy metal pan or cast-iron skillet on the bottom rack while the oven preheats.
- When you’re ready to bake, carefully pour 1 cup of boiling water into the hot pan (stand backsteam is dramatic).
- Immediately load your bread on the rack above and shut the door fast to trap steam.
Option B: Ice-Cube Burst (Fast Steam, Less Measuring)
- Set a metal pan on the bottom rack during preheat.
- When loading bread, toss in a handful of ice cubes for a quick steam blast.
Steam matters most during the first part of baking. After the crust begins to form, you can let the oven dry out
so the crust turns crisp instead of leathery.
Scoring + Baking
1) Score the Loaves
Right before baking, use a very sharp knife or razor to slash 3–5 diagonal cuts along each baguette.
Keep cuts fairly shallow (about 1/4 inch). Scoring controls expansion so your bread doesn’t split wherever it feels like.
2) Bake With Steam, Then Finish Dry
- Bake at 475°F for 10 minutes with steam in the oven.
- Carefully remove the steam pan (or just let it run dry if it’s safe to do so), and bake another 10–15 minutes.
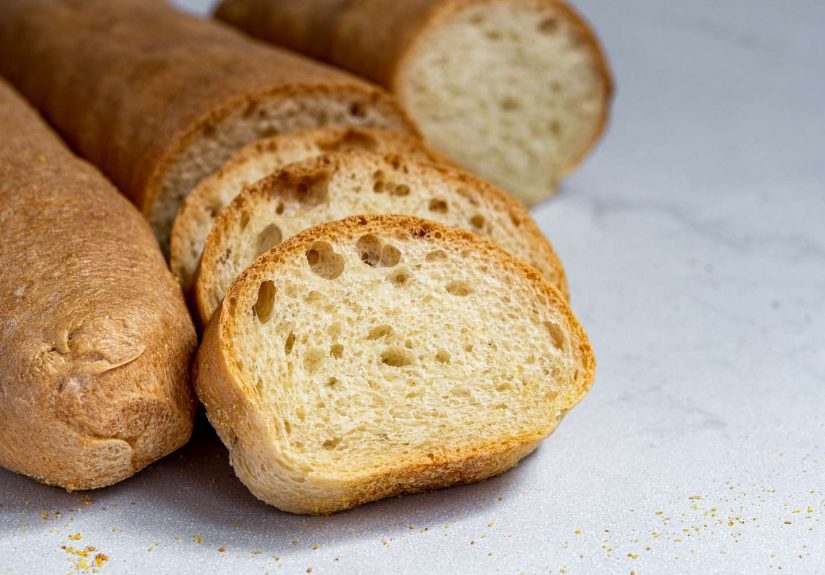
- The bread is done when deep golden brown and the internal temperature reads about 200–205°F.
3) Cool (Yes, Actually Cool)
Move loaves to a rack and cool at least 20–30 minutes.
Cutting too early can squash the crumb and make the inside feel gummyeven when the bread was baked properly.
Think of cooling as the bread finishing its paperwork.
How to Make It Even Crustier
- Use bread flour: higher protein helps the dough hold gas and shape, which supports better oven spring and chew.
- Go a touch wetter: if your dough seems stiff, add a tablespoon of water. A slightly higher hydration can boost open crumb and crust blistering.
- Preheat longer: stones/steels need time. A hot surface = faster spring.
- Finish with a short “dry-out”: in the last 2–3 minutes, crack the oven door slightly (wooden spoon trick) to vent moisture.
- Skip the fridge for short storage: refrigeration can speed staling for many breads; freezing is better for long-term.
Troubleshooting: Common Bread Machine French Bread Problems
“My bread is dense and heavy.”
- Yeast may be oldtest it before baking again.
- Dough may be too drycheck texture during mixing and add water gradually.
- Under-proofed dough won’t expandlet it rise until puffy, not just “a little bigger.”
“My crust is still soft.”
- You may need more heat or a longer bake.
- Vent moisture near the end (crack the oven door briefly).
- Cool on a rack, not on the baking sheettrapped steam softens crust.
“My loaf blew out the side.”
- Score deeper or more confidently.
- Don’t over-proofover-risen dough is fragile and collapses or tears.
“The bottom is too dark.”
- Move the rack up one level.
- Use a second baking sheet underneath to buffer heat.
Variations That Still Taste Like French Bread (But With Personality)
Seeded “Boulangerie” Style
Add 2–3 tablespoons sesame seeds on top after shaping (lightly mist the loaf so seeds stick).
Garlic-Herb Twist
Add 1 teaspoon dried herbs (or 1 tablespoon fresh minced herbs) during mixing. Keep it subtleFrench bread shouldn’t taste like a perfume counter.
Half Whole Wheat
Swap 25–40% of the bread flour for whole wheat flour. Add 1–2 extra tablespoons water if the dough feels tight.
Whole wheat brings flavor, but it can reduce loft if you push it too far.
Storage, Freezing, and Re-Crisping
Crusty bread is best the day it’s bakedbecause that crust is a living, crackling thing and it has plans.
For short storage, keep bread at room temperature in paper or loosely wrapped so the crust can breathe.
For longer storage, slice and freeze in an airtight bag.
To revive day-old bread: lightly spritz the crust with water and bake at 350°F for 8–12 minutes.
It won’t be identical to fresh, but it will be wildly better than sad countertop bread.
Conclusion
The best bread machine crusty French bread recipe doesn’t ask your bread maker to do everything.
Let it do what it’s great atmixing, kneading, proofingthen let your oven bring the drama with high heat and steam.
You’ll get a loaf that slices for sandwiches, tears beautifully for soup, and makes your kitchen smell like you know what you’re doing.
(Even if you had to watch a dough ball for 10 minutes like it was a reality show.)
Experiences From the Real World (The Part Recipes Don’t Always Tell You)
Most people who try crusty French bread in a bread machine have a very specific first experience: excitement, confidence, and then a loaf that’s delicious
but oddly soft on the outsidelike French bread wearing a sweatshirt. That’s not your fault; it’s physics. Bread machines are designed to trap moisture,
which is perfect for soft loaves but basically the enemy of a crisp crust. Once you accept that the oven is your “crust department,” everything gets easier.
Another common moment: opening the bread machine mid-knead and thinking, “Uh… that looks wrong.” The dough might be too dry and clunking around like a rock,
or too wet and smearing along the sides like frosting. This is where small adjustments feel like cheating but are actually just good baking.
A tablespoon of water can rescue a dry dough; a tablespoon of flour can pull a sticky dough back from chaos. After you do this once or twice,
you start recognizing the “right” texture on sightand suddenly you’re the person casually saying things like, “It needs a touch more hydration.”
Shaping is its own little adventure. The first time you roll a baguette, it’s normal to end up with something shaped like a mildly confused submarine.
Dough rests are the secret weapon here: a 10-minute rest after dividing makes the dough relax so it stops shrinking back like a stubborn rubber band.
People are often shocked by how much better their loaves look when they simply pause, cover the dough, and let it chill out before shaping.
Baking rewards patience in the most annoying, delicious way.
Steam can feel intimidating because it involves boiling water in a hot oven, which sounds like a warning label waiting to happen.
The good news: you don’t need fancy gear. A sturdy metal pan on the bottom rack and a cup of boiling water gets the job done.
Some bakers prefer ice cubes because they’re easy to portion and create a quick burst of steam. Either way, the first time you nail it,
you’ll notice the crust color changing faster, the slashes opening cleanly, and the loaf “jumping” upward instead of spreading outward.
That’s the moment it stops being just bread and starts being French bread energy.
And then there’s the cooling stage, aka the stage everyone tries to skip. Fresh bread smells like a warm hug, and slicing it feels inevitable.
But cutting too early traps steam and compresses the crumb. The experienced-baker move is to wait until the loaf is cool enough that the inside finishes setting.
If you want a compromise, tear off a small end piece (the baker’s tax) and let the rest cool properly. This is not only acceptableit is tradition.
Finally, you’ll learn that crusty bread has a personality: it’s crispest right after baking, then it softens as moisture migrates.
That doesn’t mean you failed; it means bread is made of water and science and it’s going to act like it.
The win is knowing you can bring it back with a quick re-crisp in the oven, and that leftovers can become garlic toast, croutons, or the best bread crumbs
you’ve ever made. Once you’ve made this recipe a few times, you stop chasing perfection and start enjoying the rhythm:
dough cycle, shape, steam, bake, cool, repeat. And that’s when homemade French bread becomes a habit instead of a project.