Table of Contents >> Show >> Hide
- What Are Blistered Green Beans?
- Why This Method Works (Without Being Fussy)
- Ingredients
- Equipment You’ll Want (But Don’t Stress If You Don’t Have)
- Step-by-Step: How to Make Blistered Green Beans
- Recipe Card
- Pro Tips for the Best Charred, Blistered Beans
- Flavor Variations (So You Never Get Bored)
- Oven/Broiler Method (When You Want Less Stovetop Drama)
- What to Serve with Blistered Green Beans
- Storage, Reheating, and Make-Ahead Notes
- FAQ
- Conclusion
- Extra: of Real-Life Blistered Green Bean Experiences
If green beans have ever felt like the “responsible friend” of the dinner tablereliable, polite, and a little too well-behavedthis recipe is here to give them a leather jacket. Blistered green beans are what happens when you introduce fresh beans to a screaming-hot pan and refuse to hover-parent them. The skins pucker, char in spots, and turn smoky-sweet, while the insides stay snappy. It’s fast, dramatic, andbonusmakes you feel like a restaurant wizard using nothing but a skillet and confidence.
This is a blistered green beans recipe you’ll use year-round: weeknight-simple, holiday-worthy, and endlessly customizable. I’ll walk you through the core method, the “why it works” science (don’t worry, no lab coat required), plus variations like miso butter, soy-butter, crunchy toppings, and a Sichuan-inspired twist.
What Are Blistered Green Beans?
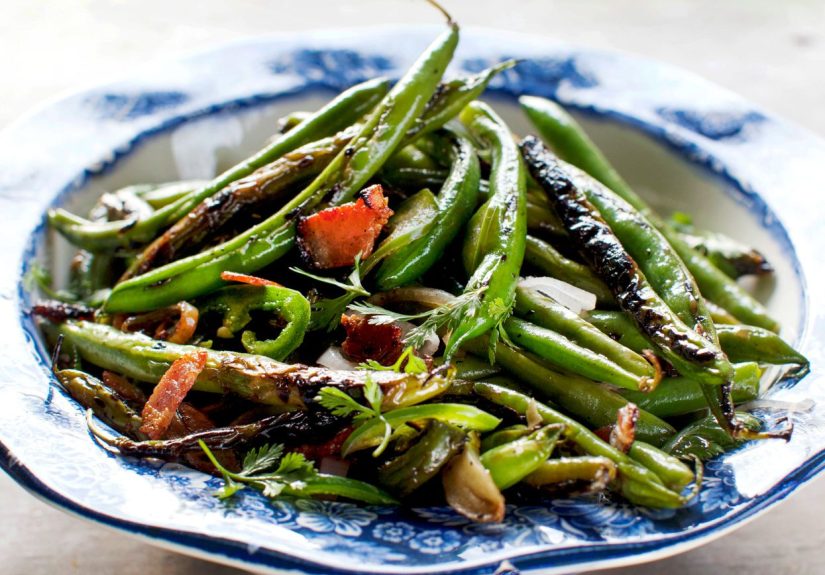
“Blistered” means the beans’ outer skin gets dark, wrinkly, and spot-charred from high heatsimilar to what happens to shishito peppers or a tortilla that got a little too close to the flame. It’s not burnt; it’s toasty. That char brings out the beans’ natural sweetness and adds a faint smokiness that makes plain steamed beans quietly sob in the corner.
Why This Method Works (Without Being Fussy)
- High heat = flavor: You’re chasing browning (aka deliciousness), not a slow simmer into sadness.
- Dry beans blister better: Moisture cools the pan and encourages steaming. Steam is fine… but we’re here for drama.
- Minimal stirring: Leaving beans undisturbed helps them sear and pucker instead of just rolling around getting warm.
- Short cook time: You get crisp-tender beans with char, not limp beans with regrets.
Ingredients
For the Classic Garlicky Blistered Green Beans (4 servings)
- 1 pound fresh green beans, trimmed
- 2–3 tablespoons high-heat oil (avocado, grapeseed, canola, or light olive oil)
- 5–6 cloves garlic, thinly sliced (or minced if you like living on the edge)
- 1/2–1 teaspoon red pepper flakes (optional, but fun)
- 1 tablespoon capers, drained and chopped (optional, briny pop)
- Kosher salt and black pepper
- 1–2 teaspoons lemon juice (or a splash of rice vinegar)
- Optional finishers: flaky salt, lemon zest, toasted sesame seeds
Ingredient Notes
- Choose the right beans: Thinner beans (often labeled haricots verts) blister quickly and evenly. Regular green beans work great too.
- Oil choice matters: Because the pan runs hot, use an oil that won’t instantly smoke itself into a panic.
- Garlic timing: Garlic burns fast. Add it near the end so it perfumes the oil instead of becoming a bitter cautionary tale.
Equipment You’ll Want (But Don’t Stress If You Don’t Have)
- Large cast-iron skillet (ideal) or a heavy stainless skillet
- Tongs for flipping and corralling runaway beans
- Splatter screen (optional, but your stovetop will send a thank-you note)
- Good ventilation (open a window, turn on the hood, bribe a fanwhatever works)
Step-by-Step: How to Make Blistered Green Beans
1) Prep the beans (2 minutes)
Trim the stem ends. Rinse if needed, then dry thoroughly with a clean towel. If the beans are wet, they’ll steam and sputter instead of blistering. Dry beans = better char + less splatter + fewer life choices questioned.
2) Preheat the pan (5 minutes)
Set a large skillet over medium-high to high heat. Let it get truly hotlike “the pan is making decisions without you” hot. Add the oil and swirl. You want it shimmering.
3) Add beans in a single layer (6–9 minutes)
Add the green beans and spread them out. Do not crowd the pan. If your beans are piled like laundry, they’ll steam. Work in two batches if neededyour patience will be rewarded with char.
- Let the beans sit undisturbed for about 2 minutes to start blistering.
- Toss or flip, then let them sit again for another 1–2 minutes.
- Repeat until you see wrinkled skins and browned spots all over, and the beans are crisp-tender.
Season with a good pinch of salt and a few cracks of pepper while they cook (or right aftereither works).
4) Add aromatics and finish (1–2 minutes)
Lower heat to medium. Add the sliced garlic and red pepper flakes. Toss constantly for 30–60 secondsjust until the garlic is fragrant. Add capers if using. Remove from heat and finish with lemon juice (or vinegar). Taste and adjust salt.
5) Serve immediately (because crisp-tender waits for no one)
Transfer to a platter. If you want restaurant energy, hit it with flaky salt, lemon zest, and/or toasted sesame seeds.
Recipe Card
Blistered Green Beans with Garlic (and Optional Capers)
Prep time: 5 minutes | Cook time: 10 minutes | Total: 15 minutes
Servings: 4
Directions
- Trim and thoroughly dry green beans.
- Heat a large skillet over medium-high/high until very hot. Add oil and swirl.
- Add beans in a single layer. Let sit 2 minutes, toss, then sit again. Continue 6–9 minutes until blistered and crisp-tender.
- Season with salt and pepper. Reduce heat to medium.
- Add garlic and red pepper flakes; toss 30–60 seconds until fragrant. Add capers if using.
- Off heat, finish with lemon juice (or vinegar). Taste and adjust seasoning. Serve hot.
Pro Tips for the Best Charred, Blistered Beans
- Dry = safe + crispy: Wet beans create steam and extra splatter.
- Single layer or bust: Crowding is the #1 cause of “why are these… soft?”
- Let them sit: Constant stirring prevents blistering. Think “sear,” not “stir-fry panic.”
- Use your senses: You’re looking for browned spots, wrinkled skins, and a bright green snap inside.
- Ventilation is your friend: High heat = a little smoke. That’s flavor, not failure.
Flavor Variations (So You Never Get Bored)
1) Soy-Butter Blistered Green Beans
Swap the lemon finish for 1 tablespoon butter and 1–2 teaspoons soy sauce. Add butter at the end, toss until glossy, then drizzle soy sauce and serve. It’s salty, silky, and dangerously snackable.
2) Miso Butter (Umami Mode)
Mix 1 tablespoon softened butter with 1–2 teaspoons white miso. Toss hot blistered beans with the miso butter off heat. Finish with sesame seeds and a squeeze of lemon for balance.
3) Pickled Shallots + Crunchy Breadcrumbs
Top blistered beans with quick-pickled shallots (vinegar + pinch of sugar + salt) and toasted breadcrumbs for a tangy-crunchy finish. This makes the beans feel like they put on a blazer and got promoted.
4) XO Sauce (Big Flavor, Minimal Effort)
If you can get XO sauce, toss a spoonful with blistered beans at the end. It’s spicy-salty-savory and turns a side dish into an obsession. Serve with lemon wedges to keep things bright.
5) Sichuan-Inspired Dry-Fried Vibes
For a nod to Sichuan-style dry-fried green beans, finish blistered beans with: minced garlic + ginger + scallions, crushed dried chiles, a pinch of sugar, and a splash of soy sauce. If you want the full Sichuan vibe, add a sprinkle of Sichuan peppercorn (toasted and ground) and a little chopped preserved mustard greens if you have it.
6) Brown Butter Vinaigrette + Nuts + Herbs
Brown a few tablespoons of butter, then whisk with a little vinegar or lemon and a pinch of salt. Pour over charred beans and finish with toasted nuts (hazelnuts or almonds) and an herb like sage or parsley. This one feels like a holiday table upgrade with minimal extra effort.
Oven/Broiler Method (When You Want Less Stovetop Drama)
Want blistered beans without babysitting the skillet? Toss beans with oil, salt, and pepper. Spread on a sheet pan and broil on high until blistered, usually 2–6 minutes depending on your broiler. Toss once midway. Finish with garlic oil, lemon, or any variation above.
What to Serve with Blistered Green Beans
- Weeknight heroes: roast chicken, salmon, pork chops, burgers
- Cozy plates: mac and cheese, baked potatoes, meatloaf
- Holiday lineup: turkey, ham, prime ribanything that likes a smoky, bright side
- Vegetarian mains: lentils, tofu stir-fries, grain bowls, or pasta with a lemony sauce
Storage, Reheating, and Make-Ahead Notes
- Best fresh: Blistered beans are at peak glory right after cooking.
- Fridge: Store leftovers in an airtight container up to 3 days.
- Reheat: Use a hot skillet for 2–3 minutes to bring back some char. Microwaving works, but it softens the texture.
- Make-ahead strategy: Trim and dry beans earlier in the day. Keep them wrapped in a towel in the fridge. Cook right before serving.
FAQ
Can I use frozen green beans?
You can, but the texture will be softer and blistering is harder because frozen beans release more moisture. If you try it, thaw completely and dry aggressively. Fresh beans are the real MVP here.
Why are my beans not blistering?
Usually one of three culprits: the pan wasn’t hot enough, the beans were wet, or the pan was crowded. Turn up the heat, dry the beans, and cook in batches.
How do I keep garlic from burning?
Add garlic near the end and lower the heat. Garlic should smell amazing, not like it’s writing its resignation letter.
Is “blistered” the same as burnt?
Nope. Blistered means charred in spots with a crisp-tender bite. Burnt means bitter and sad. We’re aiming for smoky-sweet, not charcoal.
Conclusion
This blistered green beans recipe is the quickest way to turn a simple vegetable into something people actually talk about. The method is straightforward: get the pan hot, keep the beans dry, don’t crowd, and let the char happen. From there, you can steer the flavor anywheregarlic-caper, soy-butter, miso, crunchy toppings, XO sauce, or Sichuan-inspired heat. Once you nail the blister, green beans stop being a side dish you tolerate and start being a side dish you crave.
Extra: of Real-Life Blistered Green Bean Experiences
The first time I made blistered green beans, I did what any confident cook does: I told everyone it would be “quick.” Then I turned the heat up like I was trying to signal an airplane, and my kitchen immediately smelled like a campfire had moved in and started paying rent. I panicked for roughly eight secondsbecause smoke usually means something is wronguntil I remembered: this is the whole point. Blistered means a little smoky. It means flavor. It means the green beans are finally getting a personality.
Here’s what surprised me: people do not politely eat blistered green beans. They hunt them. The platter lands on the table and suddenly everyone is doing that “casual” reach where they pretend they’re not grabbing the best pieces. The most charred beansthe ones with the wrinkled, browned skinsare the first to disappear. It’s like the green bean version of the crispy corner brownie effect.
I’ve served them at weeknight dinners where the main course was basically “whatever protein was on sale,” and the beans still stole the show. One night it was rotisserie chicken; another night it was a lazy tofu bowl; once it was breakfast-for-dinner (eggs and toast) because adulthood is wild like that. Every time, the beans made the meal feel intentionallike I planned it instead of improvising at 6:47 p.m.
The technique also taught me a valuable life lesson: leave things alone. If you keep stirring, nothing browns. If you keep poking, nothing blisters. The beans need a moment of uninterrupted focushonestly, same. Once you accept that, cooking gets calmer. You stop chasing the food around the pan and start letting heat do the work.
I’ve experimented with finishes like a mad scientist with a spice rack: miso butter when I want deep umami, soy-butter when I’m craving salty gloss, and lemon zest when the meal needs a bright little wake-up call. I’ve topped them with toasted breadcrumbs for crunch, which is basically giving green beans a crunchy hat. And when I want to impress people, I’ll do the Sichuan-inspired versiongarlic, ginger, chiles, maybe a little sugarbecause that flavor combo makes everything taste like it belongs in a restaurant.
My favorite part is how forgiving the idea is: even if you over-char a few beans, it doesn’t ruin the batchit adds contrast. A little extra blister here and there is like freckles; it’s character, not a flaw. Plus, once you’ve made them a few times, your cooking instincts level up. You start recognizing the sound of a proper sear, the smell of toasted garlic, and the exact second when “perfectly blistered” is about to become “okay, turn it off, chef.” And that’s when you realize blistered green beans aren’t just a recipethey’re a tiny skill you’ll keep using, because it makes dinner better every single time.


