Table of Contents >> Show >> Hide
- What Are Pandan Checkerboard Cookies?
- Why This Recipe Works
- Ingredients You’ll Need
- Tools That Make Life Easier
- How To Make Pandan Checkerboard Cookies (Step-by-Step)
- Step 1: Mix the Dry Ingredients
- Step 2: Cream Butter and Sugar
- Step 3: Add Egg and Vanilla
- Step 4: Add Dry Ingredients (Don’t Overmix)
- Step 5: Divide and Flavor One Half With Pandan
- Step 6: Shape Into Rectangles and Chill
- Step 7: Cut Strips and Build the Checkerboard
- Step 8: Freeze Until Sliceable
- Step 9: Slice and Bake
- Pro Tips for Sharp Checkerboard Edges
- Troubleshooting (Because Cookies Like Drama)
- Flavor Variations (Same Technique, Different Personalities)
- Storage and Make-Ahead Instructions
- Pandan Checkerboard Cookies Recipe Card
- Baking Experiences That Make You Better at These Cookies (500+ Words)
If your cookie tray has been feeling a little… beige, let’s fix that. Pandan checkerboard cookies are buttery, slice-and-bake
show-offs with a crisp grid pattern and a sweet, vanilla-adjacent aroma that smells like your dessert just got upgraded to first class.
The best part? They look like you spent all day measuring with a laser level, but the method is basically “make dough, chill dough,
cut dough, stack dough, slice dough.” (Dough is doing a lot of emotional labor here.)
In this guide, you’ll get an in-depth, foolproof recipe plus the “why” behind each stepso your checkerboard stays sharp, your pandan
flavor stays balanced, and your cookies don’t spread into modern art.
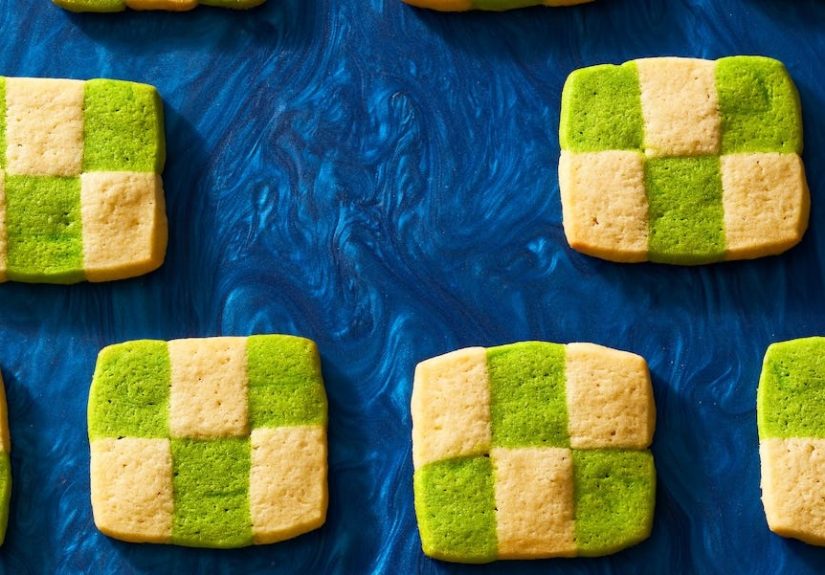
What Are Pandan Checkerboard Cookies?
Checkerboard cookies are classic icebox (slice-and-bake) butter cookies made from two differently colored doughs assembled into a neat
patternthen chilled and sliced into picture-perfect squares. In this pandan version, one dough is flavored (and tinted) with pandan
extract, which brings a sweet, fragrant note often described as vanilla-like with a distinctly tropical, grassy-floral vibe.
Think of pandan as vanilla’s fun cousin who shows up to the party wearing green and somehow makes everyone’s day better.
It’s bold, but not loudespecially when paired with a simple buttery cookie base.
Why This Recipe Works
- Measured chilling keeps the pattern crisp and prevents tearing and smudging during assembly.
- A sturdy butter-cookie base slices cleanly, bakes evenly, and stays tender-crisp (not cakey, not sandy).
- Balanced pandan gives flavor and color without turning the cookies into perfume-flavored neon tiles.
- A simple 2×3 checkerboard build looks impressive but doesn’t require geometry trauma.
Ingredients You’ll Need
This is a pantry-friendly cookieplus one special guest: pandan extract. If you’ve never bought pandan extract in the U.S., check Asian
grocery stores or the baking aisle where flavor extracts live (some mainstream brands carry it now).
Cookie Dough
- 1 1/2 cups all-purpose flour (spooned and leveled)
- 1/4 teaspoon baking powder
- 1/4 teaspoon kosher salt
- 1/2 cup (1 stick) unsalted butter, softened
- 1/2 cup granulated sugar
- 1 large egg, room temperature
- 1/4 teaspoon pure vanilla extract
- 1 teaspoon pandan extract (start with less if yours is very strong)
Optional (But Highly Recommended) Flavor Boosts
- 1/4 teaspoon coconut extract or 1 tablespoon toasted coconut flakes (finely chopped)
- Pinch of extra salt for a more “grown-up bakery cookie” vibe
Tools That Make Life Easier
- Stand mixer or hand mixer
- Bench scraper (or a sturdy spatula)
- Ruler (yes, reallythis is cookie architecture)
- Parchment paper
- Sharp chef’s knife
- Plastic wrap
- 2 baking sheets
How To Make Pandan Checkerboard Cookies (Step-by-Step)
Read through once before starting. These cookies aren’t hard, but they are a “chill and assemble” situationmore like building edible Lego
than tossing chocolate chips into dough.
Step 1: Mix the Dry Ingredients
In a medium bowl, whisk together the flour, baking powder, and salt. This quick whisk prevents clumps and helps the cookies bake evenly.
Step 2: Cream Butter and Sugar
In a large bowl (or stand mixer), beat the softened butter and sugar until light and fluffy, about 2–3 minutes.
Don’t rush thisproper creaming helps the cookies bake up tender with a clean “snap” at the edges.
Step 3: Add Egg and Vanilla
Beat in the egg until fully combined, then mix in the vanilla. Scrape down the bowl so everything blends evenly.
Your future cookie squares will thank you for your attention to detail.
Step 4: Add Dry Ingredients (Don’t Overmix)
With the mixer on low, gradually add the dry ingredients and mix just until the flour disappears.
Overmixing develops gluten, which makes cookies tougher and less “melt-in-your-mouth.”
Step 5: Divide and Flavor One Half With Pandan
Split the dough into two equal portions. Keep one plain. To the other half, add pandan extract and mix on low until the color is even.
If your pandan extract is extremely potent (some are!), start with 1/2 teaspoon and add more until you like the color and aroma.
Color note: Natural pandan extracts and pastes can varysome are subtle and olive-green, others are bright.
Aim for “pretty pistachio,” not “highlighter incident.”
Step 6: Shape Into Rectangles and Chill
Place each dough on plastic wrap and shape into a tidy rectangleabout 2 inches by 7 inches and roughly 3/4-inch thick.
The straighter your sides, the sharper your checkerboard.
Wrap both rectangles well and refrigerate until slightly firm, 30–45 minutes. You want them cool enough to cut clean strips,
but not so cold they crack like cookie drywall.
Step 7: Cut Strips and Build the Checkerboard
Unwrap the dough rectangles. Cut each rectangle lengthwise into three equal strips (a ruler helps). Now you’ll have:
three plain strips and three pandan strips.
- Swap the center strip of the plain dough with the center strip of the pandan dough.
- You should now have two “logs,” each with alternating colors (for example: green–plain–green and plain–green–plain).
- Stack one log on top of the other, aligning so the colors alternate vertically too, forming a clean checkerboard.
Use a bench scraper (or your palms) to gently press the stack into one cohesive rectangular log, straightening the sides.
If anything feels soft, pause and chill for 10 minutes. This is a cookie, not a race.
Step 8: Freeze Until Sliceable
Wrap the assembled log tightly and freeze until firm, about 1 hour. This is the secret handshake of slice-and-bake cookies:
cold dough = sharp pattern = less spreading.
Make-ahead win: Keep the wrapped log frozen for weeks, then thaw briefly before slicing whenever a cookie emergency occurs.
(Cookie emergencies are real. Don’t let anyone tell you otherwise.)
Step 9: Slice and Bake
Heat the oven to 350°F. Line baking sheets with parchment paper.
Let the frozen log sit at room temperature for about 10–15 minutes so it doesn’t shatter when sliced.
Then slice into 1/4-inch cookies with a sharp knife, wiping the blade if the colors start to smear.
Bake 11–13 minutes, rotating pans halfway through, until the cookies look set and the edges are just barely turning golden.
Cool on the sheet for 5 minutes, then transfer to a rack to cool completely.
Pro Tips for Sharp Checkerboard Edges
- Chill early, chill often: If the dough warms up during any stage, stop and chill. Warm dough tears and smears during stacking.
- Measure your strips: Uneven strips lead to a “checkerboard” that looks like it was assembled during an earthquake.
- Use parchment to prevent sticking: Assemble on parchment for clean lifting and less color transfer.
- Slice with confidence: A sharp knife makes cleaner cuts. If the pattern drags, wipe the blade between slices.
- Don’t overbake: Checkerboard cookies look best with minimal browning so the colors stay distinct.
Troubleshooting (Because Cookies Like Drama)
My dough is too soft and sticky.
Chill it longer. Sticky dough is usually just warm butter. Wrap and refrigerate 15–30 minutes, then try again.
If your kitchen is very warm, work in shorter bursts.
My checkerboard looks blurry after baking.
Two likely culprits: the dough wasn’t cold enough when sliced, or the cookies baked too long and browned heavily.
Next time, freeze longer and pull them when the edges are only lightly golden.
My log cracked when I sliced it.
It was too cold. Let the log sit at room temperature 10–15 minutes, then slice again.
My cookies spread and the squares became… rectangles.
Chilling is the fix, but also check your butter: if it was very soft or melty at mixing time, the dough can be looser.
Firm up the assembled log well before slicing and baking.
Flavor Variations (Same Technique, Different Personalities)
- Pandan + coconut: Add a tiny bit of coconut extract to the plain dough too, or roll the sliced cookies in coconut sugar for crunch.
- Pandan + chocolate: Replace the plain dough with a cocoa dough for a pandan-chocolate checkerboard (green meets brownie energy).
- Citrus pandan: Add finely grated lime zest to the plain dough for a bright contrast.
- More squares: Cut into 4 strips instead of 3 and assemble a 4×4 pattern. More work, more wow.
Storage and Make-Ahead Instructions
- Room temperature: Store baked cookies airtight for 4–5 days.
- Freeze baked cookies: Freeze in a sealed container for up to 2 months.
- Freeze dough log: Wrap tightly and freeze for up to 2–3 months; thaw briefly before slicing and baking.
Pandan Checkerboard Cookies Recipe Card
Best Pandan Checkerboard Cookies
Yield: About 22–24 cookies (depending on thickness)
Total time: ~2 hours (includes chilling/freezing)
Ingredients
- 1 1/2 cups all-purpose flour
- 1/4 tsp baking powder
- 1/4 tsp kosher salt
- 1/2 cup unsalted butter, softened
- 1/2 cup granulated sugar
- 1 large egg
- 1/4 tsp vanilla extract
- 1 tsp pandan extract (adjust to taste/strength)
Directions
- Whisk flour, baking powder, and salt.
- Cream butter and sugar until fluffy (2–3 minutes). Beat in egg and vanilla.
- Add dry ingredients and mix just until combined.
- Divide dough in half. Mix pandan extract into one half until evenly colored.
- Shape each dough into a neat 2×7-inch rectangle (about 3/4-inch thick). Wrap and chill 30–45 minutes.
- Cut each rectangle into three equal strips. Swap center strips, then stack to form a checkerboard log.
- Wrap tightly and freeze until firm (about 1 hour).
- Heat oven to 350°F. Slice into 1/4-inch cookies and bake 11–13 minutes, rotating halfway.
- Cool 5 minutes on sheet, then transfer to rack to cool completely.
Baking Experiences That Make You Better at These Cookies (500+ Words)
Making pandan checkerboard cookies is one of those baking projects that feels suspiciously fancy until you’re actually doing it. The first “experience”
most home bakers have is realizing that the dough has moods. When it’s cool and calm, it slices like butter (ironically). When it’s warm, it behaves like
a toddler with finger paintsmearing color everywhere and refusing to hold a straight edge. The good news is that the solution is never complicated:
pause and chill. That’s it. A short fridge break can turn a sticky situation into clean, crisp strips.
Another classic experience is discovering how different pandan extracts can be. Some smell gentle and sweet, like vanilla with a tropical wink. Others are
strongeralmost like you opened a bottle and the whole kitchen instantly turned green in spirit. If you’re new to pandan, it’s normal to worry about adding
too much. That’s why many bakers start with a smaller amount, mix, then decide if they want more color or aroma. The funny part? Most people who under-do
pandan at first end up thinking, “Wait, why didn’t I go for it?” The cookie base is buttery and mild, so pandan usually has plenty of room to shine.
Then comes the “cookie assembly phase,” which is where you feel like a tiny dessert engineer. You line up strips, swap centers, stack layerssuddenly you’re
measuring dough with a ruler like it’s a high school science fair. And yes, it can feel a bit extra. But the payoff is immediate when you slice that first
cookie and see clean squares. There’s a very specific joy in realizing you just made a geometric pattern out of dough and it actually worked. It’s like
edible stationery.
A small but real experience: your hands will probably get a little green. Not scary-green, just “I handled something colorful” green. If you want to avoid
tinting everything you touch, wash hands between working with the two doughs, or use parchment as a barrier while shaping. Also, don’t be surprised if your
plastic wrap looks like it attended a slime festival. That’s normal. Baking is glamorous in photos and extremely unglamorous in real life.
Slicing is another moment where experience matters. The first couple of slices might look flawless, and thensuddenlyone slice drags color across the face
like a tiny watercolor brush. This usually means the dough is either too soft or the knife needs a quick wipe. A lot of bakers keep a damp paper towel nearby
to clean the blade between slices. It sounds fussy, but it’s one of those small “pro” moves that makes the whole batch look bakery-worthy.
Finally, the baking itself teaches a valuable lesson: not all cookies should get deeply golden. With checkerboards, pale is beautiful. You’re aiming for set
edges and a dry surface, not a dark tan. The first time someone bakes these, it’s common to wait for “more color” and accidentally blur the contrast. After
you’ve made them once, you’ll trust the process: pull them when they look just barely done, let them cool, and they’ll crisp up perfectly. The overall
experience is equal parts patience and payofflike building a tiny cookie mosaic that disappears faster than you’d like.


