Table of Contents >> Show >> Hide
- Why We Chose Wood Planks for the Dining Room
- Planning the Project Before We Started
- What We Used
- How We Added Wood Planks to the Dining Room and Side Wall
- Design Choices That Kept the Look Fresh
- Mistakes We Tried Very Hard Not to Make
- Was Adding Wood Planks Worth It?
- Our Experience Living With the Dining Room and Side-Wall Planks
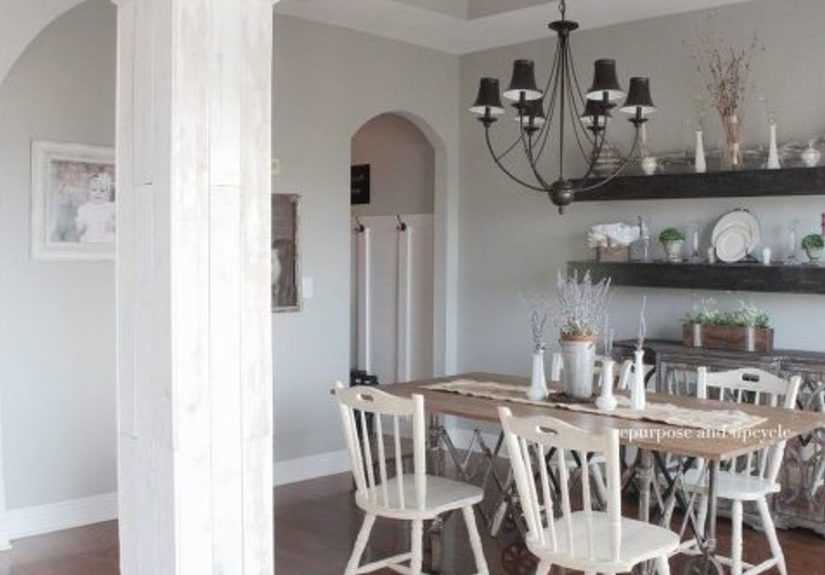
There are home upgrades that whisper, and then there are the ones that politely clear their throat and announce, “Yes, this room has a personality now.” Adding wood planks to our dining room and side wall landed firmly in the second category. Before the project, the room felt fine in the way plain toast is fine. Functional. Beige-adjacent. Emotionally neutral. After the planks went up, the space felt warmer, more finished, and a lot more like a room people would actually remember after dinner.
That is the magic of a wood plank wall when it is done thoughtfully. It adds texture without needing loud color, creates an instant focal point, and gives a dining room the kind of layered, custom look that usually makes guests assume you hired someone with a tape measure holster and strong opinions about trim profiles. The good news is that this type of update is also very doable for a confident DIYer.
In our case, the goal was simple: add character to the main dining room wall, tie in the nearby side wall so the space felt intentional, and make the whole room look more polished without turning it into a fake barn. That balance matters. Wood planks can look clean and modern, cozy and organic, or classic and architectural depending on the profile, finish, spacing, and wall placement. The trick is choosing the right combination before you buy a single board and start a weekend relationship with a brad nailer.
Why We Chose Wood Planks for the Dining Room
A dining room is one of the best places to use wall planking because it benefits from warmth, visual depth, and a little drama. Unlike a bathroom or laundry room, where practicality usually wins every argument, a dining room has permission to be a little extra. It is the room that hosts holidays, weeknight pasta, birthday candles, and the occasional takeout container you swear you plated nicely. In other words, it deserves more than blank drywall.
Wood planks also solved a design problem for us. The dining room needed a focal point, but we did not want to rely only on oversized art or a trendy paint color that might feel tired in a year. Paneling offered a more architectural fix. It made the room feel taller, richer, and more custom. On the connected side wall, continuing the treatment helped the space flow instead of looking like one wall had dressed for the occasion while the other forgot the invitation.
Another reason this project made sense is flexibility. Wood planks come in several styles, including shiplap, tongue-and-groove, slat panels, and board-and-batten-inspired looks. That means you can steer the final result toward farmhouse, coastal, Scandinavian, modern organic, traditional, or somewhere in the glorious middle where real homes tend to live.
Planning the Project Before We Started
Choosing the Right Walls
Not every wall needs paneling. In fact, restraint is what keeps a wood-plank project from feeling heavy. We focused on the dining room wall that naturally drew the eye and the adjacent side wall that helped the design feel connected. This approach made the treatment feel intentional instead of random, and it worked especially well because those walls were relatively uninterrupted by doors and windows.
Picking a Plank Style
We considered a few options before landing on a clean plank look. Shiplap is popular because it is relatively forgiving to install and gives a classic horizontal shadow line. Tongue-and-groove offers a tighter, more tailored fit. Slat-style walls feel more contemporary and can visually stretch a room upward, especially when installed vertically. Board and batten creates a more formal, framed effect that works beautifully in dining rooms.
For our space, we wanted something in the sweet spot between casual and polished, so we chose planks with subtle texture and enough visual rhythm to make the walls interesting without screaming for attention during dinner.
Deciding on Layout and Direction
Plank direction changes the mood of a room fast. Horizontal planks tend to make a wall feel wider and more relaxed. Vertical planks can make ceilings appear taller and the room feel more tailored. Patterned layouts such as chevron or herringbone are beautiful, but they also increase cutting, layout work, and the odds of saying a few words your paint can should not hear.
Because we wanted the room to feel open and calm, we went with a simple layout that emphasized clean lines and easy flow. Sometimes the best design choice is the one that does not require a spreadsheet.
Thinking About Finish
The finish is where wood planks can swing from “modern classic” to “lodge lobby” in a hurry. Natural and light wood tones feel warm and current. Painted planks create a softer, more subtle texture. Dark stain can be gorgeous, but it usually works best when the room has strong natural light and enough contrast through furniture, textiles, and decor.
We chose a finish that played nicely with our dining table, flooring, and trim, because the goal was cohesion, not a plank identity crisis. Matching exactly is not necessary, but clashing on undertones is an excellent way to make a room feel slightly off for reasons no one can explain at brunch.
What We Used
Our project list was fairly standard: wood planks, measuring tape, level, stud finder, miter saw, jigsaw for detailed cuts, construction adhesive, brad nailer or finish nails, wood filler, caulk, sandpaper, primer or paint if needed, and patience. Do not skip the patience. It is not sold in stores, which is rude, but it is essential.
We also removed outlet covers, wall plates, and trim where necessary before starting. That extra prep time made the final result look much cleaner and saved us from trying to trim around details later like we were making life harder on purpose.
How We Added Wood Planks to the Dining Room and Side Wall
1. We Let the Materials Acclimate
This step is not flashy, but it matters. Before installing anything, we let the planks sit in the room so they could adjust to the temperature and humidity. Wood moves. It expands, contracts, and generally reminds everyone that it used to be part of a tree. Giving the material time to acclimate helps reduce the risk of gaps, shifting, or warping after installation.
2. We Prepped the Walls Properly
We checked the walls for cracks, bumps, and anything else that would interfere with a smooth install. Paneling goes up best over walls in good condition, so we cleaned the surfaces, handled minor repairs, and made sure everything was flat enough for the boards to sit well. We also removed baseboards carefully so they could be reinstalled later for a finished look.
3. We Mapped the Layout First
Before fastening a single plank, we measured the wall, located studs, and dry-planned the layout. This step helped us avoid ending with an awkward skinny strip in a very obvious place. We also marked outlet locations and tricky corners. If a wall has electrical boxes or uneven edges, planning first saves a lot of frustration later.
4. We Started With a Level First Row
The first course sets the tone for the whole job. We used a level, checked it twice, and started carefully because one crooked starting row can create a ripple effect all the way up the wall. On our project, we worked methodically across the wall and staggered seams so the installation looked natural instead of repetitive.
Some installers use adhesive and nails together, while others rely more heavily on one method depending on the product and wall condition. We followed the plank specifications and used a fastening approach that gave the boards a secure hold while keeping the face clean.
5. We Cut Around Outlets and Edges
The side wall had the fussy parts: corners, trim transitions, and electrical cutouts. That is where a jigsaw and careful measuring earned their keep. We made templates where needed, took our time, and reminded ourselves that “measure twice, cut once” is only annoying because it is correct.
6. We Reinstalled Trim and Finished the Surface
Once the planks were up, we reattached baseboards, filled nail holes, caulked small gaps, and sanded where needed. If you are painting the planks, this is where the project starts looking dramatically better in a short amount of time. If you are staining or leaving the wood visible, finish work matters even more because every little flaw loves natural light and an audience.
Design Choices That Kept the Look Fresh
The biggest reason the room turned out well is that we treated the planks like a design element, not a gimmick. We kept the furniture lines clean, let lighting do some of the heavy lifting, and balanced the texture of the wood with softer materials like upholstered chairs, curtains, and a rug. That contrast kept the room from feeling too hard or too rustic.
We also paid attention to scale. On the main dining room wall, the planks provided a backdrop for art and a statement light fixture without competing with them. On the side wall, the continued treatment helped the room feel wrapped and cohesive. It looked intentional, like the room had always wanted this all along and was frankly a little annoyed we had waited.
Color played a role too. Rather than going extremely dark or extremely trendy, we leaned toward a timeless finish. That choice made it easier to style the room seasonally and let the wood texture stay relevant even as decor changes over time.
Mistakes We Tried Very Hard Not to Make
One of the easiest mistakes with a wood plank wall is picking the wrong wall. A feature wall works best when it supports the room’s architecture or use, not when it is chosen randomly because it happened to be empty for twelve minutes. Another common error is ignoring undertones. Warm wood, cool paint, and mismatched flooring can make a room feel visually confused.
Skipping prep is another classic DIY trap. If the wall is uneven, if the boards have not acclimated, or if the layout has not been planned, the finished project can look homemade in the wrong way. There is also the temptation to overdo the look with too much farmhouse styling, too many distressed finishes, or too many decorative signs that appear to be yelling “Gather” at the mashed potatoes. We respectfully declined that path.
Finally, it helps to remember that wood planks are there to add character, not visual clutter. Let them be part of the room, not the entire personality of the room.
Was Adding Wood Planks Worth It?
Absolutely. This was one of those projects that changed how the dining room felt more than almost any single furniture swap could have. The room became warmer, more interesting, and much more finished. It also gained that layered, custom-home feeling people notice even if they cannot immediately explain why.
From a practical standpoint, the project was manageable with careful planning and standard tools. From a style standpoint, it gave us texture, depth, and architectural interest without requiring a full remodel. And from a personal satisfaction standpoint, there are few things better than sitting down to dinner and knowing the wall behind you no longer looks like an afterthought.
Our Experience Living With the Dining Room and Side-Wall Planks
After the sawdust settled and the nail gun stopped sounding like a tiny construction-themed drum solo, we finally got to live with the finished walls. That is when we realized the best part of the project was not the installation itself. It was the way the room behaved afterward. The dining room felt calmer. The side wall felt purposeful. Even the lighting seemed more flattering, which was rude because apparently all the room needed to glow up was a little wood and a better attitude.
What surprised us most was how much the planks changed the atmosphere during everyday life, not just when the room was “styled.” Morning coffee looked better there. Weeknight dinners felt less rushed. Holiday meals suddenly had a backdrop that made the table feel special before a single centerpiece showed up. We did not expect wall texture to have that kind of effect, but it turns out architecture-level detail does a lot of emotional heavy lifting.
We also noticed that the room became easier to decorate because the walls were no longer blank and needy. Before, everything had to work harder: the art, the chandelier, the curtains, even the chairs. Afterward, the planks carried some of that visual weight. That meant we could decorate more simply and still have the room feel layered and complete. It was the home-design version of finally buying a good coat and realizing the rest of your outfit can calm down now.
The side wall, in particular, ended up being one of our favorite choices. We briefly worried that extending the planks beyond the main dining room wall might be too much, but it actually made the entire area feel more connected. Instead of one pretty wall and one forgotten wall standing beside it like an awkward wedding guest, the space read as a full composition. That continuity made the project feel more high-end and less like a one-off DIY experiment.
Of course, the project was not entirely glamorous. There were a few moments involving imperfect corners, stubborn trim, and measurements that became mysteriously less trustworthy once we started cutting. We had to slow down more than once and correct our layout instead of pretending the wall would somehow forgive us later. It would not have. Wood planks are beautiful, but they are not emotionally supportive.
Still, that is part of why we love the result. The room does not feel factory-made. It feels thoughtfully built. The minor quirks are hidden by careful finish work, and the overall effect is clean and polished. Guests notice the walls almost immediately, but usually in a good way: they ask what changed, why the room feels warmer, or whether the house always had that detail. That last question is the dream, because it means the update looks like it belongs.
If we were doing it again, we would make the same core decisions: keep the profile simple, prioritize wall prep, continue the treatment where it improves flow, and choose a finish that works with the whole room instead of chasing a trend. We might work even faster the second time, but we would not rush the planning. The success of this project came from the boring decisions as much as the pretty ones.
In the end, adding wood planks to our dining room and side wall gave us more than a design upgrade. It changed the way we experience the space. The room now feels grounded, welcoming, and finished in a way plain drywall rarely manages on its own. And every time we walk past it, we get that deeply satisfying little homeowner thought: yes, that was absolutely worth the sawdust in our socks.