Table of Contents >> Show >> Hide
- Why Cutting Curves in Wood Feels So Difficult
- The 7 Essential Tips for Cutting Curves in Wood
- 1. Choose the Right Tool for the Curve
- 2. Start with a Fair, Smooth Layout Line
- 3. Rough Cut Outside the Line, Then Sneak Up on It
- 4. Pick the Right Blade and Setup for Curves
- 5. Use Templates and a Router for Perfect, Repeatable Curves
- 6. Control the Feed Rate and Support the Work
- 7. Smooth and Refine the Curve Like a Pro
- Safety First (Yes, Even When You’re Having Fun)
- Extra Shop Wisdom: Real-World Experiences with Cutting Curves
- Conclusion: Bring Smooth Curves into Your Next Project
- SEO Summary
Straight cuts are fine if you’re building a shipping crate. But if you want arched doorways,
elegant brackets, or a curvy garden bench that doesn’t look like it was designed by a robot,
you need to learn how to cut smooth curves in wood. The good news? With the right layout,
tools, and a few pro tricks, cutting curves is a skill any DIYer can master.
Woodworking pros often reach for tools like jigsaws, band saws, routers with templates, and
even scroll saws to create clean, graceful curves. Band saws are widely considered one of the
most accurate and versatile tools for curved cuts, especially in thicker stock, while jigsaws
shine for portable, on-site work and irregular shapes. Routers paired with a good template can
turn a rough cut into a perfect arc that looks factory-made.
Let’s walk through seven battle-tested tips for cutting curves in wood, along with real-world
advice from the shop so you can bend your projects (literally) to your will.
Why Cutting Curves in Wood Feels So Difficult
Before we jump into the tips, it helps to know why curves can be tricky:
- Wood grain fights you. As the blade turns, the grain can pull it off course.
- Most blades like straight lines. Wider blades resist tight turns and can burn or wander.
- Thick stock hides problems. A cut that looks good on top may be crooked on the bottom if the blade flexes.
- Impatience shows up as chatter marks. Rushing the cut almost guarantees a rough, wavy edge.
The solution is planning, proper tool choice, and a step-by-step approach: lay out a fair curve,
rough cut outside the line, then refine with a router, sander, or hand tools until it’s silky smooth.
The 7 Essential Tips for Cutting Curves in Wood
1. Choose the Right Tool for the Curve
You can technically cut a curve with almost anything sharp, but using the right tool makes it
safer and cleaner. Here’s a quick breakdown:
- Band saw: Often the first choice for cutting curves in wood. Its continuous blade and rigid setup
are ideal for smooth, controlled curves and thick stock. - Jigsaw (saber saw): The go-to for many DIYers. It’s portable and great for cutting curves in sheet
goods or when you can’t drag a big panel to a stationary saw. Use it for medium-tight curves and irregular shapes. - Scroll saw: Perfect for delicate, intricate curves and tight inside turns in thinner stock, like
decorative scrollwork or small brackets. - Router with a template: The “finishing” tool of the curve world. Once you’ve rough-cut close to the line,
a router with a pattern or flush-trim bit and a template will make the curve perfectly repeatable. - Circular saw: Surprisingly useful for very large, gentle curves (like sweeping arcs) if you nibble along
the line with multiple straight cuts.
A simple rule of thumb: the tighter and more precise the curve, the more likely you’ll want a band saw,
scroll saw, or router. For bigger, looser curves in construction lumber, a jigsaw or even a circular saw may be enough.
2. Start with a Fair, Smooth Layout Line
The blade is only as honest as the line you ask it to follow. “Fair” curves (smooth, flowing arcs with
no flat spots or kinks) start with smart layout:
- Use a flexible batten: Clamp or pin a thin, flexible strip of wood along several layout points and let it
naturally form a smooth arc. Trace along the batten. - Try a string-and-nail compass: For big arcs, drive a nail at the center point, tie on a string with a
pencil at the other end, and swing an arc just like a giant compass. - Make a dedicated template: For repeated parts such as arch-top casings, corbels, or brackets, draw your
curve on a piece of MDF or plywood, refine it carefully, and use that as the master pattern.
Take your time here. It’s much easier to erase a pencil line than to “erase” a lump in a curve after
you’ve removed half the board.
3. Rough Cut Outside the Line, Then Sneak Up on It
One of the biggest beginner mistakes is trying to cut exactly on the line in one pass. That’s like
trying to parallel park at full speed.
Instead:
- Stay 1/8 to 1/4 inch outside the line. Use your jigsaw or band saw to remove most of the waste without
worrying about perfection yet. - Use relief cuts. For tight curves, make short cuts perpendicular to your layout line so the waste can break
away easily. This prevents the blade from binding in thick or stubborn stock. - Refine with a router, sander, or hand tools. Once most of the material is gone, bring in a router with a
bearing-guided bit, a spindle sander, drum sander, rasp, or spokeshave to creep up to the line and smooth it out.
This two-step approach gives you cleaner, safer results, especially in hardwoods or thick pieces where blades like to wander.
4. Pick the Right Blade and Setup for Curves
If you’re fighting the cut, your blade may be the problem. Curves demand flexible, appropriately sized blades:
- Narrow blades for tight curves. On a band saw, narrower blades (like 1/4" or 3/16") can turn tighter radii,
but they’re more fragile. Use them for intricate shapes and smaller workpieces. - Curve-friendly jigsaw blades. Choose a jigsaw blade made for curves: narrower width, fine teeth, and, if
available, blades marketed specifically for tight radius cuts. - Adjust your saw properly. On a band saw, set the blade tension and guide bearings correctly and lower the
blade guard close to the work to reduce deflection. On a jigsaw, reduce aggressive orbital action if it’s chattering
or wandering in tight curves. - Let the blade do the work. Push at a steady, moderate pace. If the blade is burning, screaming, or refusing
to turn, slow down or switch blades.
A well-chosen blade cuts more smoothly, lasts longer, and makes you look much more skilled than you may feel.
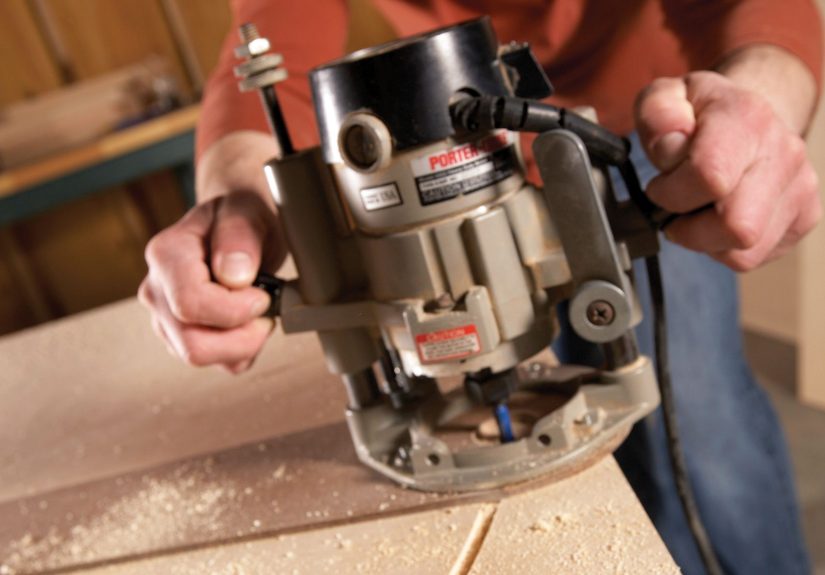
5. Use Templates and a Router for Perfect, Repeatable Curves
If you need more than one identical curved part, a router and template combo is your best friend. This is a
classic Family Handyman-style trick that turns a “good enough” rough cut into professional results.
- Make a master template. Cut and sand a single piece of MDF or plywood until the curve is exactly what you want:
smooth, fair, and free of flat spots. - Attach the template to your workpiece. Use double-sided tape, hot glue dots, or screws in off-cut areas to
temporarily fasten the template to the board. - Rough-cut the workpiece. Stay slightly proud of the template with a jigsaw or band saw so you’re not asking the
router bit to hog off huge chunks. - Flush-trim with the router. Use a pattern bit or flush-trim bit with a bearing riding along the template.
Move steadily and keep the router balanced to avoid tipping.
Once the template is dialed in, you can reproduce the same curve again and againperfect for multiple brackets,
stair stringers, or arch casings.
6. Control the Feed Rate and Support the Work
Even with the right blade and template, how you handle the workpiece makes a huge difference in the final surface:
- Keep the work supported. On the band saw, always keep the stock flat on the table. With a jigsaw, use a sacrificial
board or foam sheet underneath so the shoe stays fully supported through the cut. - Use two hands. One hand should guide direction while the other feeds the work. Don’t “steer” with one hand from
the back onlyyou’ll end up with a faceted, wobbly curve. - Feed smoothly, not in jerks. Push the piece or the saw at a steady pace. Stopping and starting frequently leaves
bumps and burn marks. - Pause to realign. If you drift off the line, stop the cut, back up slightly (if safe), or pull out, then restart
along the correct path. Forcing the blade sideways is a fast way to ruin a curve or snap a blade.
Think of it like driving on a winding roadslow, steady steering beats last-second corrections every time.
7. Smooth and Refine the Curve Like a Pro
No matter how good the cut, most curves need a little cleanup. This is where the magic really happens:
- Oscillating spindle or drum sander: Fantastic for smoothing inside curves and removing saw marks without flattening
the shape. - Rasps and files: A coarse rasp followed by a finer file lets you quickly sculpt the curve, especially on thicker
hardwoods. - Spokeshave or block plane: Ideal for outside curves, chair parts, or edges you can easily access from above.
- Sanding blocks that match the curve: Wrap sandpaper around a piece of dowel, PVC pipe, or a scrap molded to the
same radius as your curve. This keeps the profile consistent.
Work through the gritssay 80, 120, 180, and 220until the curve looks and feels smooth. Run your fingers along the
edge; they’ll find imperfections your eyes miss.
Safety First (Yes, Even When You’re Having Fun)
Curves might look playful, but the tools cutting them are not. A few quick reminders:
- Wear safety glasses or a face shieldcurved cuts tend to throw chips in unpredictable directions.
- Use hearing protection with power saws and routers.
- Clamp small workpieces; don’t chase them around with a spinning blade.
- Keep hands to the sides of the blade path, not directly in line with it.
- Let blades and bits stop completely before setting tools down or reaching near the cut.
Extra Shop Wisdom: Real-World Experiences with Cutting Curves
On paper, “cutting curves in wood” sounds like one neat little skill. In the shop, it turns into a series of
small discoveries, minor disasters, and satisfying “aha” moments. Here are some experience-based lessons that
don’t always show up in tool manuals.
First, curves will expose any impatience you bring into the shop. If you rush a straight cut, you might be able
to hide it with a trim piece. If you rush a curved cut, everyone can see that flat spot or sudden kink from
across the room. The fix is simple but not glamorous: slow down. Mark the line clearly, rough cut outside of it,
and then treat the cleanup phase as its own mini project rather than an afterthought.
Second, practice on scrap pays off more with curves than almost any other cut. Take a spare piece of 2x stock or
plywood, draw a few different arcs, and run them through your jigsaw or band saw just to feel how the blade behaves.
You’ll quickly learn how tight a radius your blade can handle before it starts complaining, and you’ll get a better
sense of how much pressure is “enough” versus “way too much.”
Many DIYers also discover that blade wander in thick stock is real. You cut a perfect line from the top, and then you
flip the board over and realize the bottom of the curve lives in a slightly different universe. One practical trick is
to make the cut from both sides when possible, or use the band saw primarily for roughing and let a router with a
template do the precision work. It feels like an extra step, but it saves time compared to trying to sand a crooked
cut back into alignment.
Another experience you’ll earn quickly: grain direction matters. When you’re routing or planing along a curve, there
will be spots where the grain changes direction relative to your cut. That’s when tear-out likes to show up and ruin
your day. Listen and feel as you workif the tool starts to chatter, grab, or leave fuzzy fibers instead of clean shavings,
it may be time to reverse your direction or take a lighter pass.
Templates are one of those ideas that sound “advanced” until you try them once, and then you wonder why you didn’t
start sooner. Making a template forces you to think about the shape of the curve by itself, without worrying about
the final piece of expensive hardwood. You can fuss over the MDF, adjust the line, sand a bump, step back and look at
it, and only when you’re happy do you commit that shape to your good lumber. Over time, you’ll build a little library
of go-to curves that you can reuse on future projects.
Sanding curves is its own art. Many beginners instinctively wrap sandpaper around their fingers and attack the edge
directly. It works, but it’s easy to unintentionally flatten spots. Using a shaped blocklike a chunk of dowel or a
scrap with the same radius as the curvekeeps your sanding honest. A few minutes of shaping a sanding block can save
you an hour of trying to fix a wavy edge.
Finally, accept that your first few curved cuts won’t look like they came from a CNC machineand that’s okay. Hand-cut
curves have a character that’s hard to fake. As your confidence grows, you’ll start designing more arched openings,
rounded shelves, and sculpted details into your projects. That’s when cutting curves stops being a challenge and starts
becoming one of the most enjoyable parts of woodworking.
The real “secret” experience shared by many woodworkers is simple: curves invite you to slow down, pay attention, and
enjoy the process. When you lean into that mindset, you’re not just cutting woodyou’re shaping something with personality.
Conclusion: Bring Smooth Curves into Your Next Project
Cutting curves in wood isn’t mysteriousit’s a series of smart steps: draw a fair line, choose the right tool, rough cut,
refine with a template or sander, and finish with patient smoothing. Whether you’re building arch-top trim, a curved
headboard, or decorative brackets, these seven tips give you a reliable roadmap.
Start with scrap, take your time, and expect each curve to teach you something new. Before long, you’ll be the one your
friends call when their “simple little project” suddenly involves cutting a perfect arc.
SEO Summary
sapo: Cutting smooth curves in wood is the secret to projects that look custom, not cobbled together. In this in-depth guide, you’ll learn seven essential tips for laying out fair curves, choosing the right tools (from jigsaws and band saws to routers and templates), rough cutting safely, and refining your edges to a silky, paint-ready finish. We’ll also share real-world shop experiences, from dealing with blade wander in thick stock to taming tricky grain direction, so you can avoid common mistakes and confidently add arches, brackets, and sculpted details to your next build.