Table of Contents >> Show >> Hide
- Before You Start: A 3-Minute Wood-Saving Checklist
- 5 Ways to Remove Acrylic Paint from Wood
- Way #1: Dish Soap + Warm Water (Best for fresh or slightly tacky paint)
- Way #2: Isopropyl (Rubbing) Alcohol (Best for dried acrylic on sealed woodwhen used carefully)
- Way #3: Heat (Hair Dryer or Heat Gun) + Gentle Scraping (Best for thicker, fully dried paint)
- Way #4: Citrus- or Soy-Based Paint Stripper (Best for multiple layers or stubborn paint on woodwork)
- Way #5: Mechanical Removal (Plastic Scraper + Sanding) (Best for leftover haze, paint in the grain, or final cleanup)
- Which Method Should You Use? A Quick Decision Guide
- Common Mistakes (So You Don’t Accidentally Start a “Refinishing Era”)
- FAQs
- Conclusion
- Real-World Experiences and Lessons from the Acrylic-Paint Trenches (Extra )
Acrylic paint is the glitter of the DIY world: fun at first, then somehow it’s on your table, your trim, and
(mysteriously) your elbow. The good news? Acrylic is usually easier to remove from wood than oil-based paint
especially if you act fast and use the right method for the surface.
This guide breaks down five reliable ways to remove acrylic paint from wood, whether you’re dealing with a
fresh craft spill on a dining table or a dried splatter on baseboards. You’ll also get realistic expectations, finish-safe tips,
and a final section of “been-there” scenarios that’ll make you feel less alone in your paint-related life choices.
Before You Start: A 3-Minute Wood-Saving Checklist
1) Figure out what you’re cleaning: finished vs. unfinished wood
Finished wood (sealed with polyurethane, varnish, lacquer, etc.) has a protective topcoat. That topcoat is
great for durabilityand also great at getting dulled by strong solvents. Unfinished wood is more forgiving
about sheen, but it can absorb paint deeper into the grain, which means more work.
2) Do a small “hidden spot” test
Even “gentle” methods can react with certain finishes. Test behind a leg, under a lip, or anywhere a future you won’t stare
at daily while eating cereal.
3) Safety (because we like eyebrows where they are)
- Ventilation: Open windows and use a fan when using alcohols, strippers, or heat.
- Fire safety: Many solvents (and the fumes) are flammable, so keep them away from flames and sparks.
- Gloves: Chemical-resistant gloves are a smart move for strippers and solvents.
- Dust caution: Sanding creates dust. Use a mask/respirator and clean up carefully.
4) One important note about older homes (built before 1978)
If you’re removing paint from older trim, windows, doors, or built-ins, it’s worth considering lead-paint precautions.
Lead paint is more likely in homes built before 1978, and disturbing old paint can create hazardous dust. If this might apply,
follow lead-safe renovation guidance and consider professional testing before aggressive scraping or sanding.
5 Ways to Remove Acrylic Paint from Wood
Way #1: Dish Soap + Warm Water (Best for fresh or slightly tacky paint)
If the paint is still wetor only recently driedstart here. This is the least risky method for most finishes and the easiest
way to avoid turning a small spill into a full furniture-refinishing saga.
What you’ll need
- Warm water
- Dish soap
- Soft microfiber cloths
- Plastic scraper or an old credit card
- (Optional) Soft toothbrush for grooves
Steps
- Blot, don’t smear: If the paint is wet, blot up excess with a dry cloth or paper towel.
- Make suds: Mix warm water with a small squirt of dish soap.
- Soften the paint: Dampen a cloth (not dripping) and lay it over the paint for 1–2 minutes.
- Lift gently: Wipe with the grain. Use a plastic scraper to lift paint without gouging wood.
- Detail work: Use a soft toothbrush for corners, carvings, or wood grain texture.
- Dry promptly: Wipe with a clean dry cloth so water doesn’t sit on the wood.
Pro tip: On finished wood, avoid soaking the area. You want “damp,” not “mini indoor pool.”
Way #2: Isopropyl (Rubbing) Alcohol (Best for dried acrylic on sealed woodwhen used carefully)
Once acrylic paint dries, it becomes more stubborn and often needs a solvent to break it down. Rubbing alcohol is a common
choice because it can soften many water-based paints without being as aggressive as harsher solventsthough it can still dull
certain finishes. Work slowly, test first, and stop if the finish starts looking cloudy or sticky.
What you’ll need
- Isopropyl alcohol (70% can work; 90%+ often works faster)
- Cotton balls or soft cloths
- Plastic scraper
- Clean water + soap for a final wipe
Steps
- Test: Dab alcohol on a hidden spot. Wait a minute. Wipe. Check for dulling or finish damage.
- Dab, don’t flood: Wet a cotton ball/cloth with alcohol and dab the paint. Don’t pour alcohol directly onto wood.
- Let it work: Hold the damp cotton/cloth on the spot for 15–45 seconds to soften the paint.
- Lift: Gently scrape softened paint with a plastic scraper, then wipe with a clean cloth.
- Repeat as needed: Work in small sections until paint is gone.
- Finish: Wipe with a lightly soapy cloth, then dry.
Safety note: Isopropyl alcohol is flammable. Use it with good ventilation and keep it away from heat sources.
If you’re also using a heat gun later, let the area fully air out first.
Way #3: Heat (Hair Dryer or Heat Gun) + Gentle Scraping (Best for thicker, fully dried paint)
Heat softens dried paint so you can lift it off the surface. This method is popular for larger areas, old drips,
and paint that laughs at soap and water. The tradeoff: too much heat can scorch wood or damage finishes, so patience matters.
What you’ll need
- Hair dryer (lower risk) or heat gun (faster, higher risk)
- Plastic scraper or putty knife (use gently)
- Clean cloth
- Fine steel wool or nylon pad (optional, for residuetest first on finishes)
Steps
- Start low: Use the lowest heat that softens the paint. Keep the tool moving constantly.
- Watch for softening: When paint looks slightly glossy or pliable, stop heating that area.
- Scrape gently: Lift paint with a scraper at a shallow angle, working with the grain.
- Wipe residue: Use a clean cloth to wipe away softened paint bits.
- Repeat in sections: Small sections reduce overheating and improve control.
Finish-friendly tip: If you’re working on a glossy finished surface, a hair dryer often gives enough softening
without the “oops-I-made-toast” temperature risk of a heat gun.
Way #4: Citrus- or Soy-Based Paint Stripper (Best for multiple layers or stubborn paint on woodwork)
When acrylic is thick, old, or layeredor when you want a more “set it and let it do the work” approacha gel paint stripper can
break down the paint so you can scrape it off. Citrus and soy-based options are often chosen for lower odor and longer working time.
Always follow the product label, protect nearby surfaces, and plan for cleanup.
What you’ll need
- Citrus/soy paint stripper gel
- Disposable brush
- Plastic wrap (optional but helpful to keep the stripper wet)
- Plastic scraper
- Nylon brush/toothbrush for details
- Rags + mild soap and water for cleanup
- Chemical-resistant gloves
Steps
- Protect: Cover floors and tape off areas you don’t want stripper touching.
- Apply generously: Brush on an even coat thick enough to stay wet.
- Cover (optional): Lay plastic wrap over the stripper to slow evaporation and boost effectiveness.
- Wait: Follow label timing. Check periodically; paint should bubble or soften.
- Scrape: Lift softened paint with a plastic scraper.
- Detail scrub: Use a nylon brush for crevices.
- Clean thoroughly: Wipe off residue per label directions, then let the wood dry completely.
Realistic expectation: Stripper often removes “most” of the paint, then you still do a light sanding to smooth
things out. Think of it as teamwork: chemistry does the heavy lifting, sandpaper does the final polishing.
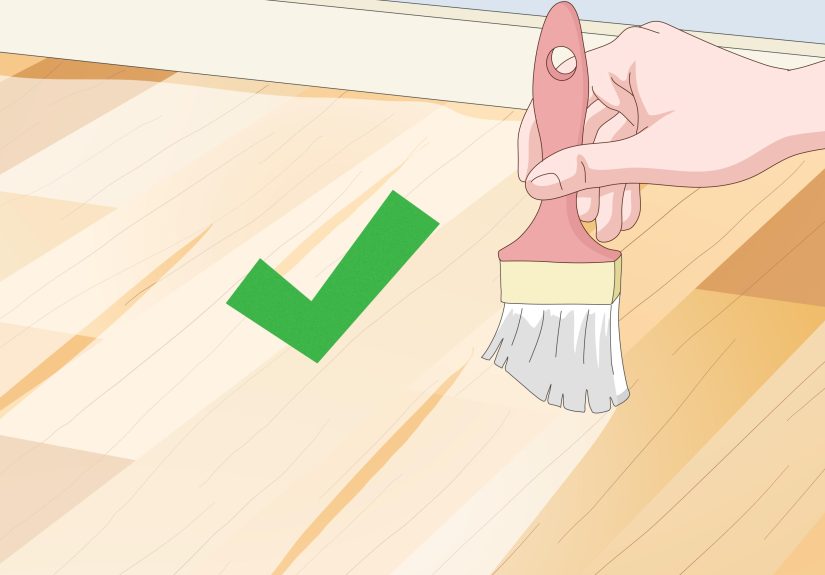
Way #5: Mechanical Removal (Plastic Scraper + Sanding) (Best for leftover haze, paint in the grain, or final cleanup)
Sometimes the paint is mostly gone, but a faint tint remainsespecially on unfinished wood or open-grain species like oak.
Mechanical removal is the go-to for finishing the job, but it can alter the wood surface, so it’s best used thoughtfully.
What you’ll need
- Plastic scraper or putty knife
- Fine-grit sandpaper (start around 220; go finer if needed)
- Sanding block or orbital sander (optional)
- Tack cloth or slightly damp microfiber cloth
- Vacuum (to remove dust)
Steps
- Scrape first: Remove any raised paint with a plastic scraper to reduce sanding time.
- Sand with the grain: Use light pressure. The goal is paint removal, not carving your initials into the table.
- Feather edges: Blend the boundary between cleaned and uncleaned areas so the surface looks uniform.
- Clean dust: Vacuum and wipe down thoroughly before applying any new finish or paint.
Important: Sanding can change sheen on finished pieces. If the wood is stained/finished and you sand through the topcoat,
you may need to spot-refinish or refinish the whole surface for a consistent look.
Which Method Should You Use? A Quick Decision Guide
- Paint still wet: Start with Soap + Warm Water.
- Small dried splatter on sealed wood: Try Rubbing Alcohol (spot test first).
- Thicker dried paint blobs: Use Heat + Gentle Scraping.
- Large areas / multiple layers: Choose a Citrus/Soy Stripper.
- Leftover haze or paint in the grain: Finish with Scraper + Sanding.
Common Mistakes (So You Don’t Accidentally Start a “Refinishing Era”)
1) Using metal scrapers like a medieval knight
Metal scrapers can gouge wood fast. If you use one, keep the angle shallow, pressure light, and consider a plastic tool for safer work.
2) Soaking wood with water or solvent
Wood swells and finishes can haze when they’re over-wet. Apply cleaners to a clothnot the woodand work in small sections.
3) Mixing methods without letting fumes clear
Solvents plus heat can be a bad combo. If you use alcohol or stripper, let the area dry and ventilate thoroughly before switching to a heat tool.
4) Skipping the “hidden spot” test
Finishes can react differently than you expect. A 30-second test can save you hours of “why is this sticky now?”
FAQs
Will rubbing alcohol damage a wood finish?
It can. On some finishes, alcohol may dull sheen or soften the topcoat. That’s why spot-testing is non-negotiable. If the finish changes,
stop and switch to a gentler option (or plan for refinishing).
Can I use acetone or nail polish remover?
Acetone is strong and can damage many finishes quickly. It’s typically a last resort for tiny, stubborn spotsand only after a careful test.
If you value the finish, you’ll usually have better luck with rubbing alcohol, gentle heat, or a finish-safe stripper.
What if the paint soaked into unfinished wood?
When acrylic gets into open grain, it may take a combination approach: soften and lift what you can (soap/water or alcohol), then do light sanding
to remove tinted fibers. Expect to refinish that area if you want the wood to match perfectly.
How do I clean up after using a stripper?
Follow the product label instructions for residue removal. Many gels require thorough wiping/scrubbing and full drying time before you stain or seal.
Rushing this step can cause adhesion problems with the new finish.
Conclusion
Removing acrylic paint from wood is mostly about matching the method to the situation. Fresh paint usually gives up with soap and warm water.
Dried paint often needs rubbing alcohol, controlled heat, or a gentle stripper. And when there’s still a ghost of paint haunting the grain,
sanding is the final exorcism.
The biggest secret? Go slow, test first, and treat the wood finish like it’s a fragile friendship. Do that, and you’ll remove the paint
without turning your coffee table into a “rustic, accidentally sanded” statement piece.
Real-World Experiences and Lessons from the Acrylic-Paint Trenches (Extra )
Most people don’t wake up and say, “Today I will remove acrylic paint from wood.” It usually starts with something innocent:
a kid’s art project, a “quick” craft night, a furniture flip attempt, or an enthusiastic dab of paint that lands three inches outside the drop cloth.
And thenbamyou’re negotiating with dried pigment like it owes you rent.
One of the most common scenarios is the fresh spill on a sealed table. The good news is fresh acrylic often lifts easily.
The bad news is panic makes people scrub like they’re trying to erase their browser history. In real life, the best outcome usually comes from
slowing down: blot first, then warm soapy water, then gentle scraping with something plastic. People who rush tend to spread the paint into a wider,
thinner smearlike turning a single footprint into a full crime scene.
Another classic is the dried splatter on baseboards. This often happens when someone paints a wall (latex) and also had acrylic nearby for touch-ups,
crafts, or “fun accents.” Once the splatter dries, many DIYers discover the awkward truth: you can’t bully it off with just a damp rag.
This is where rubbing alcohol becomes the MVPif you test first. Many people report the “oh wow” moment when the paint softens and lifts in little curls.
But the other real-world lesson is that some trims have finicky finishes, and alcohol can dull them. The most successful attempts tend to be careful dabbing in
small sections instead of soaking the area and hoping for the best.
Then there’s the antique dresser situation, where the paint isn’t just on topit’s in every carved detail like it paid for a season pass.
In these cases, the process is usually a combination: a gel stripper to do the heavy work, plastic scrapers for the flat areas, and a nylon brush for the details.
The “experience” takeaway here is patience. People who expect one application to remove everything are often disappointed.
The folks who get good results treat it like a slow-cooker recipe: apply, wait, scrape, repeat, then clean thoroughly and let it dry fully.
Finally, there’s the heartbreak of unfinished wood: raw pine shelves, bare plywood projects, or DIY boards that never got sealed.
Acrylic can sink into the grain and stain the fibers. In real-world attempts, the paint may come off the surface but leave a tinted shadow behind.
The most practical fix is often light sanding and then refinishing the areasometimes the whole boardto make the color even again.
It’s not failure; it’s just woodworking’s way of saying, “Next time, seal me first.”
The overall lesson people learn (usually after the first mistake) is simple:
start gentle, test first, and escalate slowly. That approach protects the finish, saves time, and keeps your project from turning into a full
weekend of accidental furniture restoration. And if you do end up refinishing? Congratulationsyou’ve officially leveled up from “paint remover” to “wood whisperer.”


