Table of Contents >> Show >> Hide
- Before You Start: Figure Out the “Right” Height (So You Don’t Create a New Problem)
- Way #1: Use Furniture Risers (Fastest, Easiest, Surprisingly Effective)
- Way #2: Install Adjustable Leveling Feet (Small Height Boost + No More Wobble)
- Way #3: Replace the Table Legs with Taller Ones (Clean Look, Big Upgrade)
- Way #4: Add Locking Casters (Height + Mobility, Great for Work Tables)
- Way #5: Build a Platform Base (Most Stable for Big Height Changes)
- How to Choose the Best Method (A Quick Decision Guide)
- Safety & Stability Checklist (Do This Every Time)
- Conclusion: Taller Table, Happier Back
- Extra: Real-World Experiences & Lessons People Learn the Hard Way (So You Don’t Have To)
- 1) “I raised the table… and now my chair feels wrong.”
- 2) “Risers worked… until the floor betrayed me.”
- 3) “The table is taller, but it looks… awkward.”
- 4) “Casters made it tall and mobile… but it wobbles when I type.”
- 5) “I drilled for leveling feet and accidentally went off-center.”
- 6) “The ‘best’ setup is sometimes a combo.”
Your table is too short. Your back is mad. Your coffee cup is somehow at “gremlin height.” Whatever the reasonnew chair, new rug, new posture goals, or you’re just tall and tired of living in a world built for hobbits raising a table is usually easier (and cheaper) than replacing it.
The trick is picking the right method for how much height you need and how stable the table must be. A dining table that wobbles during spaghetti night is a tragedy. A desk that tilts while you’re typing is an immediate villain origin story. Let’s fix it.
Before You Start: Figure Out the “Right” Height (So You Don’t Create a New Problem)
“Raise the table” sounds simple until you realize you can raise it into a new circle of ergonomic chaos. Use these quick checks first:
Quick height check for desks & work tables
- Sit in your normal chair with shoulders relaxed. Bend your elbows so your forearms are roughly parallel to the floor. Your keyboard/working surface should land around that elbow level (or slightly below).
- If you raise the desk a lot, you may also need to raise the chairor add a footrestso your feet stay supported.
Quick height check for dining tables
- Most standard dining setups work best when the table height pairs comfortably with your chair seat height. If you change one, you may need to adjust the other.
- Aim for comfortable leg clearance: the underside/apron shouldn’t bonk knees, and chairs should slide in without drama.
Pro move: Measure the height you want before buying anything. Stack books or sturdy wood scraps under each leg (temporarily), test it for a day, then measure the difference. That number is your target lift.
Way #1: Use Furniture Risers (Fastest, Easiest, Surprisingly Effective)
Furniture risers (also called table risers, bed risers, or leg risers) are the “I need this taller by dinner” solution. They sit under the legs and instantly add heightoften 1 to 6 inches, sometimes stackable for more.
Best for
- Adding 1–4 inches quickly
- Tables with straight legs that sit flat
- Renters or anyone who wants a no-tools option
Watch-outs
- Stability: The higher you go, the more leverage (and wobble) you can introduceespecially on narrow-legged tables.
- Floor protection: Hard plastic on hardwood can scuff. Look for rubberized bases or add felt pads.
- Weight ratings: Risers are often rated per riserdon’t guess; check the packaging/specs.
Expert tips for risers
- Choose the right “cup” size. The leg should sit snugly in the recessed topno teetering.
- Use risers on a flat surface. If your floor is uneven, fix that wobble first (see leveling feet in Way #2).
- Do the wobble test. After installing, gently push the table from different sides. Any rocking means you need a different riser style, added grip pads, or a different method.
- Keep it consistent. Use the same riser height on every leg (unless you’re deliberately leveling a slope).
Real example: A craft table that’s 2 inches too low for comfortable cutting can often be fixed with 2-inch risers plus non-slip padsno drilling, no sawdust, no existential crisis.
Way #2: Install Adjustable Leveling Feet (Small Height Boost + No More Wobble)
Adjustable leveling feet (also called levelers, furniture glides, or leveling legs) are the quiet heroes of table stability. They’re designed to correct uneven floors and can add a bit of heightoften from a fraction of an inch up to a couple inches, depending on the style.
Best for
- Adding about 1/4 inch to ~2 inches
- Fixing a wobbly table while gaining height
- Work tables, desks, and dining tables where stability matters
How it usually works
- You drill a centered hole in the bottom of each leg and install a threaded insert (or a T-nut), then screw in the adjustable foot.
- You fine-tune height by turning the foot in/out; many setups also use a jam nut to lock the adjustment.
Expert tips for leveling feet
- Get the thread size right. Common hardware uses sizes like 5/16″-18 or 1/4″-20. Match the foot, insert, and any mounting plates so they play nice together.
- Drill straight. A crooked hole creates a crooked foot… which creates a crooked life.
- Lock it in. If your kit includes a jam nut, use it. It helps prevent the feet from slowly turning over time.
- Protect floors. Choose feet with rubber pads for hard flooring, or add felt if needed.
Real example: Your dining table rocks because the floor is slightly uneven. Leveling feet can steady it and add a subtle height bumpenough to clear a thick rug edge or stop chair arms from bumping the apron.
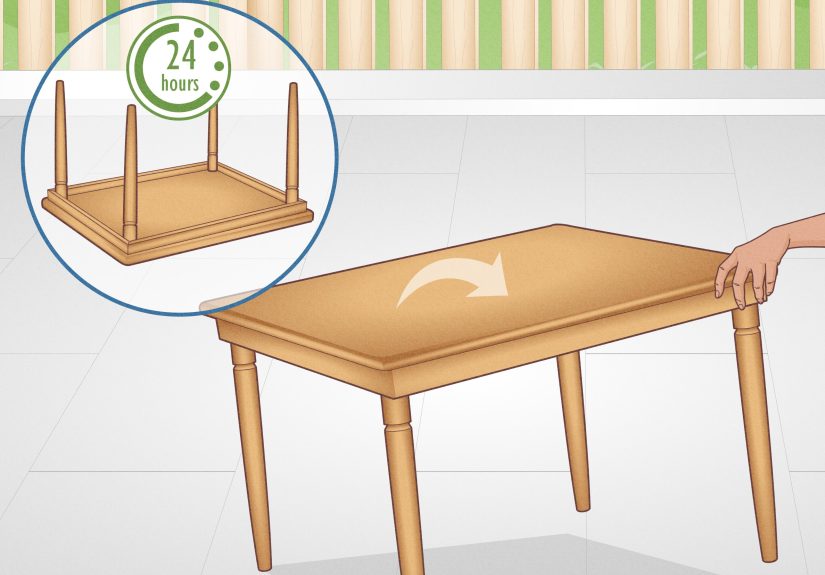
Way #3: Replace the Table Legs with Taller Ones (Clean Look, Big Upgrade)
If you want the table to look like it was always meant to be taller, replacing the legs is the most “finished” option. This can be as simple as buying taller legs in a matching styleor as custom as turning new legs or hiring a local woodworker.
Best for
- Adding 2–8+ inches (or more) in a stable way
- Upgrading style while solving height issues
- Tables with legs that can be removed (or modified) safely
What to check before buying legs
- How the current legs attach: screws into corner blocks, mounting plates, hanger bolts, brackets, etc.
- Apron/structure: a table with a solid apron and corner blocks is usually easier to reinforce than a flimsy frame.
- Footprint: going taller can increase tipping risk on narrow basesespecially on pedestal or small side tables.
Expert tips for swapping legs
- Measure twice, buy once. Measure current floor-to-top height and calculate the exact leg length you need. Remember: leg length + top thickness = total height.
- Use proper mounting hardware. Many legs use hanger bolts that screw into mounting plates. Predrill holes to avoid splitting wood.
- Reinforce if needed. If the table frame is lightweight, add corner braces or stronger corner blocks before installing taller legs.
Real example: You bought a gorgeous vintage dining table that’s a bit low. Taller replacement legs (in a similar style) can lift it to a more comfortable height without changing the tabletop.
Way #4: Add Locking Casters (Height + Mobility, Great for Work Tables)
Casters are the “make it taller and roll it around” option. They’re popular for workbenches, craft tables, home office desks, and dining tables that moonlight as event furniture. Many caster sets add a couple inches of height, and some heavy-duty designs add even more.
Best for
- Adding about 2–5 inches (varies by caster size/design)
- Tables you want to move regularly
- Workspaces where cleaning/access matters
Non-negotiables
- Use locking casters. Prefer styles that lock both the wheel and the swivel if possible.
- Confirm load ratings. Check capacity per caster and total capacity for the table’s weight + whatever you put on it.
- Mount them correctly. A caster that isn’t seated flush or is under-tightened can wobble or loosen over time.
Expert tips for casters
- Choose the right mount type. Plate-mount casters need a flat mounting surface. Stem casters require compatible sockets/inserts.
- Go wider for stability. A slightly larger wheel or wider stance can feel steadier on imperfect floors.
- Re-check hardware. After a week of use, tighten fasteners againthings can settle.
Real example: A standing desk frame that’s almost tall enough can sometimes gain meaningful height with locking casters, while also making the desk easier to reposition for cable access.
Way #5: Build a Platform Base (Most Stable for Big Height Changes)
If you need a significant height increase and want rock-solid stabilityespecially for heavy dining tables, conference tables, or anything that gets leaned onconsider a platform base (also called a plinth). Instead of “making legs longer,” you raise the entire table with a sturdy, level structure underneath.
Best for
- Adding 3–8+ inches with maximum stability
- Heavy tables or tables used by kids (aka tiny chaos engineers)
- Situations where you don’t want to modify the original legs
Platform base ideas
- Simple plywood plinth: Build a box with internal bracing; add trim to make it look intentional.
- Low riser frame: A perimeter frame under the legs spreads load and can reduce point pressure on floors.
- Hybrid approach: A small platform (1–2 inches) plus leveling feet can solve both height and uneven-floor issues.
Expert tips for platforms
- Make it wider than you think. A broader base improves stability and reduces tipping risk.
- Level it precisely. Use shims or leveling feet on the platform itself if needed.
- Finish the edges. Trim + paint/stain turns “wood box” into “custom pedestal.”
Real example: You need a dining table 6 inches higher for tall stools. A reinforced platform base can lift the table and keep it sturdy, without relying on ultra-tall, wobble-prone legs.
How to Choose the Best Method (A Quick Decision Guide)
- Need 1/4–1 inch? Start with leveling feet or thicker glides.
- Need 1–3 inches fast? Furniture risers are the simplest.
- Need 2–6+ inches and want it to look “built that way”? Replace the legs.
- Need height + mobility? Locking casters (installed correctly) are a win.
- Need big height + maximum stability? Build a platform base.
Safety & Stability Checklist (Do This Every Time)
- Rock test: Push gently from multiple sides. If it moves, fix it before daily use.
- Check joints: Taller setups amplify loose joinery. Tighten screws and reinforce wobbly aprons/corner blocks.
- Mind the center of gravity: Raising a narrow table increases tipping riskespecially with kids, pets, or rolling chairs.
- Protect floors: Rubber for grip, felt for glide, and always verify the table sits fully supported.
- Don’t “mix-and-match” randomly: If you combine methods, do it intentionally (e.g., small platform + levelers).
Conclusion: Taller Table, Happier Back
Raising the height of a table doesn’t have to be complicatedor expensive. If you want speed, go risers. If you want stability plus fine-tuning, install leveling feet. If you want a “factory look,” swap the legs. If you want mobility, add locking casters. And if you want maximum stability for a big lift, build a platform base.
Pick the method that matches your target height, the table’s purpose, and your tolerance for wobble. Your spine will thank you, your coffee won’t slosh, and your table will finally stop acting like it’s trying to be a footstool.
Extra: Real-World Experiences & Lessons People Learn the Hard Way (So You Don’t Have To)
Here’s the part nobody tells you until you’ve already bought “the perfect solution,” installed it in 20 minutes, and then noticed the table feels like a baby deer learning to stand. These are common experiences DIYers, renters, and workshop folks run into when raising a tableplus how they fix them.
1) “I raised the table… and now my chair feels wrong.”
This is the #1 surprise. You lift the table 2 inches, and suddenly your chair is too low, your shoulders creep upward, and you’re typing like a T-Rex wearing a business suit. The fix is usually simple: raise the chair if possible, then make sure your feet still land firmly on the floor. If they don’t, add a footrest (even a sturdy box works temporarily). The goal isn’t just “higher table”it’s “neutral posture without drama.”
2) “Risers worked… until the floor betrayed me.”
On perfectly flat flooring, risers can feel stable. On slightly uneven floors (or older homes with a subtle slope), risers can amplify wobble because you’ve introduced a taller “stack” under each leg. A common workaround is combining risers with grippy pads, or switching to adjustable leveling feet that let you micro-tune each corner. If you’re in a rental and can’t drill, you can sometimes reduce wobble by using risers with wider bases and rubberized bottoms, or by placing thin non-slip furniture pads beneath the risers.
3) “The table is taller, but it looks… awkward.”
Some people love the utility look; others want it to feel intentional. This is where leg replacement shines. Taller legs in a matching style can make the table look “right” again. If you can’t replace legs, a platform base can also look custom when you add trim and paint/stain it to match the table. The lesson: if the table is a visual centerpiece (dining room, entryway, living room), the “cleanest” solution is often worth it.
4) “Casters made it tall and mobile… but it wobbles when I type.”
Mobility comes with trade-offs. If casters aren’t mounted flush, if screws are undersized, or if you choose casters that only lock the wheel (not the swivel), you can get that annoying side-to-side wiggle. People who are happiest with caster setups tend to: (a) choose heavier-duty locking casters, (b) mount them to solid wood (not weak particleboard edges), (c) re-tighten hardware after a few days of rolling and braking, and (d) avoid tiny wheels on rough floors. When done right, casters are fantasticespecially in workshops. When done “close enough,” they’re a daily reminder that physics is undefeated.
5) “I drilled for leveling feet and accidentally went off-center.”
It happens. A slightly off-center hole can make the foot sit at a mild angle, which can reduce stability or make adjustment feel gritty. The typical fix is slowing down and using a center punch (or even a nail) to mark the drill point, then drilling a clean pilot hole. DIYers also learn quickly that inserts and T-nuts are happiest in solid wood, and can be finicky in crumbly materials. If your table legs are hollow, thin, or made from low-density particleboard, you may be better off with external risers, leg replacement, or a platform base.
6) “The ‘best’ setup is sometimes a combo.”
One of the most practical real-world outcomes is a hybrid approach: a small platform base (for major height gain) plus leveling feet (for fine tuning), or replacement legs plus felt/rubber glides (for stability and floor protection). The key is intentionalitystacking random parts can create a tower of wobble. But combining a structural solution with an adjustment solution can produce a table that’s taller, sturdier, and more comfortable than the original.
Bottom line: raising a table is absolutely doable, and it’s often a one-afternoon upgrade. Just treat stability like a first-class requirementnot an optional accessoryand you’ll end up with a table that feels better to use and lasts longer.


