Table of Contents >> Show >> Hide
- Before You Start: Make Your Pumpkin Projects Look Better (and Last Longer)
- 45 Pumpkin Decorating Ideas (No Stress, Maximum Halloween Energy)
- Painted & Patterned Pumpkins (Clean, Classic, and Totally Custom)
- 1) Matte black “modern Halloween” pumpkin
- 2) Color-block pumpkin
- 3) Polka-dot party pumpkin
- 4) Drippy paint “melting” pumpkin
- 5) Plaid pumpkin
- 6) Ombre pumpkin
- 7) Splatter-paint pumpkin
- 8) Chalkboard pumpkin
- 9) Hand-lettered pumpkin (fake calligraphy encouraged)
- 10) Leopard-print pumpkin
- 11) “Galaxy” pumpkin
- 12) Stamped pattern pumpkin
- Glam, Metallic & “I’m Here to Impress the Neighbors”
- Texture & Mixed-Media (Because Flat Is Boring)
- Cute Characters & Kid-Friendly Creatures
- Nature-Inspired & Harvest Chic
- Classic Spooky (For People Who Like a Little “Eek!”)
- How to Make Your Decor Look Intentional (Even If It Was a Last-Minute Panic Craft)
- Final Thoughts: Your Porch Doesn’t Need PerfectionIt Needs Personality
- Extra: of Real Pumpkin-Decorating Experience (So You Don’t Repeat My Mistakes)
Pumpkin season is basically craft season with a side of snacks. And whether you’re team “classic jack-o’-lantern” or team “I refuse to scoop pumpkin guts ever again,” decorating pumpkins is one of the easiest ways to make Halloween feel like Halloweenwithout needing an art degree, a woodshop, or a therapist on standby.
This guide packs 45 pumpkin decorating ideas you can actually pull offranging from quick no-carve upgrades to more “wow, you made that?!” moments. You’ll also get practical tips on choosing pumpkins, keeping them looking fresh, and avoiding the classic mistake of using a real candle and turning your porch into a tiny sauna (for the pumpkin).
Before You Start: Make Your Pumpkin Projects Look Better (and Last Longer)
1) Pick the right pumpkin for the job
For painting, decoupage, and glam details, look for smooth, firm pumpkins with minimal scars. For stacking or topiary-style decor, choose flat-bottomed pumpkins that sit without wobbling. White pumpkins are a cheat code for bright colors and modern looks.
2) Clean it like you mean it
Wipe the pumpkin down with a damp cloth and let it fully dry. If you’re painting, a clean surface helps paint stick evenly. If you’re carving, cleaner surfaces mean fewer weird fuzzy science experiments later.
3) Carving? Consider the “cut-from-the-bottom” method
If you’re making a jack-o’-lantern, cutting the opening from the bottom (instead of around the stem) helps with structure and can reduce caving. Bonus: it’s easier to place a light without playing pumpkin Jenga.
4) Use safe lighting
Battery-operated tea lights or LED strings are your best friend. Heat dries pumpkins faster and speeds up the “why does my pumpkin look sad?” timeline.
5) Seal to protect your masterpiece
For painted pumpkins, a clear craft sealer (spray or brush-on) helps prevent scuffs and moisture damage. If you used glitter, fabric, or paper, sealing is the difference between “festive” and “my porch is permanently sparkly.”
6) Want it to last longer? Moisture management matters
Carved pumpkins deteriorate fastest at exposed cut edges. Many decorators lightly coat cut edges to reduce dehydration. If you use any preservation trick, pair it with LED lighting and keep pumpkins shaded when possible.
45 Pumpkin Decorating Ideas (No Stress, Maximum Halloween Energy)
Painted & Patterned Pumpkins (Clean, Classic, and Totally Custom)
1) Matte black “modern Halloween” pumpkin
Paint a pumpkin matte black, then add one crisp detail: a white spider, a gold monogram, or a tiny “BOO.” It’s minimalism, but make it spooky.
2) Color-block pumpkin
Tape off clean sections and paint bold stripes. Try fall tones (rust, cream, sage) or go wild with neon. The tape does the heavy liftingyour job is to pretend you planned it all along.
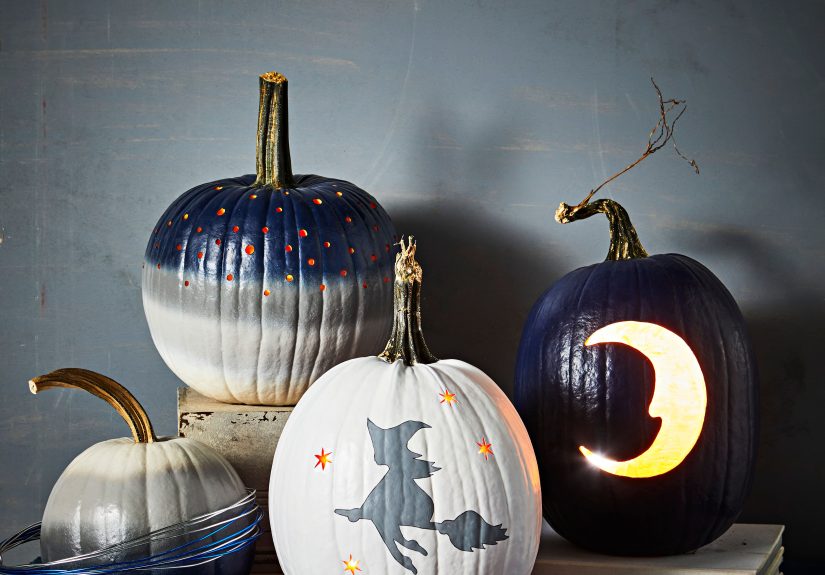
3) Polka-dot party pumpkin
Use a sponge dauber, a pencil eraser, or even a wine cork to stamp dots. Mix dot sizes for a playful look that reads “cute,” not “kindergarten art project” (unless that’s the vibe, then commit).
4) Drippy paint “melting” pumpkin
Pour or brush thick paint from the stem area so it drips down like candle wax. Use white for ghosty vibes, red for classic horror, or rainbow for “Halloween but make it happy.”
5) Plaid pumpkin
Yes, plaid on a pumpkin is possible. Use thin tape lines to create a grid, paint over it, then peel. Add a second color in the opposite direction for a cozy, flannel-inspired finish.
6) Ombre pumpkin
Blend from dark at the bottom to light at the top (or vice versa). Use a dry brush to soften transitions. It’s surprisingly forgiving because pumpkins already have natural shadingthank you, nature.
7) Splatter-paint pumpkin
Put the pumpkin in a box, load a brush, and splatter away. This looks especially good on white pumpkins. Wear an old shirt unless you want “abstract art” permanently on your laundry day outfit.
8) Chalkboard pumpkin
Paint with chalkboard paint and write messages like “Trick or Treat,” puns, or a nightly countdown to Halloween. It doubles as decor and a family scoreboard for who ate the most candy.
9) Hand-lettered pumpkin (fake calligraphy encouraged)
Use paint markers to write “BOO,” “EEK,” or a spooky family nameplate. If you’re not confident, sketch lightly in pencil first. Confidence is 40% of lettering anyway.
10) Leopard-print pumpkin
Paint a tan base, add uneven spots in brown, then dot black around the edges. It’s glam, it’s bold, and it pairs beautifully with gold accents.
11) “Galaxy” pumpkin
Blend navy, purple, and black, then flick white paint for stars. Add a few larger dots as “planets.” Halloween, but for the kids who grew up and now own a lava lamp.
12) Stamped pattern pumpkin
Use stamps or stencils for repeating shapesstars, bats, moons, florals. A simple repeating pattern looks high-end fast, especially when you stick to two colors.
Glam, Metallic & “I’m Here to Impress the Neighbors”
13) Gold-dipped pumpkin
Paint the bottom half metallic gold and leave the top natural. It’s a fancy dessert… but for your porch.
14) Copper foil pumpkin
Add thin metallic leaf (or metallic adhesive sheets) in irregular patches. The imperfect edges look intentionallike distressed jeans, but seasonal.
15) Glitter gradient pumpkin
Start dense at the bottom and fade upward. Seal well, unless you’d like your entire life to sparkle until March.
16) Rhinestone constellation pumpkin
Place tiny stick-on gems as star clusters. Keep it sparse for “celestial chic” or go full disco meteor shower.
17) Sequin “scale” pumpkin
Pin sequins in overlapping rows like mermaid scales. Try black sequins for a moody look or iridescent for “Halloween under the sea.”
18) “Marble” pumpkin
Use a water-marbling technique (or a paint swirl look) for a luxe finish. Stick with white/gray for modern marble or black/red for dramatic Halloween stone.
Texture & Mixed-Media (Because Flat Is Boring)
19) Decoupage napkin pumpkin
Use patterned paper napkins and a decoupage medium to wrap the pumpkin in florals, vintage prints, or spooky motifs. It’s basically wallpaper for gourds.
20) Book-page pumpkin
Tear old book pages and decoupage them in overlapping layers. Add a black ribbon at the stem for a “spooky library” vibe. (Bonus points if the book was already falling apart.)
21) Lace-wrapped pumpkin
Wrap lace fabric around a pumpkin and secure with pins or glue. It’s elegant and slightly hauntedlike your great-aunt’s antique curtains, but cooler.
22) Yarn-wrapped pumpkin
Wrap thick yarn around the pumpkin’s midsection to create stripes, hearts, or a big chunky band. It’s cozy and kid-friendly, with zero sharp tools.
23) Button mosaic pumpkin
Glue buttons in tight clustersmake a heart, initial, or scattered pattern. This is a great “use up the craft bin” project that looks intentionally quirky.
24) Pushpin monogram pumpkin
Outline a big letter with pushpins, then fill it in. It’s simple, fast, and makes a great front-porch “this is our house” marker.
25) Fabric patchwork pumpkin
Cut fabric shapes (diamonds or squares) and glue them in a patchwork design. Choose flannel for cozy or satin for drama.
26) “Sweater pumpkin”
Cut the sleeve from an old sweater, slip it over the pumpkin, and tie it at the stem with twine. It looks charmingly rustic and hides a multitude of pumpkin sins.
Cute Characters & Kid-Friendly Creatures
27) Googly-eye monster pumpkin
Paint a bold base color, then add a chaotic cluster of googly eyes. Instant monster. Optional: add felt teeth for maximum silliness.
28) Mummy pumpkin
Wrap gauze strips around the pumpkin, leaving space for two big eyes. It’s easy, adorable, and looks great lined up with other “classic Halloween” designs.
29) Candy-corn hedgehog pumpkin
Add candy corn “spikes” across the back and a felt face on the front. It’s cute enough to make even spooky people smile.
30) Lion pumpkin
Add a paper or felt mane around the pumpkin and simple facial features. It’s the kind of craft that makes kids feel like they discovered a new species.
31) Black cat pumpkin
Paint it black, add triangular ears from cardstock, and give it bright eyes. Keep the face simple for a sleek look or add whiskers for extra charm.
32) Owl pumpkin
Use felt circles for big eyes and layered feathers cut from paper. The round pumpkin shape is basically already an owlnature understood the assignment.
33) Dinosaur pumpkin
Cut “spikes” from foam or felt and attach down the back. Paint the pumpkin green. Congratulationsyou’ve created a prehistoric porch guardian.
34) Unicorn pumpkin
Pastel paint + a shiny horn (craft foam cone) + flowers at the stem. It’s Halloween-adjacent, but kids love it, and sometimes that’s the whole point.
35) Emoji pumpkin
Paint it bright yellow and add a familiar face: heart eyes, silly grin, or shocked expression. It’s a guaranteed crowd-pleaser and a solid photo prop.
Nature-Inspired & Harvest Chic
36) Pressed-flower pumpkin
Decoupage pressed flowers around the pumpkin for a delicate look. Great for fall tablescapes and for anyone who likes their Halloween more “cozy” than “chaotic.”
37) Leaf-decoupage pumpkin
Press real leaves (or use faux) and seal them onto the pumpkin. It looks like autumn moved in and signed a lease.
38) Succulent topper pumpkin
Attach faux succulents around the stem area to create a mini “garden.” It’s a fun centerpiece idea and surprisingly modern.
39) Wheat + twine pumpkin
Wrap twine around the pumpkin and tuck in dried wheat stems. It’s rustic, easy, and pairs well with candles and a plaid blanket you absolutely didn’t buy specifically for Instagram.
40) Pumpkin “vase” centerpiece
Hollow the top just enough to fit a jar (with water), then arrange flowers. It’s functional decorlike a pumpkin that got a job.
41) Cinnamon-stick stem bundle
Glue cinnamon sticks around the stem base to make it look thicker and textured. Add a bow. Your porch will look charming and smell like you’re winning at fall.
Classic Spooky (For People Who Like a Little “Eek!”)
42) Stenciled haunted house silhouette
Paint the pumpkin a pale color, then stencil a black haunted house scene. Add tiny bats for motion. It looks detailed without requiring you to freehand a roofline.
43) “Creepy crawlies” spiderweb pumpkin
Use a paint pen to draw a web and add a plastic spider. The trick: keep the web lines uneven so it looks organic, not like you did it with a ruler and a prayer.
44) Glow-in-the-dark painted pumpkin
Paint a ghost or bones using glow paint over a dark base. Under porch light it’s subtle; at night it’s delightfully eerie. (Test your glow paint firstsome glow like a firefly, some glow like a tired glowworm.)
45) Classic jack-o’-lantern… with upgraded details
Keep the carved face traditional but elevate it with clean lines, symmetrical shapes, and a cut-out “back panel” for easy lighting. Add a second tiny carved pumpkin nearby for a “mini me” moment.
How to Make Your Decor Look Intentional (Even If It Was a Last-Minute Panic Craft)
- Pick a palette: Choose 2–3 colors (black/white/gold, or cream/rust/sage) and repeat them across multiple pumpkins.
- Vary sizes: One big pumpkin, two medium, a few minis. The “cluster” look feels styled instantly.
- Mix textures: Pair one painted pumpkin with one fabric pumpkin and one metallic or decoupage pumpkin.
- Anchor with greenery: Add faux eucalyptus, dried leaves, or hay to ground your display.
- Use LED lighting: It’s safer, cleaner, and keeps pumpkins from drying out fast.
Final Thoughts: Your Porch Doesn’t Need PerfectionIt Needs Personality
The best Halloween pumpkin decorating ideas are the ones that fit your household: kids who want silly monsters, adults who want chic neutrals, and everyone who wants fewer messes and more laughs. Whether you carve, paint, decoupage, or glue half your craft drawer onto a pumpkin, the goal is simplehave fun and make it feel like Halloween.
Extra: of Real Pumpkin-Decorating Experience (So You Don’t Repeat My Mistakes)
After enough Octobers, you learn that pumpkin decorating is less like “arts and crafts” and more like “project management with glitter.” For example: the first time I tried a glitter pumpkin, I thought, “How messy could it be?” The answer is: messy enough that you’ll find sparkles in your sock drawer in February. If you do glitter, do it outside, on a tray, and seal it like you’re protecting a museum artifact. Otherwise, your porch becomes a disco crime scene.
Paint is another lesson. Acrylic paint is usually your friend, but pumpkins are not canvasesthey’re slightly damp, slightly bumpy, and occasionally determined to ruin your vibe. The trick is patience: wipe the pumpkin clean, let it dry, and apply thin coats. Thick paint looks great for exactly ten minutes and then cracks like it’s auditioning for a desert documentary. Also: if you’re painting white over orange, accept that you’ll need more than one coat. Pumpkins do not believe in shortcuts.
Hot glue is the hero and the villain of pumpkin season. It will attach felt, buttons, yarn, and faux flowers like a champuntil you touch the pumpkin two days later and the whole decoration slides off because the pumpkin skin got a little slick. When I want attachments to stay put, I aim for “more contact area”: bigger felt shapes, wider ribbon, or wrapping twine around the pumpkin to physically support the decor. And if you’re crafting with kids, hot glue is an adult jobbecause Halloween is supposed to be scary on purpose, not because someone touched molten glue.
Weather is the silent pumpkin killer. A perfect pumpkin on Monday can look like it’s been through an emotional breakup by Friday, especially if it’s warm or humid. Shade helps. Bringing pumpkins inside overnight helps. LED lights help a lot. If you carve early, you’re basically signing up for pumpkin maintenance like you’re caring for a tiny orange pet. That’s why no-carve pumpkins are underrated: paint, decoupage, fabric, and accessories can last longer and still look festive.
Finally, my favorite “real-life” tip: plan your pumpkins like outfits. Choose one statement pumpkin (glam, detailed, or bold), then keep the rest simpler so the display doesn’t look like a craft store exploded. A matte black pumpkin with a gold monogram looks even better next to a neutral fabric pumpkin and a leaf-decoupage pumpkin. Suddenly you’re not “decorating pumpkins”you’re “curating an autumn entry experience.” Which is a fancy way of saying: your porch looks amazing, and you didn’t have to carve 12 perfect teeth into a smile.


