Table of Contents >> Show >> Hide
- Quick Game Plan Before You Start
- Method 1: Boil, Then Brown in Butter (The Classic Two-Step)
- Method 2: Pan-Sauté / Pan-Fry From Frozen (No Pot, No Problem)
- Method 3: Bake or Air Fry (Hands-Off, Crispy Edges)
- Best Toppings for Frozen Pierogies (Because Accessories Matter)
- FAQ: Cooking Frozen Pierogies Without Drama
- Conclusion
- Bonus: Real-Life Pierogi Experiences (The Stuff That Actually Happens)
- SEO Tags
Frozen pierogies are the underrated heroes of the freezer aisle: little potato-stuffed pillows that can go from “I have nothing planned” to
“I am basically a culinary genius” with minimal effort. They’re cozy, filling, and wildly adaptablekind of like sweatpants, but edible.
In this guide, you’ll learn three reliable ways to cook frozen pierogies so they come out tender inside, nicely browned outside,
and never stuck to the pan like they’re auditioning to become permanent kitchen décor. We’ll cover timing, technique, and flavor upgradesplus a
bonus section at the end with real-life pierogi experiences that will feel extremely familiar.
Quick Game Plan Before You Start
Different brands vary a bit, but most frozen pierogies are designed for straightforward cooking. Your results improve instantly if you do these three things:
- Don’t crowd. Pierogies need space to brown. If they’re piled up, they steam and turn pale (like they’ve seen a ghost).
- Use enough fat. Butter, oil, or a mix helps with browning and prevents sticking. Pierogies love a little shine.
- Control moisture. Moisture is the difference between crisp edges and “why is this slippery?” Dry-heat methods need oil; boiling needs draining.
Keep your favorite toppings readysour cream, sautéed onions, chives, bacon bits, or even pickles. Yes, pickles. Trust the chaos.
Method 1: Boil, Then Brown in Butter (The Classic Two-Step)
If you want the most foolproof “soft inside, golden outside” pierogi, this is it. Boiling heats the filling gently and evenly; a quick pan-brown adds texture and flavor.
This method is also great when you’re cooking a big batch because boiling scales easily.
Best for
- Traditional texture (tender + lightly crisp)
- Feeding a crowd
- Reducing the risk of split pierogies
What you need
- Large pot + salted water
- Slotted spoon or spider strainer
- Skillet + butter (or butter + oil)
- Optional: sliced onions, garlic, bacon, mushrooms
Step-by-step
- Boil water: Bring a large pot of salted water to a steady boil (think “bubbly, not angry ocean”).
- Add frozen pierogies gently: Drop them in one at a time and stir once or twice so they don’t cling together.
- Cook until they float, then give them a little longer:
Once they rise, continue cooking briefly so the filling heats through. As a general rule, frozen pierogies take a few minutes after they float
(many guides land around the 3–5 minute range total, depending on size and brand). - Drain well: Scoop them out with a slotted spoon and let them drain. A quick rest on a towel helps avoid watery sautéing later.
- Brown in a skillet: Melt butter (or butter + a splash of oil) over medium heat. Add onions if using and cook until soft. Then add pierogies in a single layer.
Brown 2–4 minutes per side, until you get the golden spots you deserve. - Finish and serve: Top with chives, pepper, and sour creamor go full diner mode with bacon and caramelized onions.
Flavor upgrades (low effort, high reward)
- Brown butter + sage: Let butter turn nutty-golden, add sage leaves, then toss pierogies. Instant “fancy.”
- Onion jam effect: Cook onions longer until caramelized, then add a splash of water to loosen the fond.
- Smoky skillet: Crisp chopped bacon first, remove, then brown pierogies in the bacon fat.
- Acid = balance: Serve with pickles, sauerkraut, or a squeeze of lemon to cut richness.
Common problems (and the fix)
- “They fell apart in the water.”
- Lower the boil to a gentler simmer and avoid overcooking. Stir carefullypierogies bruise easily.
- “They stuck to the skillet.”
- Use a nonstick skillet or ensure enough fat and preheat properly. Also: don’t flip too soonlet a crust form first.
- “They’re warm but kind of bland.”
- Salt the boil, season the skillet, and finish with something bright (sour cream + chives, or vinegar-y cabbage).
Method 2: Pan-Sauté / Pan-Fry From Frozen (No Pot, No Problem)
This method is for nights when you look at a pot, and your soul whispers, “Not today.” You can cook frozen pierogies entirely in a skillet
and the trick is to use a short steam phase first, then crisp.
Best for
- Fast weeknight cooking
- Crispier pierogies
- One-pan meals (hello, kielbasa)
Step-by-step (steam, then crisp)
- Heat the skillet: Add 1–2 tablespoons butter or oil to a skillet over medium heat.
- Add pierogies: Place frozen pierogies in a single layer. Let them sit for about 1 minute to start browning.
- Steam briefly: Add 2–4 tablespoons water to the skillet (carefulsteam!), then cover with a lid for 3–5 minutes.
This heats the filling gently and prevents the outside from over-browning before the inside wakes up. - Uncover and crisp: Remove the lid, let the water cook off, and continue cooking until browned, flipping occasionally.
- Season and serve: Salt, pepper, garlic powder, paprika, chiveswhatever makes you happy.
Make it a meal: Pierogi & kielbasa skillet (example)
Start by browning sliced kielbasa (or smoked sausage) in the skillet, then remove it. Cook pierogies with the steam-then-crisp method above.
Add sliced onions and bell peppers, sauté until soft, then toss everything together. Finish with mustard on the side and a dollop of sour cream.
It tastes like comfort food that accidentally became efficient.
Crisp control (choose your adventure)
- Softer bite: Longer steam phase, lower heat, more butter.
- Crispier bite: Less steaming, more time uncovered, slightly higher heat near the end.
- Maximum browning: Use a mix of oil (for higher heat) and butter (for flavor).
Method 3: Bake or Air Fry (Hands-Off, Crispy Edges)
If your favorite cooking technique is “set a timer and pretend you’re productive,” this is your method. Dry heat turns pierogies crisp on the outside.
Because frozen foods release moisture, a little oil is key to browning instead of steaming.
Option A: Classic oven bake (simple sheet pan)
- Preheat: 400°F.
- Oil lightly: Toss frozen pierogies with a small amount of oil or spray both sides. (This helps browning and prevents sticking.)
- Spread out: Arrange in a single layer on a sheet pan.
- Bake: Typically 18–20 minutes, flipping halfway, until golden and crisped to your liking.
- Finish: Serve with sour cream, chives, and onionsor turn them into a sheet-pan dinner with veggies and sausage.
Option B: High-heat “roast” for extra browning
Want more color and crunch? Borrow a roasting mindset: higher heat, enough oil, and plenty of space. Some sheet-pan approaches use
a hotter oven (around 450°F) and even preheat the pan so pierogies start sizzling on contact.
- Preheat oven and pan: Place the sheet pan in the oven while it heats.
- Toss pierogies with oil: Coat lightly so the surface browns.
- Roast in stages: Roast, flip, then roast again until golden. Add cabbage, onions, or peppers for a full meal.
- Dress it up: Try a tangy drizzle (mustard + vinegar) or top with Parmesan and toasted nuts for a bold twist.
Option C: Air fryer (the crunch shortcut)
Air frying gives you crisp edges fast, especially for snacks or small batches. Treat it like a tiny convection oven: don’t overcrowd, and shake or flip.
- Preheat (optional but helpful): 400°F.
- Oil lightly: Toss pierogies with a small amount of oil.
- Air fry: Around 10–14 minutes depending on size, shaking or flipping halfway, until browned and hot.
- Serve immediately: Air-fried pierogies are best when they’re still audibly crispy.
Sheet-pan dinner ideas (specific examples)
- Pierogi + kielbasa + peppers/onions: Toss everything with oil, garlic powder, paprika, salt, and pepper. Roast until browned.
- Pierogi + cabbage: Roast pierogies on one pan and chopped cabbage on another, then combine and dress with something tangy.
- Pierogi “nachos”: Bake until crisp, top with cheese, broil briefly, finish with scallions and sour cream.
Best Toppings for Frozen Pierogies (Because Accessories Matter)
Classic toppings
- Sour cream + chives: The standard for a reason.
- Caramelized onions: Sweet, savory, and basically pierogi perfume.
- Bacon + black pepper: Salty crunch meets soft filling.
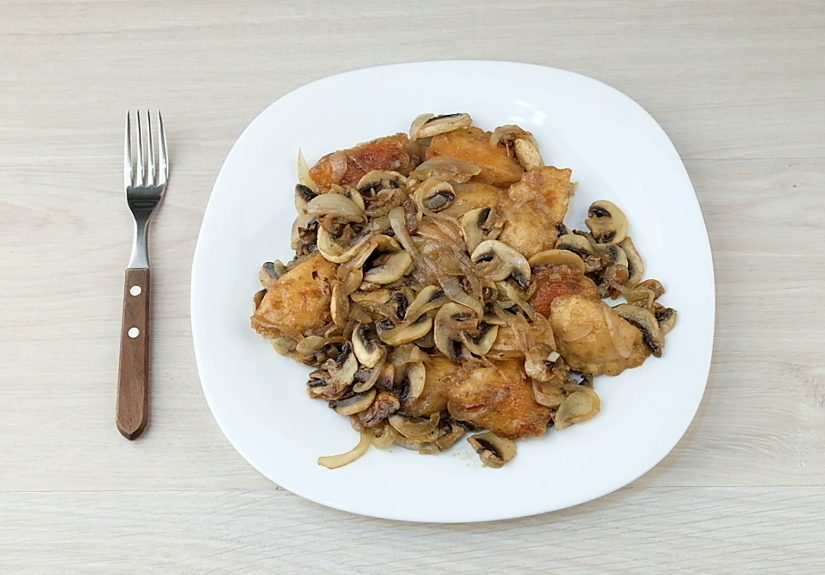
- Sautéed mushrooms: Earthy, cozy, and excellent with thyme.
Unexpected but genuinely great
- Dill pickles: Acid + crunch balances rich pierogies beautifully.
- Hot sauce or chili crisp: Turns pierogies into a snack you “accidentally” finish.
- Mustard drizzle: Especially good with sausage and cabbage combos.
- Applesauce (yes): Sweet-savory contrast can be fantastic with potato fillings.
FAQ: Cooking Frozen Pierogies Without Drama
Do I need to thaw frozen pierogies first?
Usually, no. Most cooking methods are designed for cooking pierogies straight from frozen. Thawing can make them stickier and more fragile.
If you do thaw, handle gently and shorten cook time.
How do I know pierogies are done?
You’re aiming for hot filling and a wrapper that’s tender (boiled/steamed) or crisped (pan/oven/air fryer). If you’re unsure,
cut one open: the center should be steaming hot, not lukewarm. When cooking for someone high-risk, or if your brand’s filling is not fully cooked,
follow the package guidance carefully.
What’s the best method for crispy pierogies?
For maximum crisp: air fryer or pan-fry from frozen with a short steam phase. For “crispy + tender” balance:
boil then brown.
How do I store and reheat leftovers?
Refrigerate cooked pierogies in an airtight container. Reheat in a skillet with a little butter/oil for the best texture, or use an air fryer for a quick re-crisp.
Microwave works, but the wrapper will soften (not a crime, just a vibe).
Conclusion
Frozen pierogies don’t need much help to be deliciousthey just need the right method for the texture you want.
Boil then brown for classic comfort, pan-sauté for speed and crisp edges, or bake/air fry for hands-off crunch.
Keep a bag in your freezer and you’re basically one skillet away from a very good day.
Bonus: Real-Life Pierogi Experiences (The Stuff That Actually Happens)
If you’ve ever cooked frozen pierogies on a weeknight, you know they have two personalities: “effortless comfort food” and “tiny dumpling chaos.”
The good news is that both are manageable. The most common experience is the moment you realize pierogies are the perfect bridge between snack and dinner.
You start with “I’ll make a small portion,” and ten minutes later you’re negotiating with yourself about whether six pierogies counts as a balanced meal
if you eat a pickle spear standing next to the fridge. (Technically, there’s a vegetable involved. We can call it a win.)
Another universal pierogi moment: the first flip. Everyone wants to flip too early. You peek, you prod, you get nervous, and thenboomone pierogi
tears slightly and leaks a little potato. It’s not a disaster; it’s a reminder that pierogies respond best to patience. When the pan is properly heated
and there’s enough butter or oil, they’ll release when they’re ready. Until then, let them be. Pierogies are like introverts: they open up on their own schedule,
and forcing it makes things awkward.
Then there’s the “why are these not crispy?” phase. A lot of home cooks expect frozen pierogies to brown like hash browns, but pierogies carry extra moisture
(ice on the outside, steam trapped inside). If you crowd the pan or sheet pan, you don’t roast or fryyou steam. And steaming is great if you want soft pierogies,
but it will not give you that golden crunch. The experience most people have is learning that space is an ingredient. Spread them out,
use a little oil, and suddenly your pierogies go from pale to proud.
Toppings become their own storyline. You might begin with the classic sour cream and onions, then discover that pierogies are basically a blank canvas for whatever
your pantry is willing to contribute. Some nights, it’s caramelized onions and bacon because you’re feeling traditional. Other nights, it’s garlic powder, smoked
paprika, and a drizzle of hot sauce because you’re feeling like a “fusion chef” who still eats dinner in sweatpants. And then there’s the surprisingly common
experience of adding something acidicpickles, sauerkraut, a mustardy drizzleand realizing that pierogies taste even better when they’re not carrying the full
responsibility of richness on their own.
Finally, pierogies have a special talent for turning into a “memory meal.” People associate them with family dinners, church potlucks, neighborhood festivals,
and freezer-staple comfort. Even when you’re cooking store-bought frozen pierogies, the ritual feels familiar: butter sizzling, onions softening, a bowl of sour
cream hitting the table. That’s part of why the three cooking methods matter. Boiling then browning feels cozy and classic. Pan-sautéing feels like a quick
victory after a long day. Baking or air frying feels like smart minimal-effort planning. No matter which route you take, the experience is the same at the end:
you sit down with a plate of warm, satisfying dumplings and think, “Honestly? The freezer aisle really came through for me today.”