Table of Contents >> Show >> Hide
- Quick navigation
- What makes a tool “essential”?
- Measuring tools (where accuracy lives)
- Mixing & prep tools (where muscles retire early)
- Bakeware & oven helpers (where magic happens)
- Buying tips that save moneyand muffins
- Nice-to-have upgrades (if you bake a lot)
- Real-life baking experiences (aka lessons learned)
- SEO tags
Baking is basically edible science with better PR. The good news: you don’t need a celebrity kitchen, a marble island,
or a sourdough starter with its own Instagram. You just need the right toolstools that make measuring accurate, mixing
efficient, and cleanup slightly less “crime scene.”
Below are 22 essential baking tools that cover the full journey from “I have flour” to “I have cookies.”
I’ll tell you what each tool does, what to look for when buying, and when it’s okay to skip the fancy versionbecause
you deserve great brownies and a reasonable budget.
Quick navigation
- What makes a tool “essential”?
- Measuring tools (where accuracy lives)
- Mixing & prep tools (where muscles retire early)
- Bakeware & oven helpers (where magic happens)
- Buying tips that save moneyand muffins
- Real-life baking experiences (aka lessons learned)
- SEO tags (JSON)
What makes a tool “essential”?
An essential baking tool does at least one of these things: it improves accuracy (so your cake rises instead of sulking),
boosts consistency (so “my cookies are different every time” becomes a funny memory), or reduces friction (so baking feels
like a hobby, not an endurance sport). The list below is built around repeatable resultsthe kind you can brag about
without adding, “but don’t ask me to do it again.”
Measuring tools (where accuracy lives)
1) Digital kitchen scale
If baking had a “most valuable player,” it would be a digital kitchen scale. Measuring by weight is more
consistent than scooping flour into cups (which can pack in extra flour and turn cakes dense). Look for a scale that
reads in grams, has a tare function, and feels stablenot like it’s auditioning for a magic trick. Use it for flour,
sugar, chocolate, and even dividing batter evenly between pans.
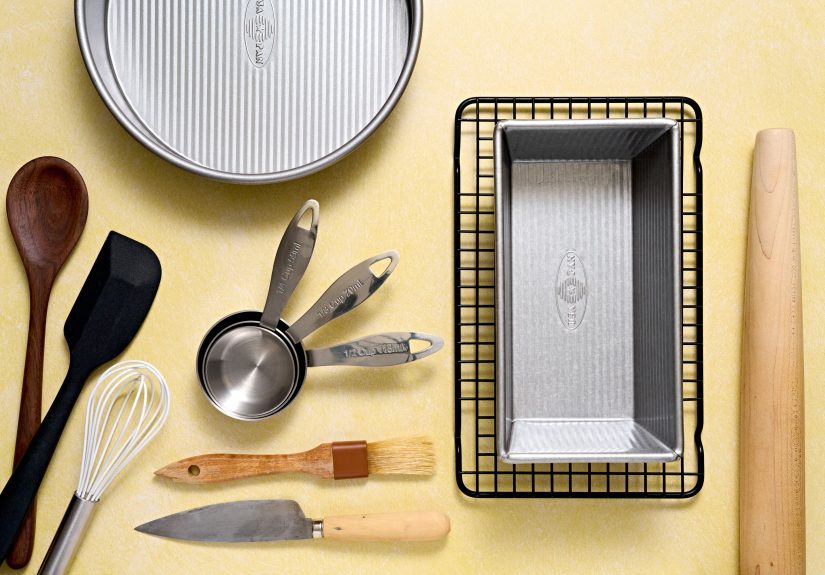
2) Dry measuring cups
Dry measuring cups are for flour, sugar, cocoa, oatsanything you level off. A sturdy set should nest, feel comfortable
in your hand, and have clearly stamped measurements (printed numbers fade like your motivation during dish duty).
Pro move: spoon flour into the cup and level itdon’t scoop straight from the bag unless you enjoy surprise carb bricks.
3) Liquid measuring cup
Liquids need a clear cup with measurement markings you can read at eye levelwater, milk, oil, even melted butter.
A spout helps you pour without baptizing your countertop. A 2-cup size is the daily driver, but a 4-cup version is
clutch for big batters and holiday chaos.
4) Measuring spoons
Measuring spoons handle the small-but-mighty ingredients: baking powder, baking soda, salt, vanilla, and spices.
Look for sturdy metal spoons with labels that won’t rub off. Bonus points if the set includes a 1/2 tablespoonbecause
halving recipes shouldn’t require a math minor.
5) Oven thermometer
Many ovens run hotter or cooler than the dial says, and baked goods are not forgiving about this. An oven thermometer
tells you the truthlike a friend who won’t let you text your ex. Hang or place it where you can read it, and adjust
temperature settings accordingly. It’s a low-cost tool that prevents dry cakes and burnt cookie bottoms.
6) Instant-read thermometer
For bread, cakes, custards, and even brownies, temperature is a shortcut to confidence. An instant-read thermometer
helps you avoid underbaking (gooey centers that are not the good kind) and overbaking (the desert called “dry”). Look
for quick readings and an easy-to-read display. Once you use one, toothpick tests feel like guessing.
Mixing & prep tools (where muscles retire early)
7) Mixing bowls (at least three sizes)
Mixing bowls are mission control. You’ll want at least one large bowl for batters, a medium bowl for dry ingredients,
and a smaller bowl for eggs or glaze. Stainless steel is lightweight and durable; glass is great for microwaving and
seeing what’s happening. The real win is having bowls that don’t skate across the counter mid-whisk.
8) Balloon whisk
A balloon whisk adds air, smooths lumps, and mixes fast. It’s essential for pancakes, whipped cream, meringue beginnings,
and combining dry ingredients so your leavening is evenly distributed. Choose one that feels springy (not flimsy) and
fits comfortably in your handbecause you’re making cake, not training for arm wrestling.
9) Silicone spatula (aka rubber scraper)
A good silicone spatula is your “waste nothing” tool. It scrapes bowls clean, folds batters gently, and saves you from
leaving half your frosting in the mixing bowl like an offering to the dishwasher gods. Look for heat resistance, a firm
but flexible head, and a one-piece design that won’t trap mysterious batter in a seam.
10) Electric mixer (stand mixer or hand mixer)
For cookies, cakes, buttercream, and whipped cream, an electric mixer turns effort into efficiency. A hand mixer
is budget-friendly and stores easily; a stand mixer shines for frequent bakers and heavier doughs.
Either way, look for multiple speeds (low is key to avoid flour explosions) and attachments that feel solid and stable.
11) Fine-mesh sieve or sifter
A fine-mesh sieve earns its keep by removing lumps from powdered sugar and cocoa, straining curds or custards, and
aerating flour when needed. It also helps you sprinkle powdered sugar on brownies like you meant to be elegant all along.
Choose a larger size for ease, and keep it bone-dry to avoid turning “sifting” into “cement-making.”
12) Bench scraper
Part tool, part countertop superhero. A bench scraper cuts dough, lifts chopped ingredients, cleans floury surfaces,
and helps portion brownies into neat squares (because chaos is not a serving style). Look for a sturdy blade and a
comfortable handle. Bonus if it has measurement markings, so you can divide dough evenly without eyeballing like a pirate.
13) Rolling pin
Whether you’re rolling pie dough, sugar cookies, or cinnamon rolls, a rolling pin keeps thickness even and frustration low.
French-style pins (tapered, no handles) give great control; handled pins can feel more familiar and steady. Whichever you
pick, keep it clean, lightly floured, and readybecause dough waits for no one.
14) Pastry blender (pastry cutter)
For biscuits, pie crusts, and streusel, you want butter cut into flour without melting it. A pastry blender does exactly
thatfast. Choose a sturdy, comfortable handle and blades that don’t bend under pressure. Could you use forks? Yes.
Will you enjoy it? Only if you enjoy unnecessary suffering.
15) Pastry brush
Egg wash, melted butter, glazethis is the tool that paints baked goods with that “bakery shine.” Brush debates get spicy:
traditional bristle brushes can apply liquid smoothly, while silicone brushes are easy to clean and don’t shed. The best pick
is the one that applies evenly for your recipes and doesn’t leave you scrubbing for 20 minutes like it’s a penance.
Bakeware & oven helpers (where magic happens)
16) Rimmed half-sheet pans
A rimmed half-sheet pan (roughly 18 x 13 inches) is the backbone of home baking: cookies, roasted nuts, sheet cakes,
granola, even catching drips under pies. Choose heavy-duty pans that won’t warp and a rim high enough to contain melted
butter accidents. If you bake often, get twoyou’ll stop playing “wash the pan mid-recipe.”
17) Wire cooling racks
Cooling racks prevent soggy bottoms by letting air circulateessential for cookies, breads, and anything that should stay crisp.
They’re also useful for glazing doughnuts or letting chocolate set without smearing. Look for sturdy racks that fit inside your
sheet pans (a dynamic duo for easy transport and less counter mess).
18) Parchment paper
Parchment paper reduces sticking, promotes even browning, and makes cleanup almost suspiciously easy. It’s perfect for cookies,
sticky candies, and lining cake pans. Tip: pre-cut sheets are ridiculously convenient, but rolls work finejust cut to fit and
crumple it briefly if it insists on curling like a petty ribbon.
19) Muffin tin (12-cup)
Muffins, cupcakes, mini quiches, brownie bitesyour muffin tin is more versatile than it gets credit for. A standard 12-cup
tin is the workhorse. Look for sturdy construction and even heat distribution. Liners are optional; good greasing plus parchment
circles can also do the job when you’re out of liners at the worst possible time.
20) Round cake pans (8- or 9-inch)
Two round pans let you bake layer cakes without awkward “I’ll just slice this one cake into layers” gymnastics. Choose light-colored
metal pans for more even baking and less over-browning at the edges. Consistency matters herematching pans bake at the same rate,
which means your layers look intentional instead of like they had different life goals.
21) Loaf pan
Banana bread, pound cake, quick breads, and some sandwich loaves all rely on a loaf pan for structure. A standard 9 x 5-inch loaf pan
covers most recipes, while 8.5 x 4.5 is common toocheck your recipe before committing. Lining with parchment “slings” makes removal easy
and keeps your loaf intact (and your pride intact).
22) Offset spatula
An offset spatula is the unsung hero of clean edges and smooth frosting. It spreads batter evenly, releases cookies neatly, and helps you
frost without dragging your knuckles through buttercream like a tragic paintbrush. A small offset (around 4–5 inches) is incredibly useful,
and a longer one is great for taller cakesbecause your cake deserves better than a spoon.
Buying tips that save moneyand muffins
- Prioritize accuracy first: scale + proper measuring tools fix more “why didn’t this work?” problems than any fancy gadget.
- Go sturdy on bakeware: warped pans cause uneven baking. A reliable sheet pan does more for your cookies than a “trending” hack.
- Think in workflows: sheet pan + parchment + cooling rack is a cleanup dream team. You’ll bake more when cleanup feels doable.
- Choose tools you’ll actually use: the best tool is the one you reach for, not the one that sits pristine like a museum exhibit.
Nice-to-have upgrades (if you bake a lot)
Once you’ve got the essentials, upgrades can make baking smoother: a silicone baking mat (reusable liner), piping bags and tips (decorating),
extra pans (like a 9×13), a zester/microplane for citrus, and a cake turntable for frosting like a calm professional instead of a frantic raccoon.
None of these are required to bake wellbut they’re delightful when your baking habit grows from “sometimes” to “we should buy more flour.”
Real-life baking experiences (aka lessons learned)
I used to believe baking success came from “good vibes” and aggressive optimism. Then I met the
digital kitchen scale, and suddenly my cookies stopped doing random interpretive dance in the oven.
The first time I baked chocolate chip cookies by weight instead of by scooped cups, the dough looked the same… but it behaved
like it had a plan. The cookies spread predictably, browned evenly, and tasted like the recipe writer and I were finally speaking
the same language. That was the day I learned: accuracy isn’t boringit’s freedom.
Next came the humbling truth about ovens. I baked a beautiful-looking cake that tasted like a dry apology. I blamed the recipe,
the weather, maybe Mercury retrograde. Then I hung an oven thermometer inside the oven and found out my “350°F” was
more like “375°F with confidence.” A small adjustment fixed everything. Now I treat my oven like a lovable liar: I enjoy its company,
but I verify its stories.
My relationship with mixing tools got better when I stopped trying to do everything with a spoon. A balloon whisk made
pancake batter smoother without overmixing, and a solid silicone spatula changed my cleanup game entirely. There’s something
deeply satisfying about scraping every last bit of brownie batter into the pan, like you’re rescuing deliciousness from waste. Also, it’s
the only time being “extra” is encouraged.
Then there was my “pie crust era,” when I learned the importance of cold butter and the value of a pastry blender.
Yes, forks can work, but a pastry blender cuts butter into flour quickly and evenly, and that speed matters. The less time your hands are in
the bowl, the less heat you transfer. The first crust I made with a pastry blender came out flaky instead of stubborn. I felt powerful, like I
could pay taxes early and alphabetize my spice rack.
A bench scraper surprised me the most. I bought it for bread dough, but it became my all-purpose kitchen assistant.
It cleaned flour off the counter in one satisfying sweep, portioned cinnamon roll dough into neat pieces, and helped transfer chopped nuts without
that awkward “cupping your hands like a shovel” move. It even made me look more competent than I felt, which is honestly half of adulthood.
Bakeware lessons were equally dramatic. Cheap, thin pans warped like they were trying to escape the oven. Upgrading to a sturdy
rimmed half-sheet pan made cookies bake more evenly and stopped the mysterious “one side is darker” phenomenon. Add
parchment paper, and suddenly cleanup went from “soak overnight” to “wipe and move on with my life.” Pair those cookies
with a cooling rack, and the bottoms stayed crisp instead of steaming themselves into sadness.
Finally, frosting taught me patienceand the importance of an offset spatula. I used to frost cakes with a butter knife,
which is like trying to paint a wall with a toothbrush. The offset spatula made smoothing easy, helped spread batter evenly, and kept my hands
out of the frosting (mostly). Now, when a cake looks clean and intentional, it’s not because I became a different person. It’s because I stopped
fighting physics and started using the right tool.
The big takeaway: you don’t need every gadget in the baking aisle. You need a smart core settools that improve accuracy, reduce stress,
and make baking feel fun. Build your kit one piece at a time, based on what you actually bake. Your future self will thank youprobably while
eating a warm cookie off a properly lined sheet pan.


