Table of Contents >> Show >> Hide
- Why Shed Organization Matters More Than You Think
- 1. Empty Everything Out Before You Organize Anything
- 2. Group Supplies by Category
- 3. Use Vertical Wall Space Like It Owes You Money
- 4. Add Pegboard for Small Tools and Accessories
- 5. Install Adjustable Shelving
- 6. Put the Back of the Door to Work
- 7. Use Clear, Lidded Bins for Small Supplies
- 8. Create a Dedicated Potting Zone
- 9. Hang Bikes, Hoses, and Bulky Gear
- 10. Use Rolling Carts for Frequently Used Items
- 11. Store Similar Containers Together
- 12. Add a Small Parts Organizer
- 13. Build in Overhead Storage for Rarely Used Items
- 14. Keep a Clean-and-Dry Tool Routine
- 15. Label Zones, Not Just Bins
- 16. Do Not Store Everything in the Shed
- 17. Create a Seasonal Rotation Zone
- Common Mistakes That Make Sheds Messy Again
- Real-Life Experiences: What Actually Works in a Busy Shed
- Conclusion
A shed is supposed to make life easier. In reality, it often becomes the place where rakes go to tangle, half-used bags of potting soil go to slump dramatically, and mystery hardware multiplies like it pays rent. If your outdoor storage space currently feels like a tiny wooden rebellion, the good news is that a smarter setup can fix it.
The best shed organization ideas are not about making the space look perfect for five minutes and then collapse back into chaos by Saturday afternoon. They are about creating a practical system that helps you find what you need, store it safely, and put it back without performing a full archaeological dig. Whether you use your shed for gardening tools, lawn care gear, sports equipment, or seasonal decorations, these strategies can help you turn clutter into order.
Why Shed Organization Matters More Than You Think
A well-organized shed does more than look nice. It saves time, protects your tools, clears up floor space, and makes it easier to spot what you already own before buying duplicates. It also reduces the odds of damaging supplies by stuffing them into damp corners or unstable piles. In short, an organized shed works harder so you do not have to.
1. Empty Everything Out Before You Organize Anything
This is the least glamorous step and the most important one. Pull everything out of the shed so you can see the full inventory. Sweep the floor, knock down cobwebs, wipe off shelves, and check for water damage, rust, or pest issues. Starting with a blank slate helps you stop organizing around clutter you do not even need.
As you empty the space, sort items into simple groups: keep, donate, toss, and relocate. If you find broken hand tools, dried-up products, or five identical trowels hiding in separate corners, congratulations, your shed has been freelancing as a chaos consultant.
2. Group Supplies by Category
Once the shed is empty, resist the urge to shove everything back in “where it fits.” Instead, sort items by use. Put garden tools together, lawn care products together, pots and planting supplies together, and outdoor cleaning items together. Sports gear, camping equipment, and seasonal décor should each have their own zone.
This category-based layout makes the shed far easier to maintain. When everything has a purpose and a place, you are much less likely to create a giant catch-all corner that becomes a junk vortex by next month.
3. Use Vertical Wall Space Like It Owes You Money
Most sheds waste valuable wall space. That is a mistake. Vertical storage is the secret weapon of small outdoor buildings because it frees up the floor for bigger items like mowers, wheelbarrows, or folding chairs.
Install wall-mounted rails, slat systems, sturdy brackets, or simple utility hooks to hold long-handled tools. Shovels, rakes, hoes, and brooms can all live happily on the wall instead of collapsing into one dangerous wooden teepee in the corner.
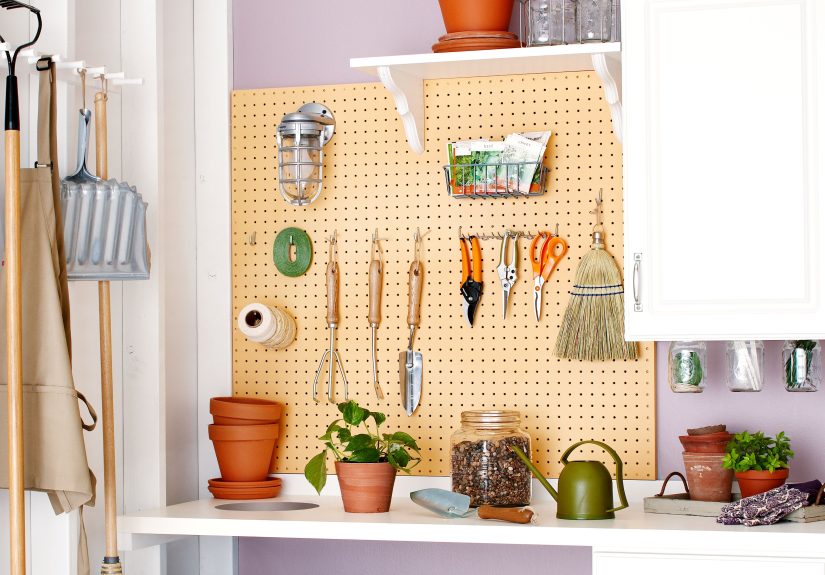
4. Add Pegboard for Small Tools and Accessories
Pegboard is one of the most versatile shed storage ideas because it turns awkward wall space into a customizable storage station. Hang pruners, gloves, twine, hand trowels, seed spreaders, scissors, and small cords where you can actually see them.
The beauty of pegboard is visibility. No more digging through a random bucket looking for the hand pruners while muttering things that would make your basil blush. With hooks, cups, and mini baskets, pegboard keeps smaller essentials neat and easy to grab.
5. Install Adjustable Shelving
Fixed shelves are useful. Adjustable shelves are smarter. Your storage needs change with the seasons, and an adjustable shelving system lets you create taller openings for bulky bins, watering cans, or bags of fertilizer when needed.
Use sturdy shelves for heavier items and place the heaviest supplies lower down for safety. Lighter items can go up top. If your shed is compact, floor-to-ceiling shelving can dramatically increase storage without increasing the footprint.
6. Put the Back of the Door to Work
The back of the shed door is prime real estate that often gets ignored. Add narrow racks, hooks, mesh pockets, or slim baskets to store lightweight items such as gloves, hand tools, garden ties, spray bottles, and kneeling pads.
This works especially well for grab-and-go supplies. If you garden often, having scissors, gloves, and twine near the door saves time and keeps you from wandering back into the yard holding one glove and a highly questionable memory of where the other one went.
7. Use Clear, Lidded Bins for Small Supplies
Small items are where organization goes to die. Nails, screws, plant labels, seed packets, hose washers, zip ties, and spare fittings can create visual noise fast. Clear bins with secure lids help you see what you have while protecting contents from dust and moisture.
Use smaller containers inside larger bins if needed, and label everything clearly. Waterproof labels are especially helpful in outdoor spaces where humidity can turn paper labels into abstract art.
8. Create a Dedicated Potting Zone
If your shed holds gardening supplies, set up a specific potting area rather than scattering that workflow across every surface. A narrow potting bench, wall-mounted fold-down table, or even one well-organized shelf can act as a planting station.
Store nearby essentials like potting mix, pots, hand tools, labels, and watering cans in the same zone. This keeps messy tasks contained and makes seasonal planting much more efficient. A potting area also reduces the chance that every flat surface in the shed becomes a parking lot for random stuff.
9. Hang Bikes, Hoses, and Bulky Gear
Bikes, hoses, ladders, and extension cords can take over a shed faster than almost anything else. Wall hooks, hose hangers, and heavy-duty hanging brackets keep these oversized items upright and out of the way.
If you store bikes in the shed, vertical hooks or staggered hanging points can save a lot of square footage. For hoses, use a dedicated holder rather than letting them coil into a swampy knot on the floor. Your future self will be very impressed by this maturity.
10. Use Rolling Carts for Frequently Used Items
A rolling cart is a clever solution for supplies that travel in and out of the shed often. It works especially well for gardening tools, planting supplies, outdoor cleaning products, or kids’ sports gear. Instead of pulling several items one by one, you can wheel out what you need in a single trip.
Rolling storage also makes seasonal transitions easier. A spring planting cart can hold seed trays, gloves, small tools, and fertilizer, while a summer yard-care cart can carry pruning supplies, twine, and bug spray.
11. Store Similar Containers Together
Plant pots, trays, saucers, buckets, and watering cans can become a messy tower of mismatched plastic if you let them. Nest pots by size, stack trays vertically in a rack, and designate one shelf or one basket for related containers.
This idea seems simple, but it makes a major difference. When similar items are stored together, you avoid duplicate purchases and can see right away what you have available for your next garden project.
12. Add a Small Parts Organizer
If your shed doubles as a mini workshop or repair zone, use a drawer organizer, divided hardware box, or wall-mounted small-parts unit for screws, anchors, nails, hooks, and replacement fittings. Tiny hardware has a magical talent for disappearing exactly when you need one very specific piece.
Label compartments by size or use, and keep the organizer near your workbench or tool area. This keeps fasteners sorted and prevents the classic coffee-can method, which is less of an organizing system and more of a cry for help.
13. Build in Overhead Storage for Rarely Used Items
If your shed has enough height, overhead storage can be a game changer. Upper shelves or ceiling-mounted racks are perfect for lightweight, rarely used, or seasonal items such as empty pots, holiday yard décor, spare netting, or backup tarps.
Use this area carefully. Overhead storage should never hold heavy items that are difficult to lift safely. The goal is to reclaim dead space, not start a personal feud with gravity.
14. Keep a Clean-and-Dry Tool Routine
Organization is not just where things go. It is also how they are stored. Before putting away garden tools, brush off soil, wipe away moisture, and make sure metal parts are dry. Clean tools last longer, resist rust better, and are easier to use next time.
You can keep a simple rag, brush, and small bottle of oil in the shed to make this a quick habit. It takes a minute, but it can save you from dealing with rusty pruners and crusty shovels later.
15. Label Zones, Not Just Bins
Most people stop at labeling containers. Go one step further and label shelves, hooks, or storage zones too. A label that says “watering supplies,” “pruning tools,” or “sports gear” creates an easy map of the shed.
This is especially helpful in shared households where more than one person uses the space. Suddenly, “put it back where it belongs” becomes an actual instruction rather than an optimistic lifestyle slogan.
16. Do Not Store Everything in the Shed
One of the smartest shed organization ideas is knowing what should stay out of the shed entirely. In a typical non-climate-controlled shed, moisture and temperature swings can damage certain items. Paint, batteries, electronics, important papers, and many fabric items are better stored indoors. That rule alone can cut clutter and protect your belongings.
If something is vulnerable to heat, cold, humidity, or pests, think twice before assigning it a shed address. A tidy shed is easier to maintain when it only contains items that actually belong there.
17. Create a Seasonal Rotation Zone
Outdoor storage needs shift all year long. In spring, seed trays and hand tools are front and center. In summer, hoses and lawn gear take over. In fall, leaf bags and pruning tools move in. In winter, holiday décor, snow tools, or protective covers may need the spotlight.
Designate one easy-access shelf or corner as your seasonal rotation zone. Move current-season items there and shift off-season items higher or farther back. This keeps the most-used supplies within reach and prevents constant rearranging.
Common Mistakes That Make Sheds Messy Again
Buying storage before sorting
It is tempting to shop first and declutter later, but that often leads to expensive containers full of things you did not need to keep in the first place.
Leaving floor space undefined
If every large item gets parked “wherever,” the shed will look messy even with great shelves. Leave clear floor zones for equipment and frequently moved items.
Ignoring maintenance
A shed is not a one-and-done project. Spend a few minutes every couple of weeks resetting tools, tossing trash, and returning stray items to their zones.
Real-Life Experiences: What Actually Works in a Busy Shed
In real life, shed organization is rarely a dramatic makeover followed by eternal perfection. It is usually a series of small fixes that make daily routines easier. One of the most common experiences people have after reorganizing a shed is realizing they had plenty of storage space all along. The problem was not the size of the shed. The problem was that the floor had become the default storage surface.
For example, a small family garden shed can feel impossibly cramped when long-handled tools are leaning in every corner, half-empty soil bags are spread across the floor, and flower pots are stacked in unstable towers. But once those same tools move onto wall hooks, the pots get nested on a shelf, and the soil is transferred into sealed bins, the shed suddenly feels twice as useful. Nothing magical happened. The layout simply started working with the space instead of against it.
Another real-world lesson is that convenience matters more than perfection. A beautifully organized shed will not stay tidy if the system is annoying to use. If hooks are too high, bins are too heavy, or labels are too vague, people stop following the plan. The best setups are easy to maintain. Gloves go in one basket near the door. Twine and pruners live on the pegboard. The hose hangs on an obvious holder. The potting mix sits near the potting bench. When the storage matches the task, cleanup becomes much faster.
Seasonal shifts also teach important lessons. In spring and summer, gardeners use the same handful of items constantly, so placing them front and center makes a noticeable difference. In colder months, those supplies can move to the side while leaf tools, covers, or decorations take their turn in the main zone. People who use this rotation system often say it cuts down on frustration because the shed starts to support the season they are actually in rather than storing every season at once in the most confusing way possible.
Shared sheds offer another interesting experience. If multiple people use the same space, unlabeled storage falls apart quickly. One person hangs the trowel neatly on a hook, another drops it into a bucket, and someone else borrows the gloves and leaves them on top of a fertilizer bag. That is why clearly labeled shelves, bins, and zones matter so much in real households. They reduce guesswork and make it easier for everyone to reset the space.
Perhaps the biggest takeaway from real shed organization projects is that maintenance is everything. Even a tidy shed can slide back into clutter if items get tossed in after a long day outside. A simple five-minute reset at the end of the week usually works better than waiting for a massive cleanout once the shed becomes a problem again. In other words, the goal is not to create a shed worthy of a museum tour. The goal is to create one that lets you find the rake without needing courage, patience, and a flashlight.
Conclusion
The best shed organization ideas are practical, flexible, and easy to maintain. Start with a full cleanout, assign supplies to clear categories, and make the most of walls, doors, shelves, and labeled bins. Focus on daily function, not showroom perfection. When every tool, pot, hose, and bag of supplies has a logical home, your shed becomes a useful extension of your yard instead of a cramped little mystery box.
Give your shed a system that matches the way you actually live and work outside. Once that happens, the space feels bigger, cleaner, and far less dramatic. And honestly, your shovel deserves better than being trapped behind three cracked planters and an angry extension cord.