Table of Contents >> Show >> Hide
- Before You Start: Tire Safety, Cleaning, and Smart “Do-Not-Do”s
- The Main Event: 12 Things You Can Do with an Old Tire
- 1) Build a Classic Tire Swing (That Drains Properly)
- 2) Make a Hanging Tire Planter (A Floating Flower Donut)
- 3) Create a Raised “Stackable” Garden Bed (Best for Flowers, Not Food)
- 4) DIY Tire Ottoman (Shockingly Chic for Something That Used to Be on a Car)
- 5) Make a Tire Coffee Table or “Planter Table”
- 6) Backyard Sandbox (Contained Chaos = Happier Parents)
- 7) Pet Bed (A Cozy Throne for Your Dog or Cat)
- 8) Tire Stool or Garden Seat (Because Kneeling Is Overrated)
- 9) DIY Boot Scraper / Mud Cleaner (A Tiny Hero by the Back Door)
- 10) Hose Holder or Extension Cord Organizer (Garage Sanity Restored)
- 11) DIY Outdoor Obstacle Course (Kids, Dogs, Adults Who Miss Gym Class)
- 12) Garden Edging or Slope Stabilizer (Functional, Not FancyBut It Works)
- Quick Troubleshooting: Common Tire DIY Problems (and Fixes)
- Conclusion: Give Your Tire a Second Life (Without the Backyard Drama)
- Experience Notes: What DIYers Learn After Their First Tire Upcycle (About )
Your tire has officially retired. But before it spends its golden years sulking behind the garage, know this: an old tire is basically a rugged, weatherproof donut made for DIY glory. With a little cleanup and a dash of creativity, it can become backyard fun, practical storage, or surprisingly stylish decor (yes, reallytires can be “rustic-chic” if you don’t tell them you said that).
This guide rounds up 12 realistic, do-it-at-home projects you can tackle with common tools and materialsplus safety notes so your upcycle doesn’t turn into a “why is the yard buzzing?” situation.
Before You Start: Tire Safety, Cleaning, and Smart “Do-Not-Do”s
1) Clean it like you’re inviting company
Used tires collect road grime, brake dust, and mystery residue. Give yours a thorough scrub with dish soap, a stiff brush, and plenty of rinse water. Let it dry completelysunlight helps. If you plan to paint, a clean surface is the difference between “cute” and “peeling sadness.”
2) Stop standing water (mosquitoes love tires)
A tire can hold rainwater like a bowl, which is great for… absolutely nothing you want near your home. If your project sits outdoors, add drainage holes where water could pool. Also, store extra tires under cover or in a sealed container rather than leaving them open to rain.
3) Don’t burn or “dispose creatively”
Burning tires is dangerous and highly polluting. If you’re not upcycling, use a local recycling or drop-off program. In short: tire projects = fun; tire bonfires = not.
4) A note on tire planters and food
You’ll see tire planters everywhere online. They can be adorableespecially painted and stacked. But if you’re growing edible plants, many gardening educators recommend choosing safer container materials because tires can break down over time and release substances you may not want near food crops. If you still love the tire planter look, consider using them for ornamentals (flowers, vines) instead of veggies, or use a sturdy liner and keep soil from direct contact with the rubber.
The Main Event: 12 Things You Can Do with an Old Tire
1) Build a Classic Tire Swing (That Drains Properly)
This one’s a backyard legend for a reason. Choose a healthy, strong tree branch, use hardware rated for outdoor loads, and always drill drainage holes so water doesn’t collect inside the tire. For safety, inspect the tire for exposed steel belts or sharp wiresif you find them, retire the tire from kid-duty projects.
- Pro tip: A swivel helps prevent rope twist.
- Make it nicer: Add a simple seat insert (marine plywood + outdoor cushion) for comfort.
2) Make a Hanging Tire Planter (A Floating Flower Donut)
Hanging tire planters look great on porches, fences, or pergolasand they’re a smart way to keep flowers up off the ground. Paint the tire first (outdoor paint), add drainage holes, then hang it using strong rope or chain.
- Best plants: trailing petunias, ivy, sweet potato vine, or any spiller-style annuals.
- Watering tip: Because tires are thick, they can hold heat; check moisture more often during hot weeks.
3) Create a Raised “Stackable” Garden Bed (Best for Flowers, Not Food)
Stack two or three tires to create a tall bed for deep-rooted ornamentals or big, dramatic plants. People often use this for potatoes and veggies, but if you’re cautious about potential contaminants, stick to non-edibles like marigolds, zinnias, or tall grasses.
- How: Level the base, stack tires, secure them (construction adhesive or screws with washers), add landscape fabric as a liner if desired, and fill with soil.
- Design upgrade: Paint each tire a different color for “garden totem” energy.
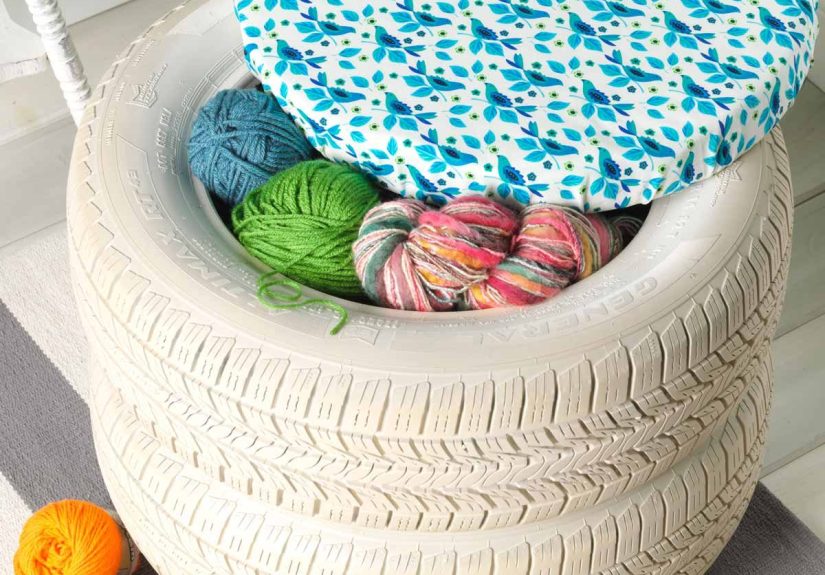
4) DIY Tire Ottoman (Shockingly Chic for Something That Used to Be on a Car)
Turn a tire into a footstool by attaching wood circles to the top and bottom, adding foam, and wrapping or upholstering. Rope-wrapped ottomans are especially popular because they hide the tire’s “I used to be a tire” vibe.
- Materials: jute rope or fabric, plywood circles, screws/bolts, foam, adhesive, staple gun.
- Where it shines: covered patios, porches, mudrooms (it’s tougher than most furniture).
5) Make a Tire Coffee Table or “Planter Table”
Want a table that can survive spilled lemonade, surprise rain, and the occasional “Oops, I sat on it”? A tire base + round top is sturdy and budget-friendly. You can top it with wood (sealed) or thick glass. Some people fill the tire center with decorative moss or faux plants and use a glass top for a terrarium-style look.
- Finishing tip: Add furniture feet or caster wheels for easier moving.
- Style tip: Wrap the sidewall with rope for a clean, coastal look.
6) Backyard Sandbox (Contained Chaos = Happier Parents)
A tire makes a perfect sandbox borderespecially a larger tire (think tractor tire if you can safely source one). It’s heavy, durable, and naturally keeps sand from migrating into every corner of your yard.
- How: Place tire on level ground, add a weed barrier underneath, fill with play sand.
- Important: Cover it when not in use to keep out rainwater and neighborhood cats.
7) Pet Bed (A Cozy Throne for Your Dog or Cat)
One tire + a cushion = instant pet lounge. Clean the tire, paint it if you like, then add a washable bed insert. For smaller pets, a single tire works great; for larger dogs, use a wider tire or build a simple wood platform base.
- Comfort tip: Cut a “front entry” notch (carefully) so older pets can step in easily.
- Easy-clean win: Use an outdoor cushion cover you can unzip and wash.
8) Tire Stool or Garden Seat (Because Kneeling Is Overrated)
Paint a tire, add a round wooden seat on top, and you’ve got a sturdy stool for the garden or garage. Add legs for a taller chair, or keep it low and use it as a kneeling alternative when you’re planting or weeding.
- Upgrade: Attach a small storage pocket (fabric or canvas) for gloves and pruners.
- Weatherproofing: Seal wood surfaces with exterior polyurethane.
9) DIY Boot Scraper / Mud Cleaner (A Tiny Hero by the Back Door)
Cut a tire section and mount it near your entryway as a rugged boot scraper. The tread is basically designed to grab dirtso let it do its job one last time, but in a less dramatic setting than the highway.
- Simple version: Half-bury a tire segment near the path and rub boots on the tread.
- Mounted version: Screw a tire strip to a board, then anchor the board to the ground or a wall.
10) Hose Holder or Extension Cord Organizer (Garage Sanity Restored)
If your hose currently lives in a tangled heap that looks like it lost a fight, a tire can help. Mount a tire to a fence or garage wall, then coil your hose inside the circle. Same trick works for extension cords and outdoor lights.
- Placement: Near the spigot or garage outlet for maximum convenience.
- Bonus: Add a hook below for spray nozzles and connectors.
11) DIY Outdoor Obstacle Course (Kids, Dogs, Adults Who Miss Gym Class)
Lay tires flat as “stepping rings,” half-bury them as tunnels/targets, or stake them upright for a weave path. This is great for backyard play, agility training, or just turning your yard into a mini adventure zone.
- Safety: Secure tires so they don’t roll unexpectedly.
- Drainage: Add holes if they can hold water after rain.
12) Garden Edging or Slope Stabilizer (Functional, Not FancyBut It Works)
Cut tires in half (or use whole tires) and set them partially into the ground as edging for paths, play areas, or a slope that tends to wash out. Fill with gravel or soil, then plant ornamentals to soften the look. It’s a tough, budget-friendly approach for areas where you need structure more than style.
- Best use cases: erosion-prone corners, hillside steps, borders around a compost area.
- Looks better when: painted dark to blend in, or planted over with trailing greenery.
Quick Troubleshooting: Common Tire DIY Problems (and Fixes)
Problem: “My tire project smells like a mechanic shop.”
Let the tire air out outdoors for a few sunny days after washing. Painting or sealing can also help. Avoid bringing tire projects indoors unless they’re fully cleaned and finished.
Problem: “Paint won’t stick.”
Degrease thoroughly, let it dry, then use a primer rated for difficult surfaces before outdoor paint. Light sanding can help, too.
Problem: “Water keeps pooling.”
Add more drainage holes in the lowest points, and make sure the tire is oriented so water can actually exit. For swings and hanging planters, drainage holes are non-negotiable.
Problem: “Cutting this tire is a nightmare.”
Tires are tough. Use the right tool (heavy-duty utility knife, jigsaw with the correct blade), wear gloves and eye protection, and go slowly. If you see exposed steel wires, stop and reconsider the projectthose can be sharp.
Conclusion: Give Your Tire a Second Life (Without the Backyard Drama)
Old tires are durable, weather-resistant, and oddly versatileperfect ingredients for DIY projects that can handle real life. Whether you’re making a tire swing, a rope-wrapped ottoman, a sandbox, or a hose organizer, the best tire projects share the same “secret sauce”: clean well, prevent standing water, and choose the right project for where it’ll live (and who will use it).
Pick one idea from this list, start small, and see how far a “retired” tire can go. Odds are, you’ll look at the next old tire and think: “I can’t throw this away. It could be a table.”
Experience Notes: What DIYers Learn After Their First Tire Upcycle (About )
People who try their first tire DIY project often start with big optimism and a tiny underestimation of how stubborn rubber can be. One of the most common “aha” moments is realizing that cleaning is not optional. DIYers who rush the wash step frequently report that paint bubbles, rope adhesive slips, or cushions pick up a lingering “garage aroma.” Those who take the time to scrub thoroughlythen let the tire dry in the suntend to have projects that look cleaner and last longer.
Another frequent lesson: drainage is the difference between charming and chaotic. Tire swings, planters, and obstacle-course tires can quietly collect water after rain. DIYers often say they didn’t notice until mosquitoes showed up like uninvited party guests. The fix is simpledrill drainage holes earlybut the experience sticks with people. Many end up making drainage holes their first step on any outdoor tire project, right after washing.
When it comes to tire planters, the “experience” most often shared is decision-making, not difficulty. Some gardeners love the look of painted tire stacks and say they’re great for ornamentals because they’re inexpensive, durable, and easy to arrange. Others decide to avoid tire planters for edible crops after reading guidance about potential contaminants. A practical compromise that DIYers frequently recommend is using tires for flowers, vines, or decorative landscapingthen choosing wood, metal, or food-safe containers for herbs and vegetables. In other words, people learn to match the project to the purpose, rather than forcing a tire into every gardening role.
On furniture projects like ottomans and coffee tables, the biggest “real-world” discovery is that finishing touches matter. DIYers who wrap a tire with rope often mention that the first few rows take patiencealignment and tension affect the final look. Once the rhythm clicks, it gets easier, but it’s still a project where careful work pays off. People also learn to plan for curing time: many adhesives need a full day to set properly. The folks who try to use the ottoman too soon often end up re-gluing corners or re-securing rope where it shifted.
Finally, there’s the “I didn’t expect it to be so heavy” lesson. Tires are awkward to move, especially larger ones. DIYers commonly recommend assembling projects near their final location (especially sandbox borders and big planters) and adding feet or casters to tire tables. The upside? Once your tire project is in place, it usually stays putwhich is exactly what you want for outdoor furniture, edging, and play structures.
In short, most tire-upcycle “experience” boils down to four words: clean, drain, finish, and place. Get those right, and your old tire won’t look like recycled clutterit’ll look like a clever DIY win.


